• IDD
  • IDD
  • Intelligent Decision Dimensions
    • Hybrid Chats
      • Hybrid Chats Installation Guide
        • Software Components to Install
          • Components of Add-On
          • Components Combinations to Be Installed
        • Prerequisites
          • System Prerequisites
          • General Prerequisites
        • Installation Activities
        • Post Installation Activities
          • Copy Standard Texts from 000 Client
          • OData Services Maintenance
          • Activate Services in SICF
          • Maintain Cross-Origin Settings
          • Assign Technical User to WebSocket Service in SICF
          • Copy Fiori Catalogs from 000 Client
          • Copy Translations from 000 Client
          • Clean Cache and Index Recalculation Activities
          • Enable Fiori 3 Theme
          • Set up Content Server to Store Photo of Operator
      • Hybrid Chats Maintenance Guide
        • Business and Technical Users Setup
          • Create User IDs and Business Partners
          • Create Business Partners
          • Appendix A :: User Authorization Matrix
        • System Configuration
          • Configure Parameters and Values Related to Hybrid Chats
          • Configure Parameters and Values Related to Live Pool
          • Configure Parameters and Values Related to Customer 360 View and Customer Match
          • Configure Status Profile
          • Set Up Technical Messages for Hybrid Chats
        • Hybrid Chats Integration with External ITSM System (Zendesk)
          • Activate Integration
          • Customize Header Fields of the Chat Log for Integration
          • Hybrid Chats Fields or Values Mapping on External ITSM Ticket Fields
          • Map Categories during Integration Procedure
          • Schedule Automatic Integration Procedure
        • Tenant Configuration
          • Create Root Organizational Unit for Tenant
          • Enable Configuration RFC Destination for the Tenant
        • Support Team Parameters Configuration
          • Create Position Attribute for Capacity
        • Live Pool Management and Configuration
          • Prerequisites
          • Start Live Pool
          • Manage Live Pool
        • Hybrid Chats Configuration
        • Hybrid Chats Categorization
          • Categorization Management
          • Assign Categories to AI Skills
          • Translate Categories
      • Hybrid Chats User Manual
        • Hybrid Chats
          • Active Mode
          • Archive Mode
        • HC Teams
          • Access HC Teams Application
          • Create New Team
          • Edit Team Name
          • Create New Team Member
          • Edit Agent
        • HC My Data
          • Edit Personal Data and Profile Picture
          • Default Settings Management
          • Notification and Dialogue Manual Mode Management
          • Quick Replies Management
            • Standard User Mode
            • Administrator User Mode
        • Analytics Applications
          • HC Analytics
          • Exit Survey Analytics
          • Operator Activity Analytics
    • Conversational Actions
      • Conversational Action Installation Guide
        • Software Components to Install
          • Components of Add-On
          • Components Combinations to Be Installed
        • Installation Activities
          • General Prerequisites
          • System Prerequisites
          • Installation
        • Post Installation Activities
          • Select Connectivity Option
          • oData Services Maintenance
          • WSDL Service Maintenance
          • Copy Configuration Content from 000 Client
      • Conversational Actions Maintenance Guide
        • Administration
          • Installation Activities
          • Uninstallation Activities
        • Implementation
          • Product Description
            • Product Versions Management
            • Product License
        • Configuration of Email Sending Mechanism
          • Prerequisites
          • License Key Maintenance
          • Configuration Settings
        • Chatbot User Setup
          • Chatbot Central oData Service Authorization Role Maintenance
          • Create Chatbot User ID
          • Assign Chatbot User ID for Authorization Check in User Validation Scenario
        • Assign Chatbot Scenarios to ABAP RIK Classes
        • Set Up Solution Specific Email Sending Control
        • Simplified User Creation Scenario Setup (Without Approval Workflow)
          • Maintain and Assign Reference Users for User Creation Scenario
          • [Optional] Activate Notification for New User Creation
        • User Creation Scenario Setup with Approval Workflow
          • Configure Approval Workflow for User Creation Scenario
          • Set Up Approval Steps for Different User Types Creation
    • Node.js Connector
      • Docker Installation and Configuration
        • Prerequisites. Hardware Recommendations
        • Connection Installation into Company’s Landscape
          • Docker Installation
          • Connector Configuration
          • Deployment Process
            • Download Image Using Registry Server
            • Manual Download of Image
            • Start Container with App
          • Start Application Using Docker Composer (optional)
          • Additional Required Configuration (Reverse Proxy)
    • IDD Uninstallation Guide
      • Prerequisites
      • Uninstallation Process
    • Bot Management
      • Bot Connector Configuration Guide
        • Connector Configuration
        • Nodejs Logs Configuration
        • Twilio Integration
        • Google Services Integration
        • AWS Integration (optional)
        • Yandex Services Integration (optional)
        • Identity Providers (optional)
      • Bot Management Installation Guide
        • Software Components to Install
          • Components of Add-On
          • Components Combinations to Be Installed
        • Installation Activities
          • Prerequisites
            • General Prerequisites
            • System Prerequisites
          • Installation
        • Post Installation Activities
          • UI5 Services Activation in Frontend System
          • RFC Destinations Configuration
          • OData Services Maintenance
          • Copy Configuration Content from 000 Client
          • Copy Tables Content from 000 client
          • Copy Fiori Catalogs from 000 Client to Productive Client
          • Copy Translations from 000 Client
          • Clean Cache and Indexes Recalculation Activities
      • Bot Management Configuration Guide
        • Register Customer Namespace
        • Intelligent Assistant Registration
        • Bot Channels Registration
          • SAP Channels Registration
            • MS Teams Channel Configuration
            • Facebook Messenger Channel Configuration
            • Skype Channel Configuration
            • Slack Channel Configuration
            • Telegram Channel Configuration
            • Webchat Channel Configuration
            • WhatsApp Channel Configuration
            • Viber Channel Configuration
            • Zoom Channel Configuration
          • Channel External Configuration
            • Facebook Messenger External Configuration
            • MS Teams External Configuration
            • Slack External Configuration
            • Telegram External Configuration
            • Skype External Configuration
            • WhatsApp External Configuration
            • Viber External Configuration
            • Zoom External Configuration
        • Chatbot Scenarios Activation
        • Bot Answers Translation
        • Chatbot Destinations Setup
        • Chatbot Scenarios Groups Management
        • Surveys Management

MS Teams External Configuration

23 views 0

Note: You can access the full tutorial on Azure/ MS Teams configuration below. It also explains the SSO configuration process:

HOW-TO: MS Teams Channel with SSO


Step 1. Create Azure Bot Service

Step 1.1 Make sure you have a working Azure account.

Go to Microsoft Azure portal https://portal.azure.com/#home.

Navigate to the Bot Services and create a new one of Azure Bot type.


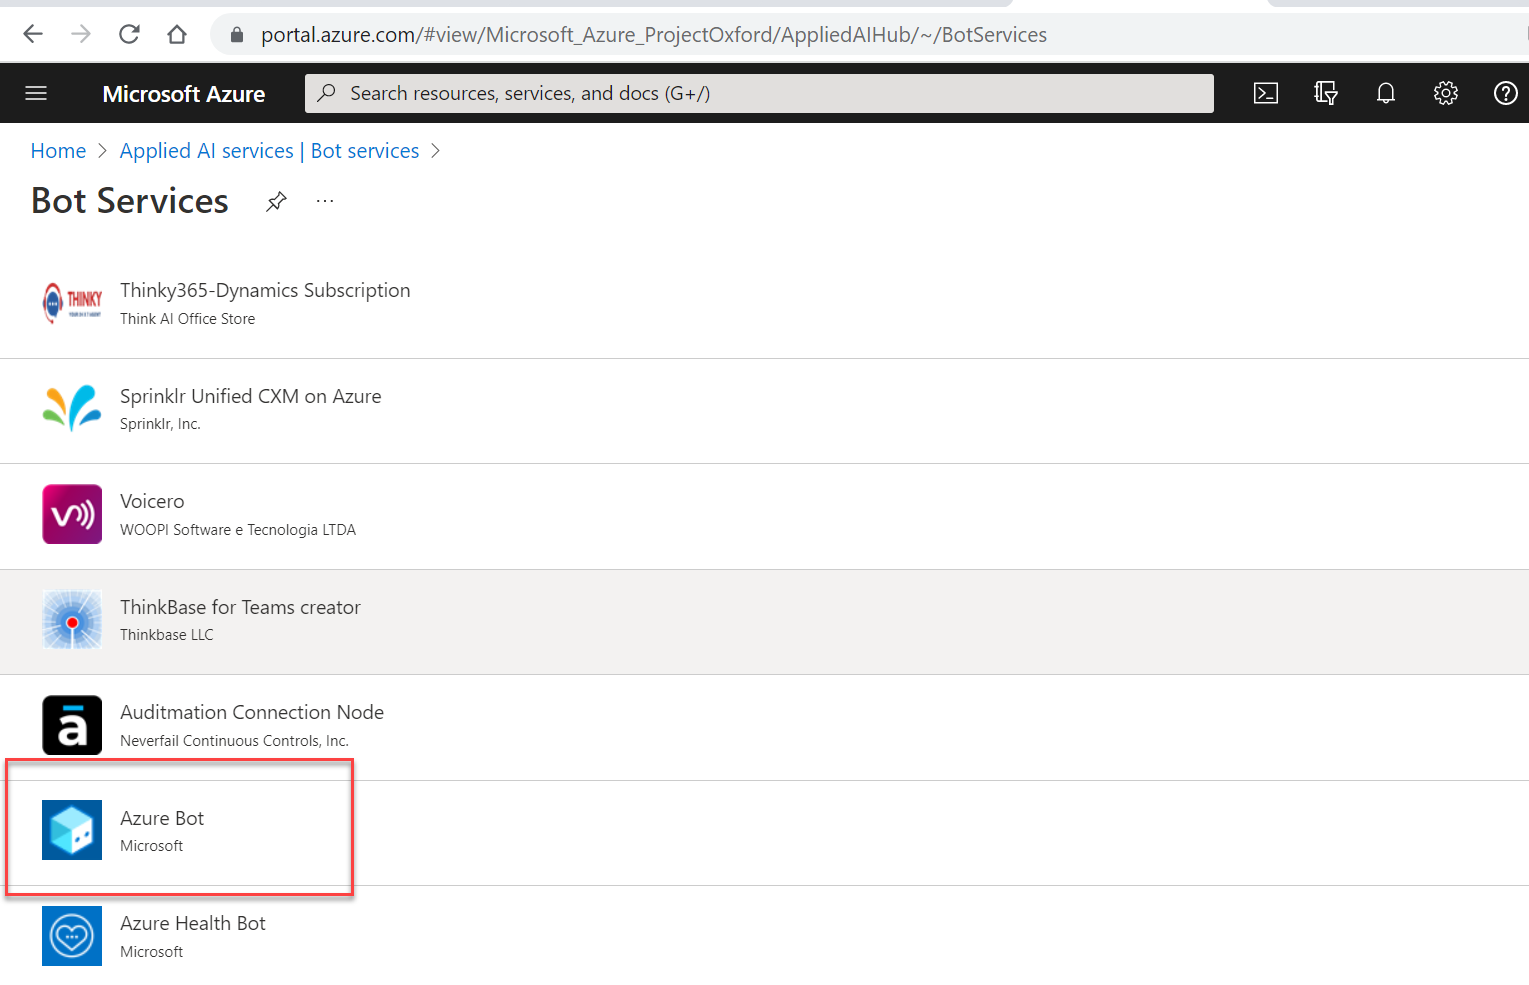
Step 1.2. Select and click Create.Graphical user interface, text, application, chat or text message Description automatically generated


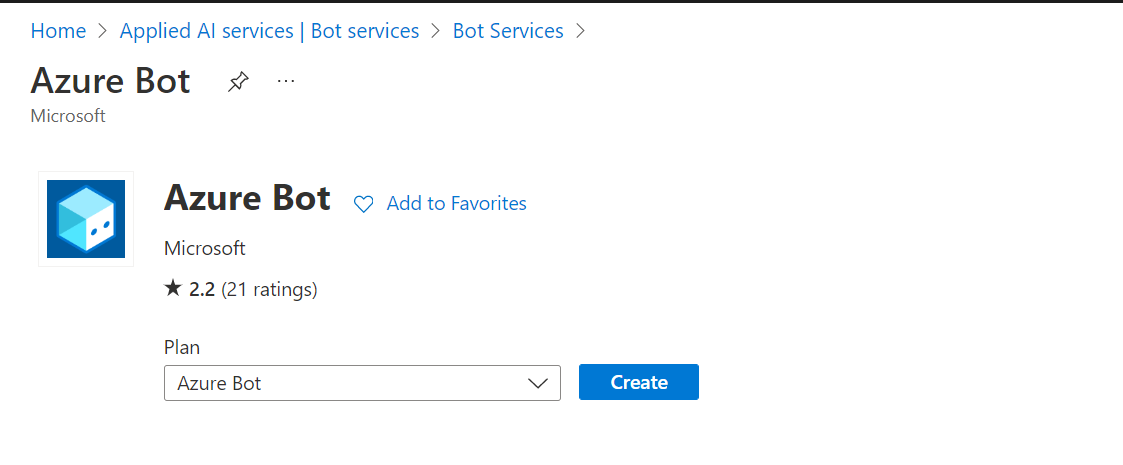
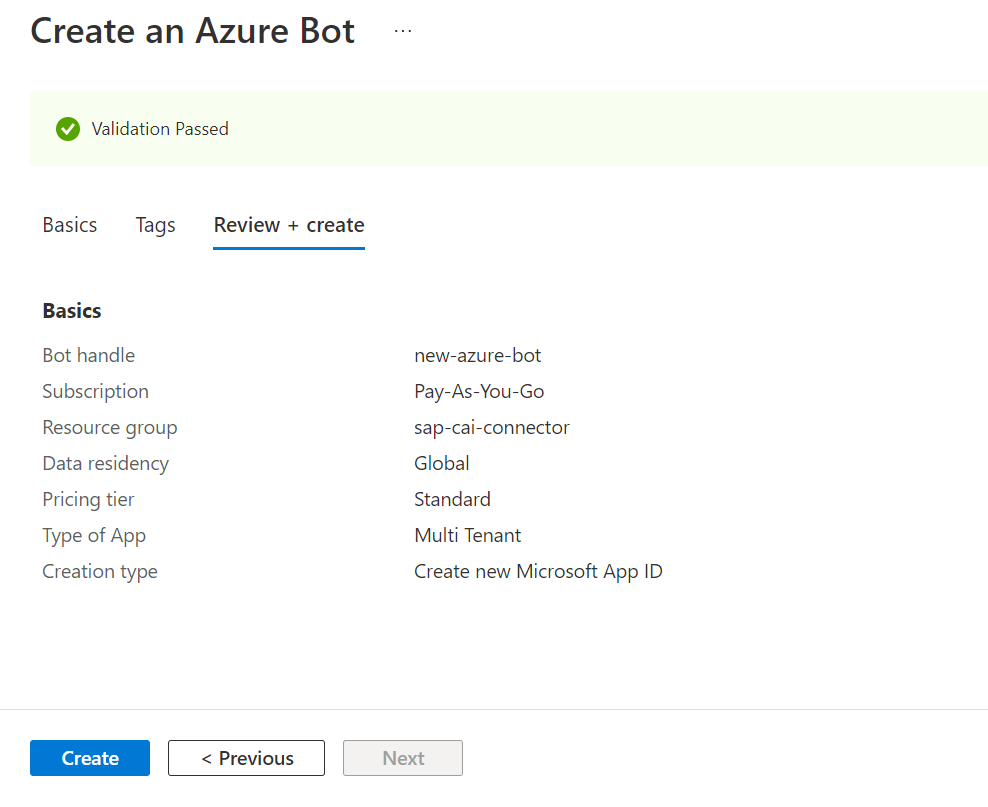
Step 1.3. Fill in the registration form:Graphical user interface, text, application Description automatically generated

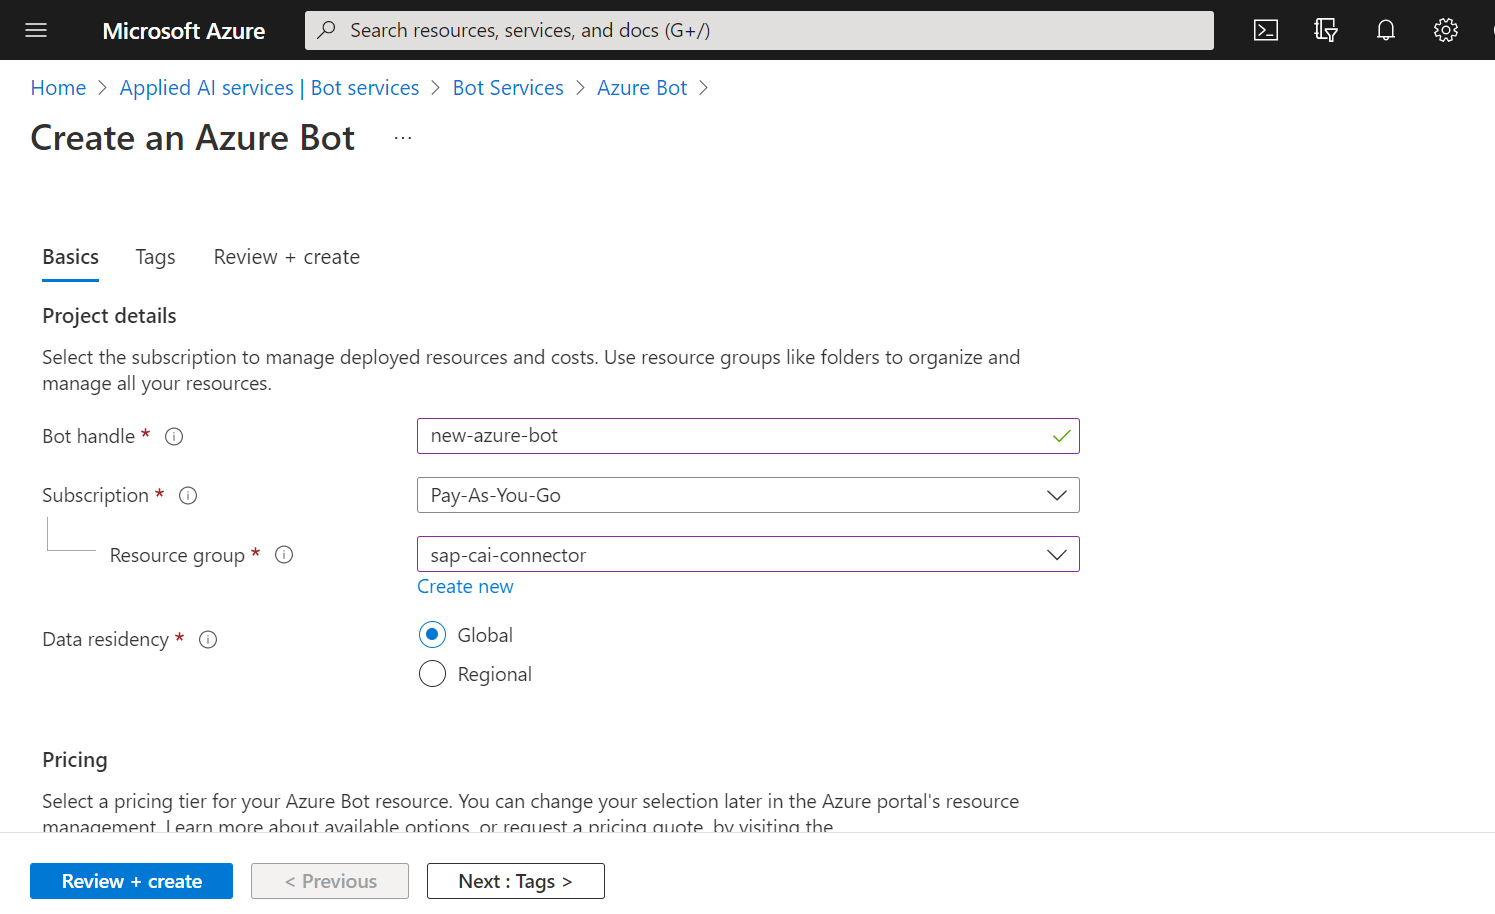
Step 1.4. Make sure that you select the multi-tenant option for the bot (only this option is supported for now)Graphical user interface, application Description automatically generated

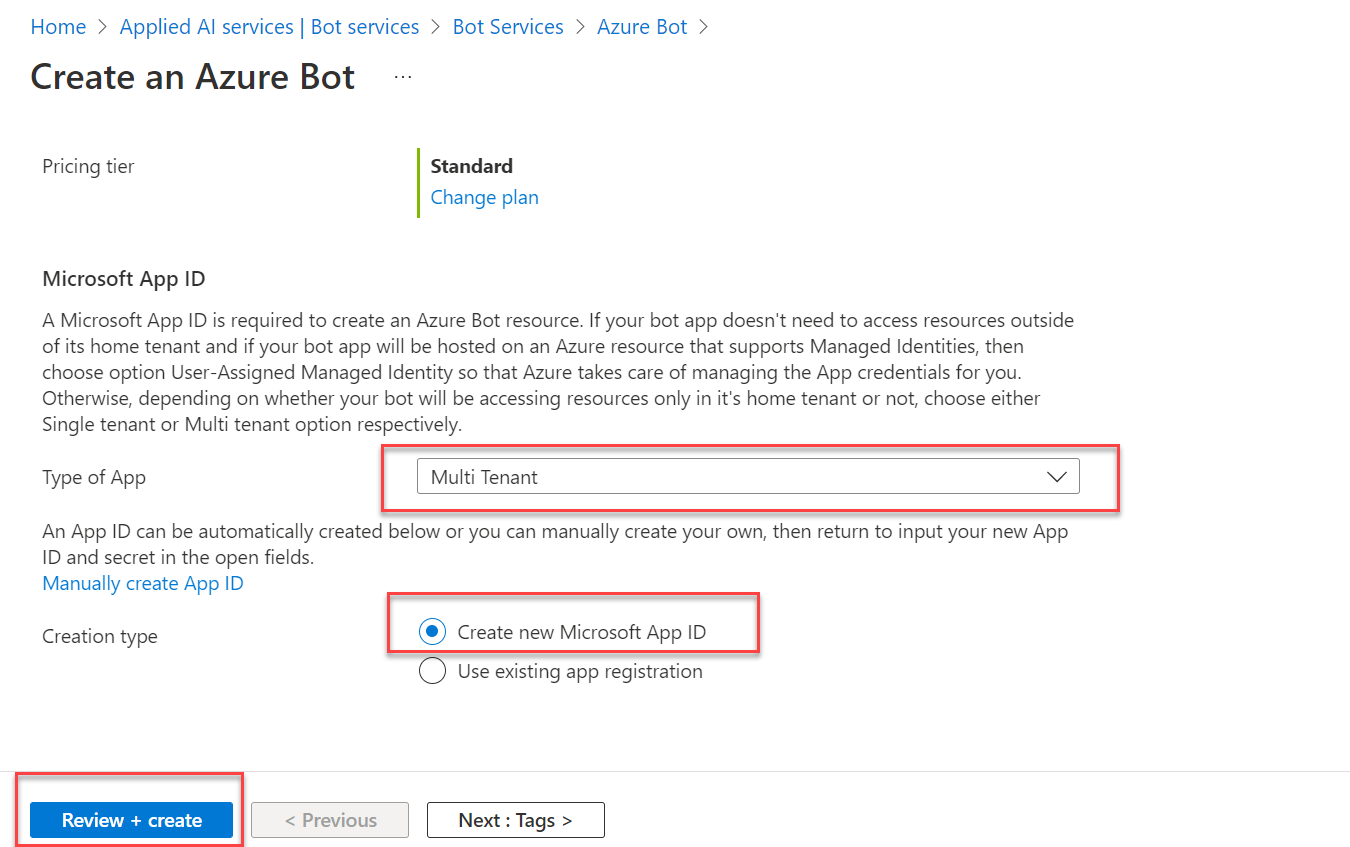
Step 1.5.  Press Create

Graphical user interface, application Description automatically generated

Step 2. In this step, we are configuring the connection between the Azure Bot Service application and our backend Node.js application (Docker Container).

Step 2.1.  Go to the Microsoft Azure portal, and open the bot service created in the previous step:Graphical user interface, text, application, email Description automatically generated 
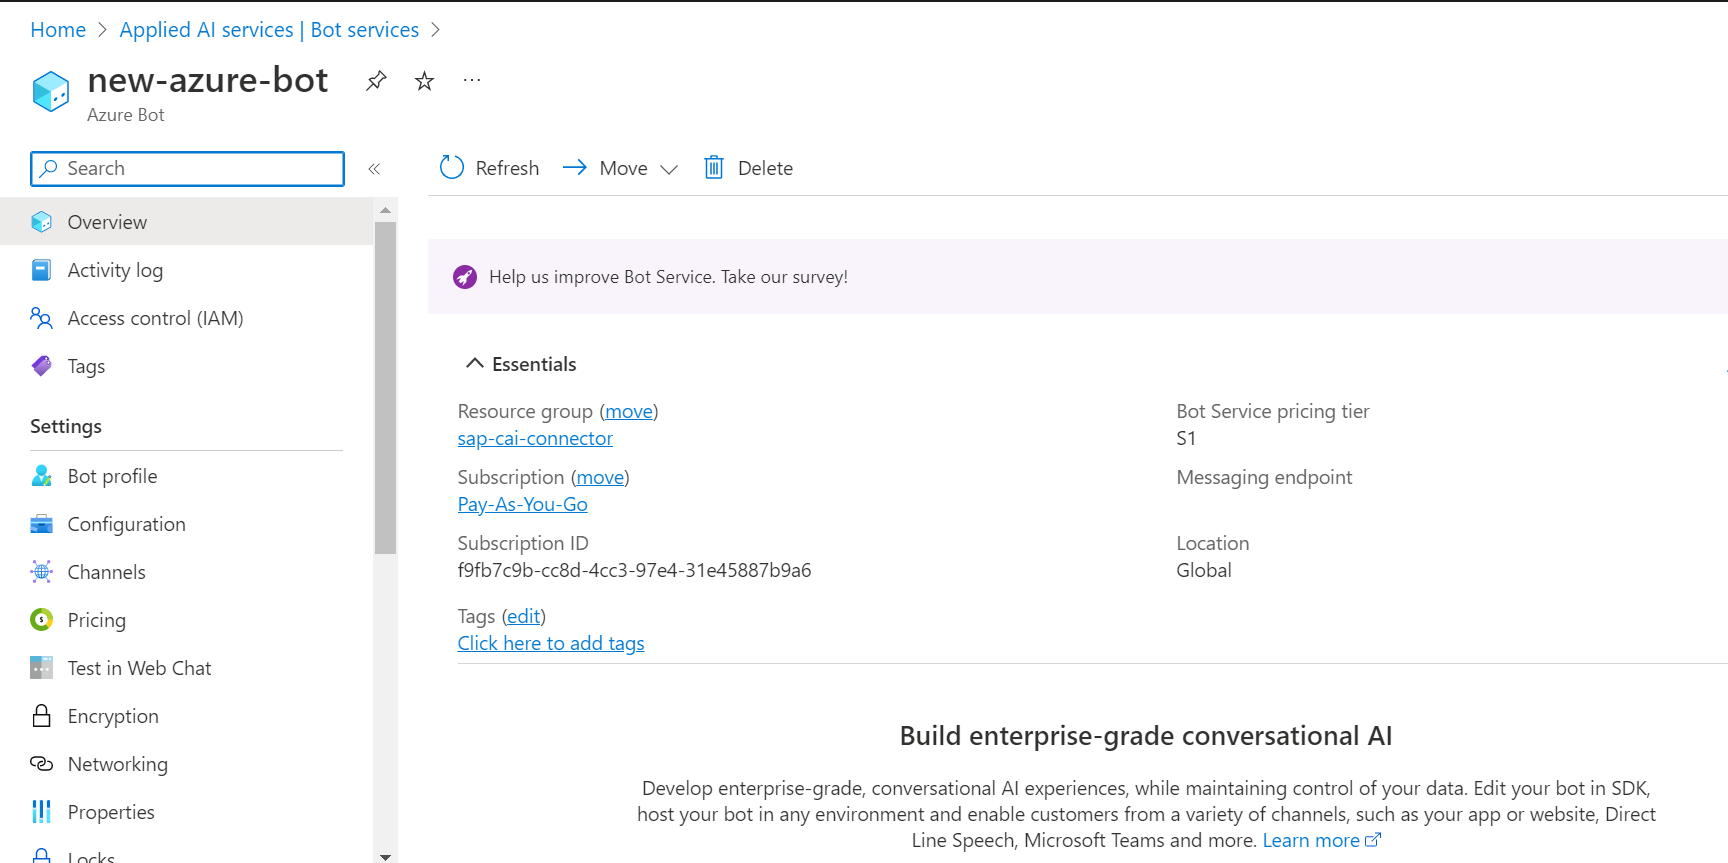
Now you need to generate a secret to be used for SSO integration

Step 2.2.  Click Settings and scroll down.

Step 2.3. Generate a Client Secret by clicking Manage, then New Client Secret, then Add.

ID and secret

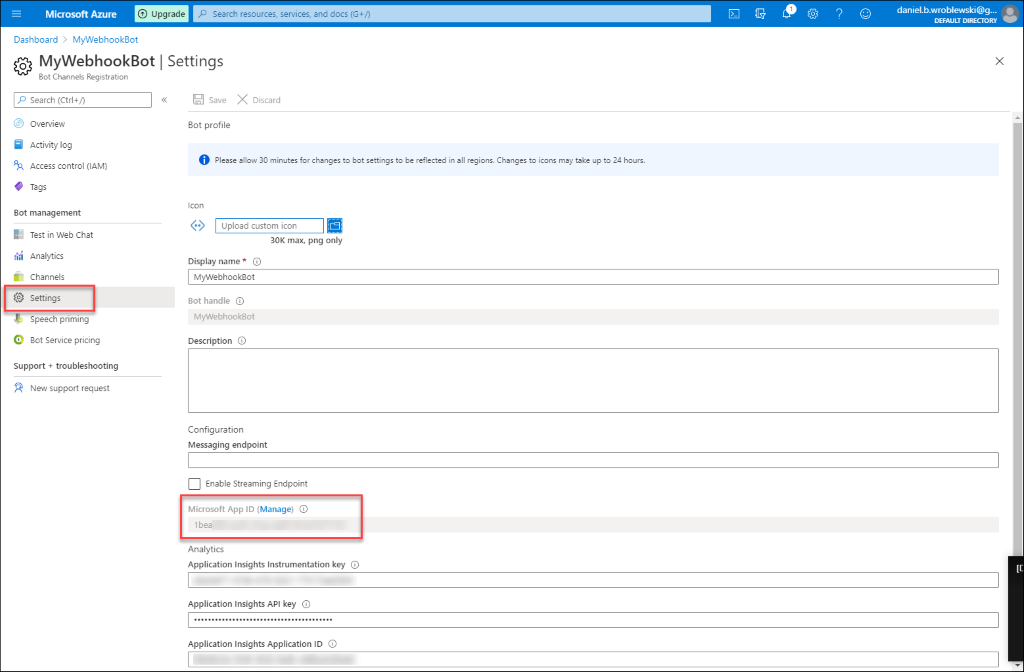
Step 2.4. Copy the Microsoft App ID and the Client Secret.

Step 2.5.  In the field of Messaging Endpoint, you need to paste your application URL.

Url format is https://<nodejs hostname>/<organization>/<bot name>/v1/api/messages,

Where <organization> is your organization name on SAP CAI, and <bot name> is the name of the bot to be connected. Please, consult the implementation team should you happen to be uncertain.

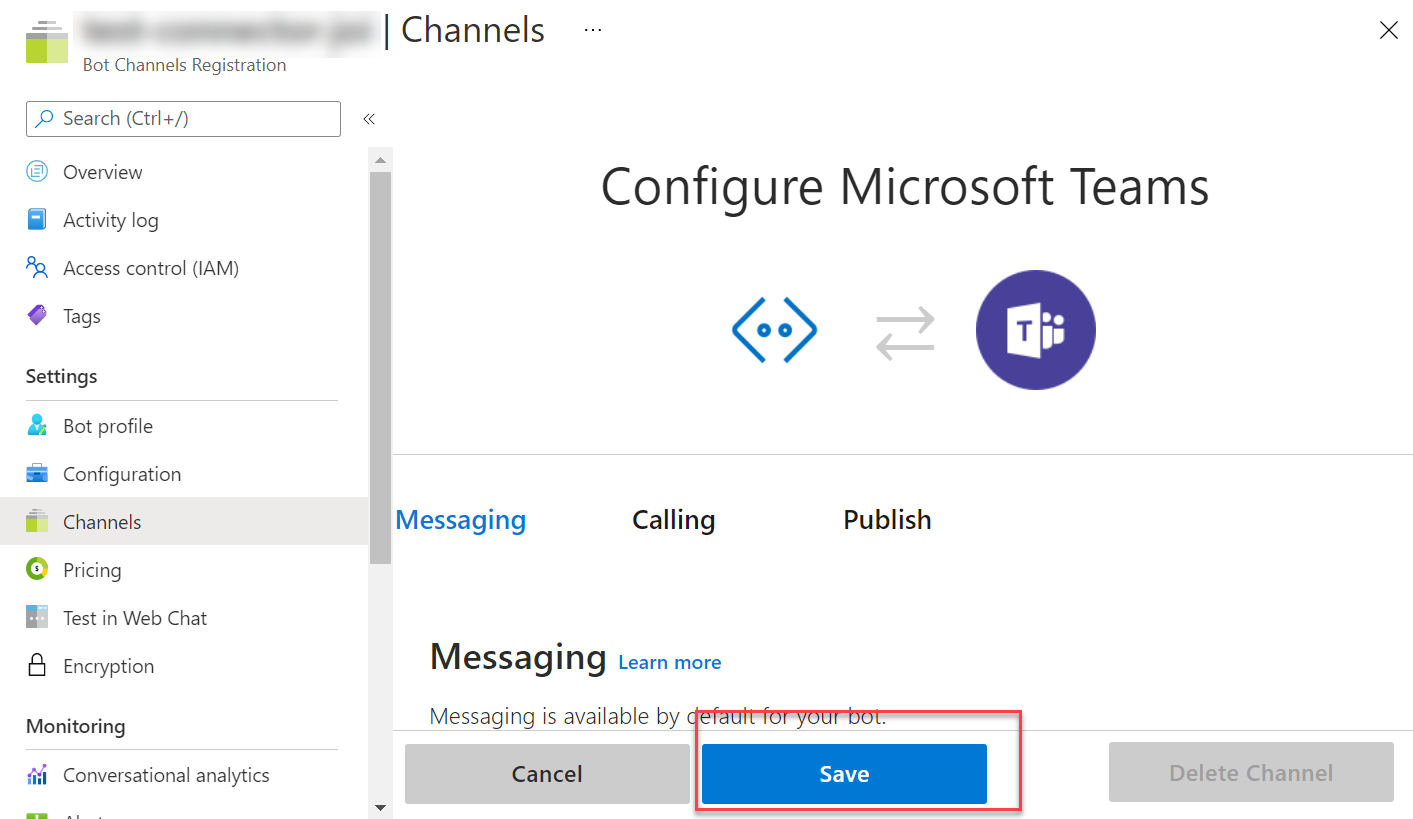
Step 2.6. Go to the Channels, and add Teams channel

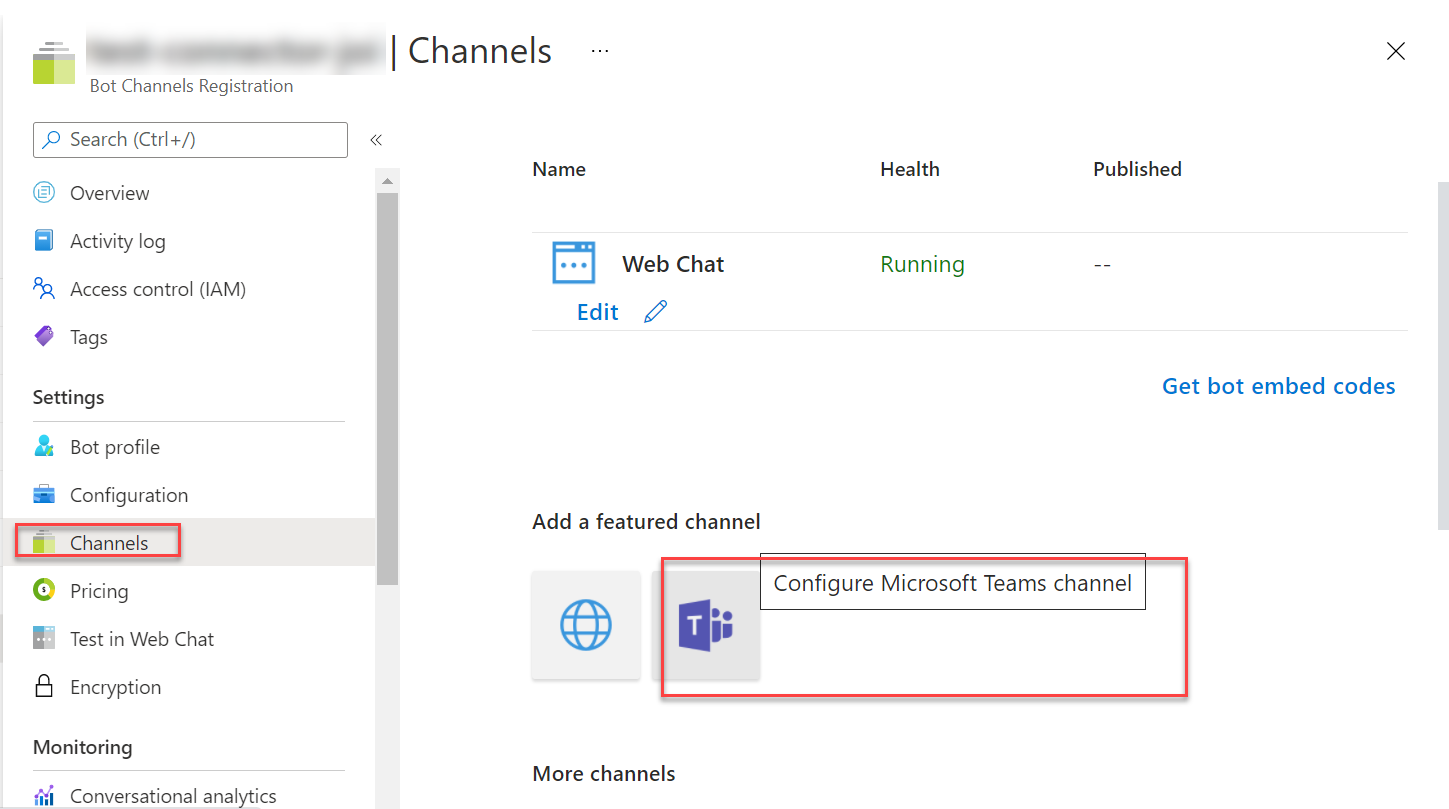
Step 2.7. Keep the default settings and press Save


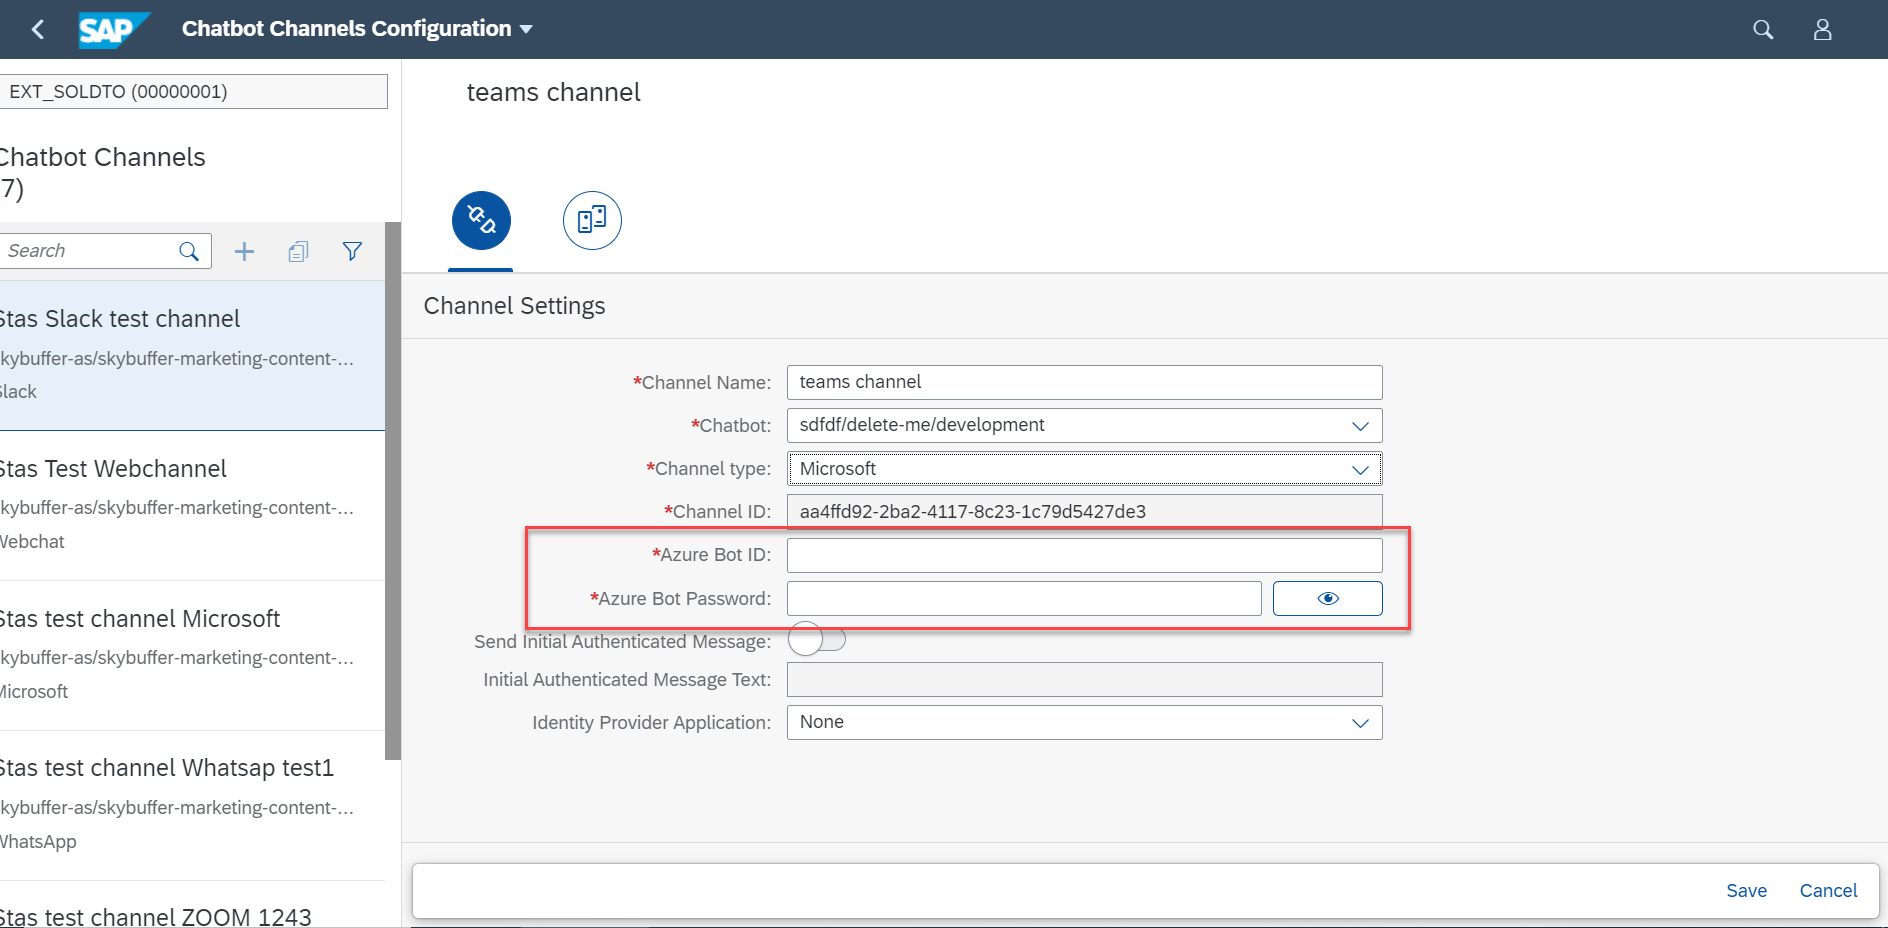
Step 2.8. Under the Bot Management applications, open the Chatbot Channel configuration, select your tenant and create a new channel of the Microsoft type.

Paste your copied App ID and Client Secret from Step 2.4. into the fields of Azure Bot ID and Azure Bot Password.

Graphical user interface, application Description automatically generated

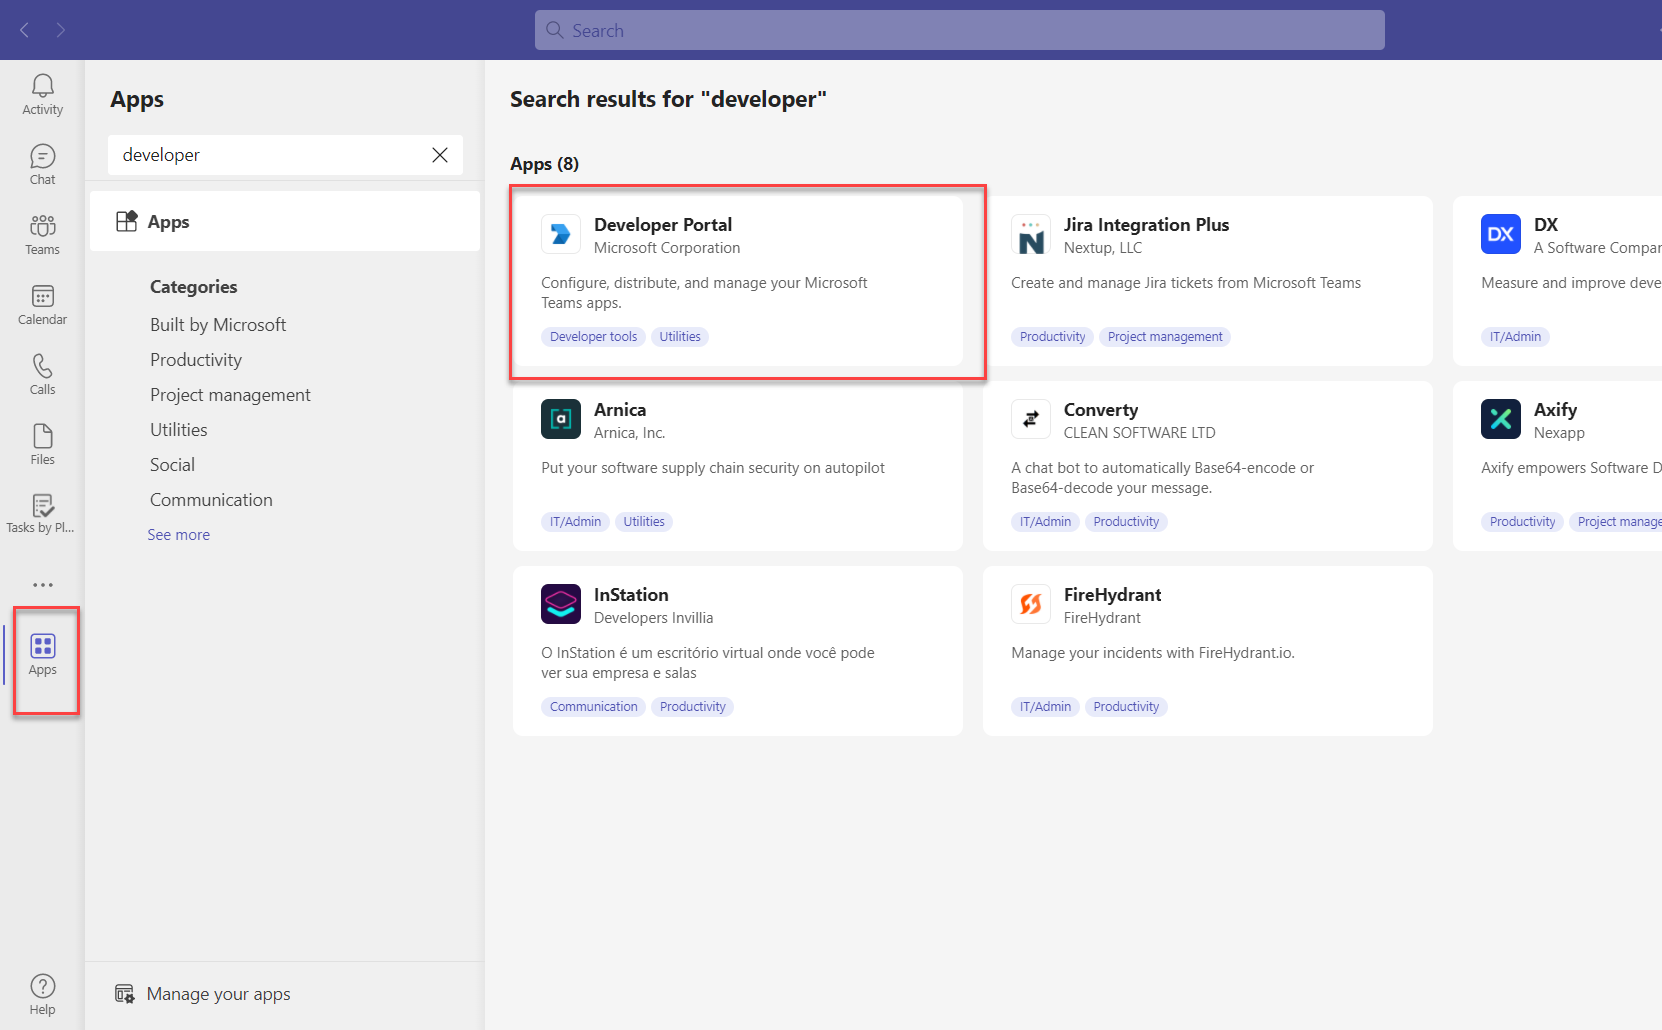
Step 3. Add the new app to MS Teams.

Step 3.1. Open MS Teams, navigate to the Apps tab, and search for the Developer Portal app. Open the app.

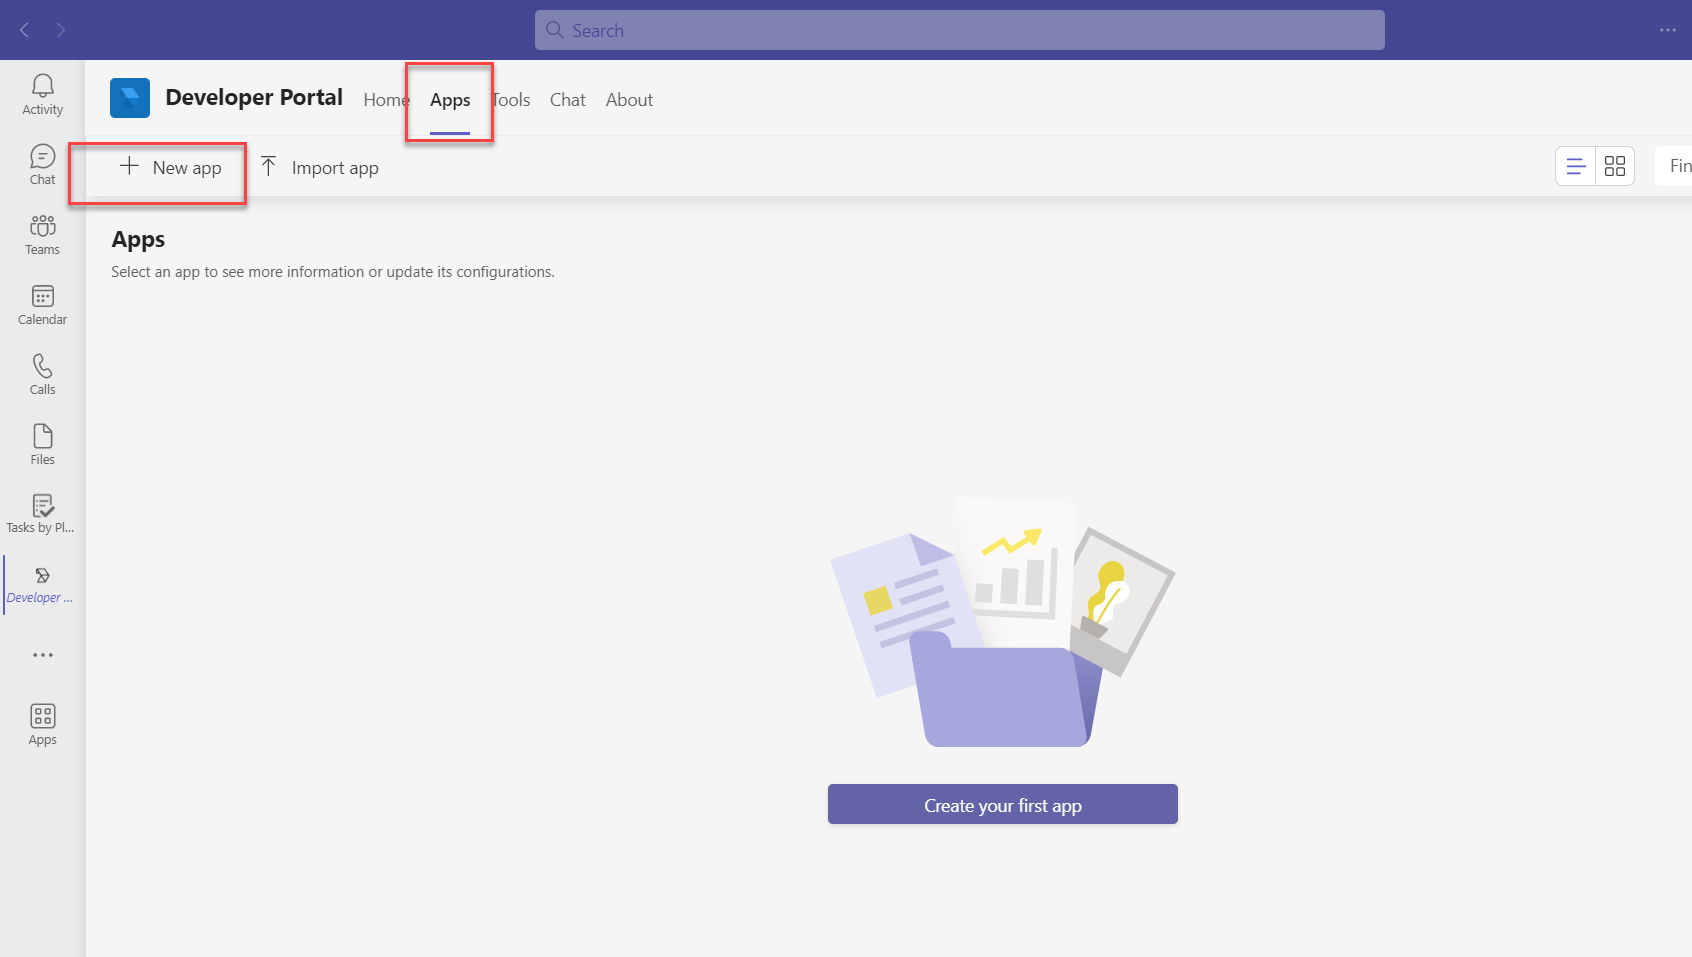
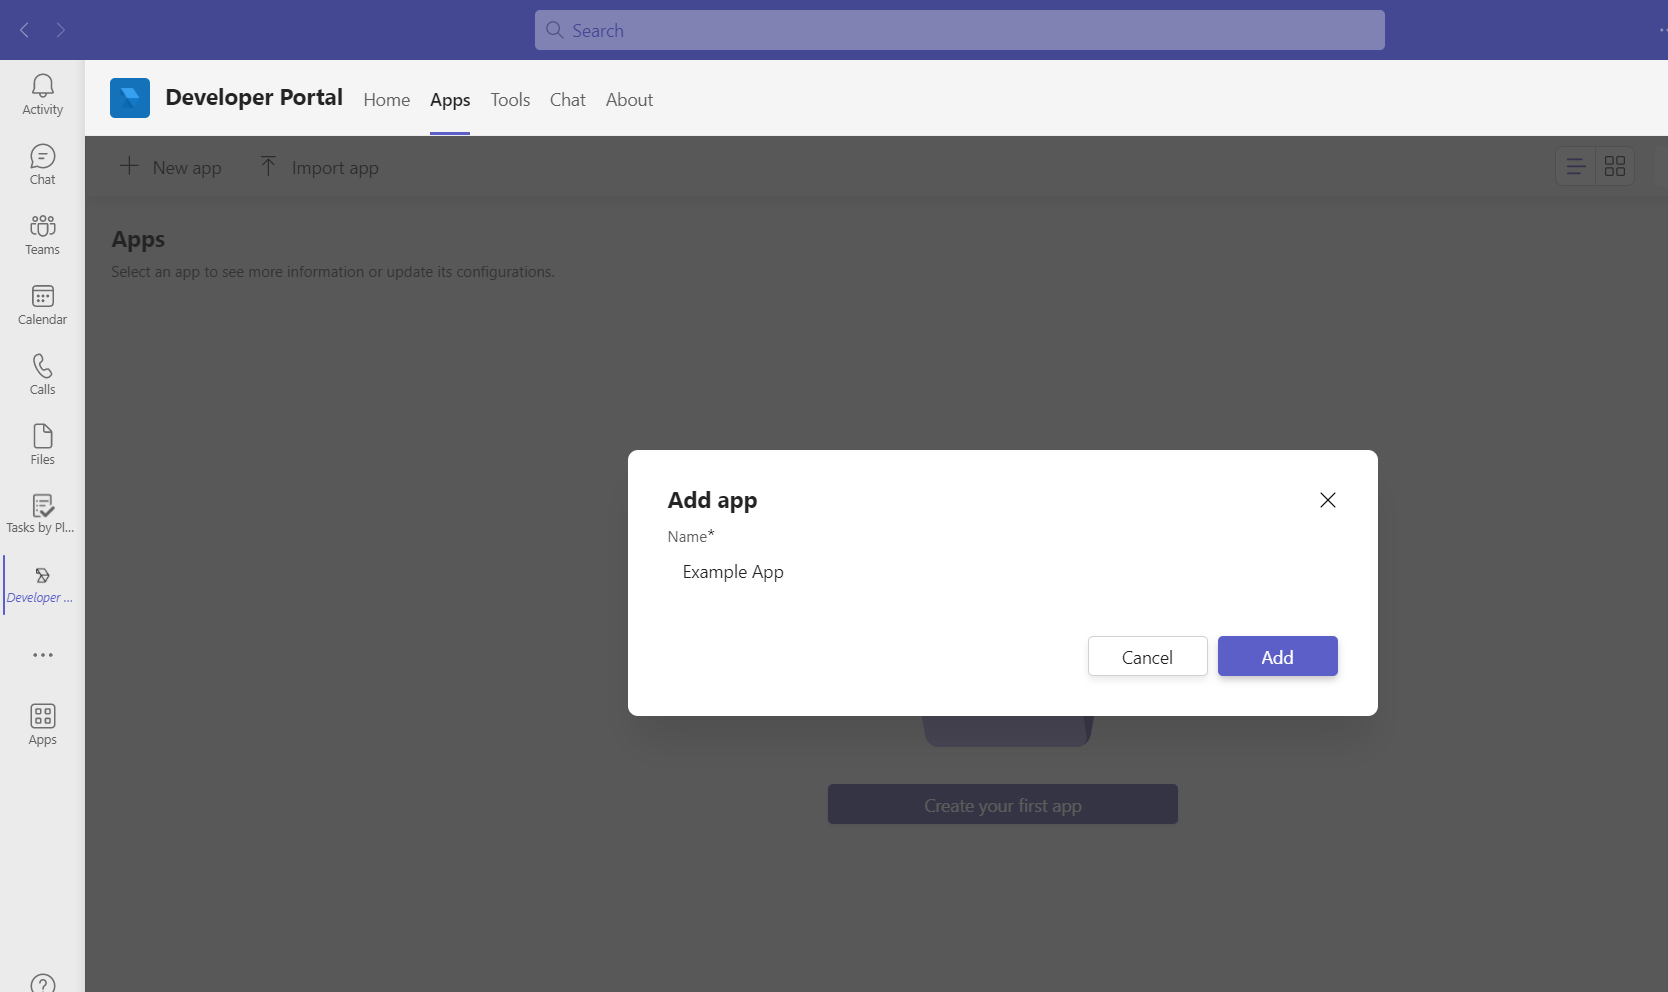
Step 3.2. Open the Apps tab inside the Developer Portal. There are two options to add a new app. You can import an existing app with the help of manifest, or create a new app.
For this tutorial, let’s use New App option:

Step 3.3. Name the app:

Step 3.4. Fill in the application details – page url, descriptions (optional step).

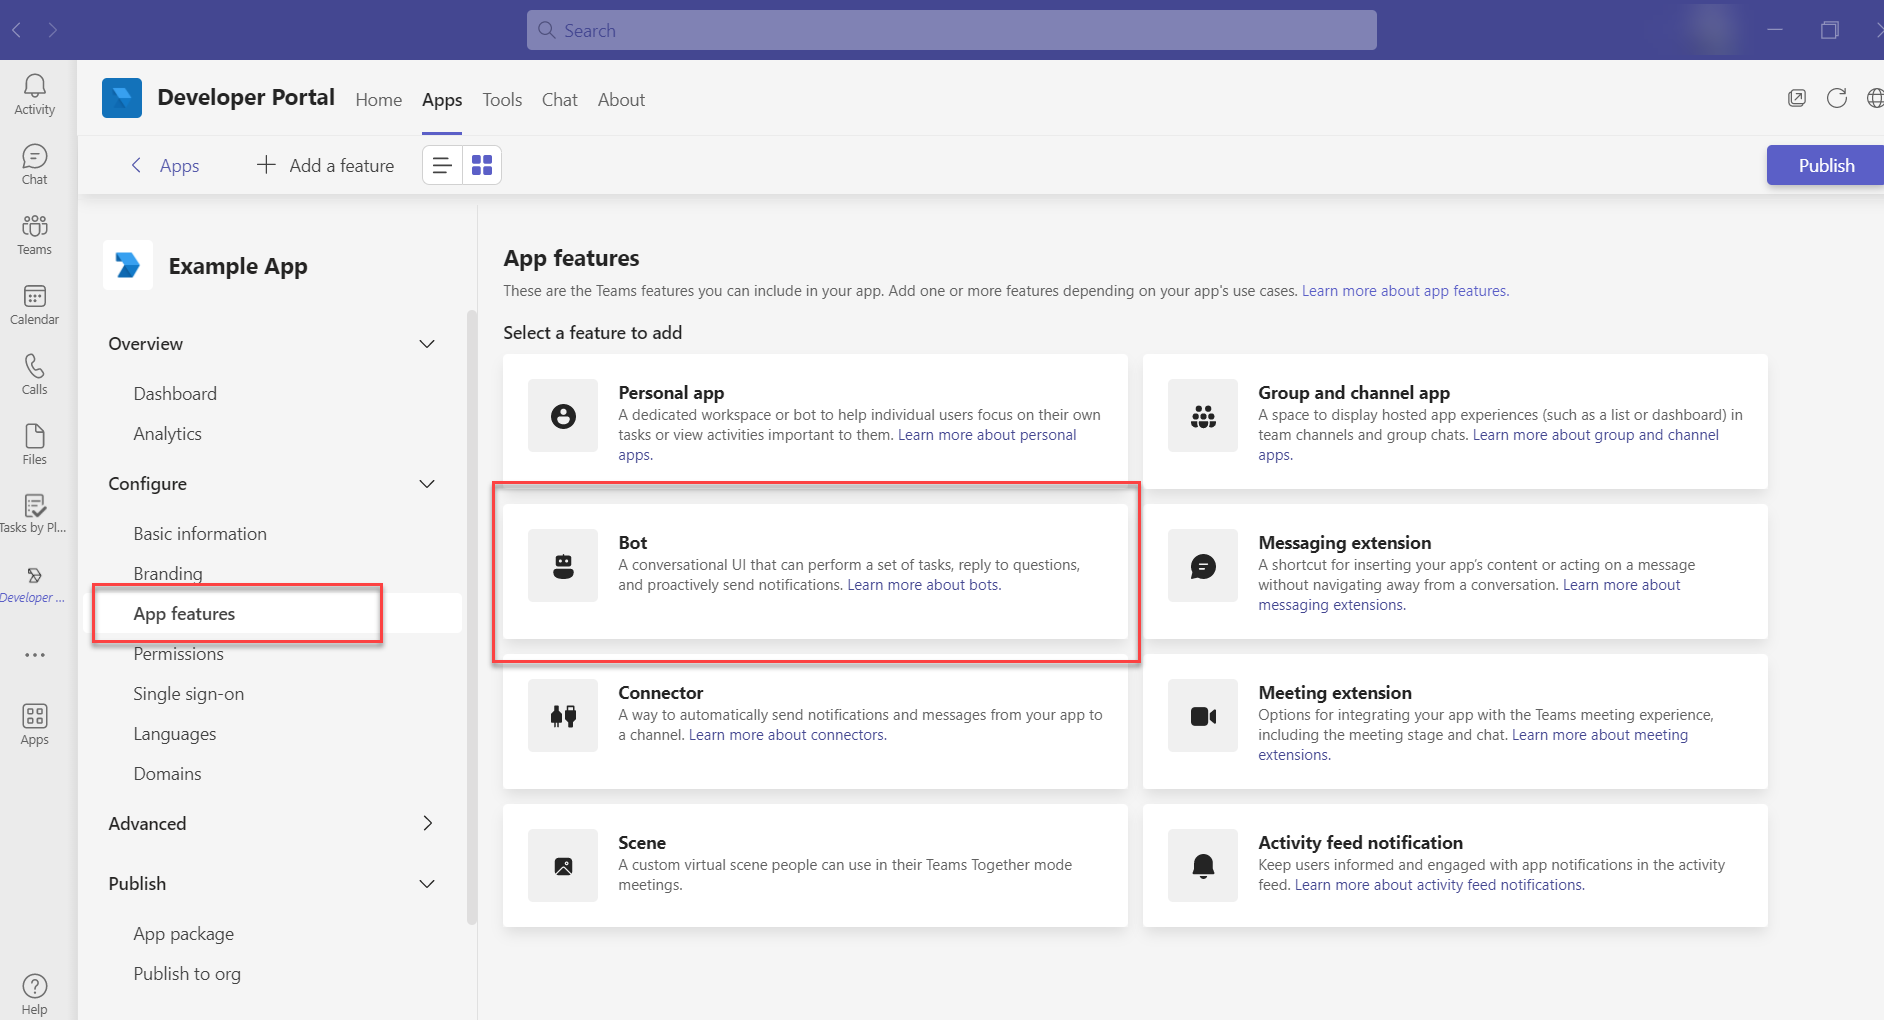
Step 3.5. Add the Bot feature.

Navigate to Configure > App features. Select new Bot feature.

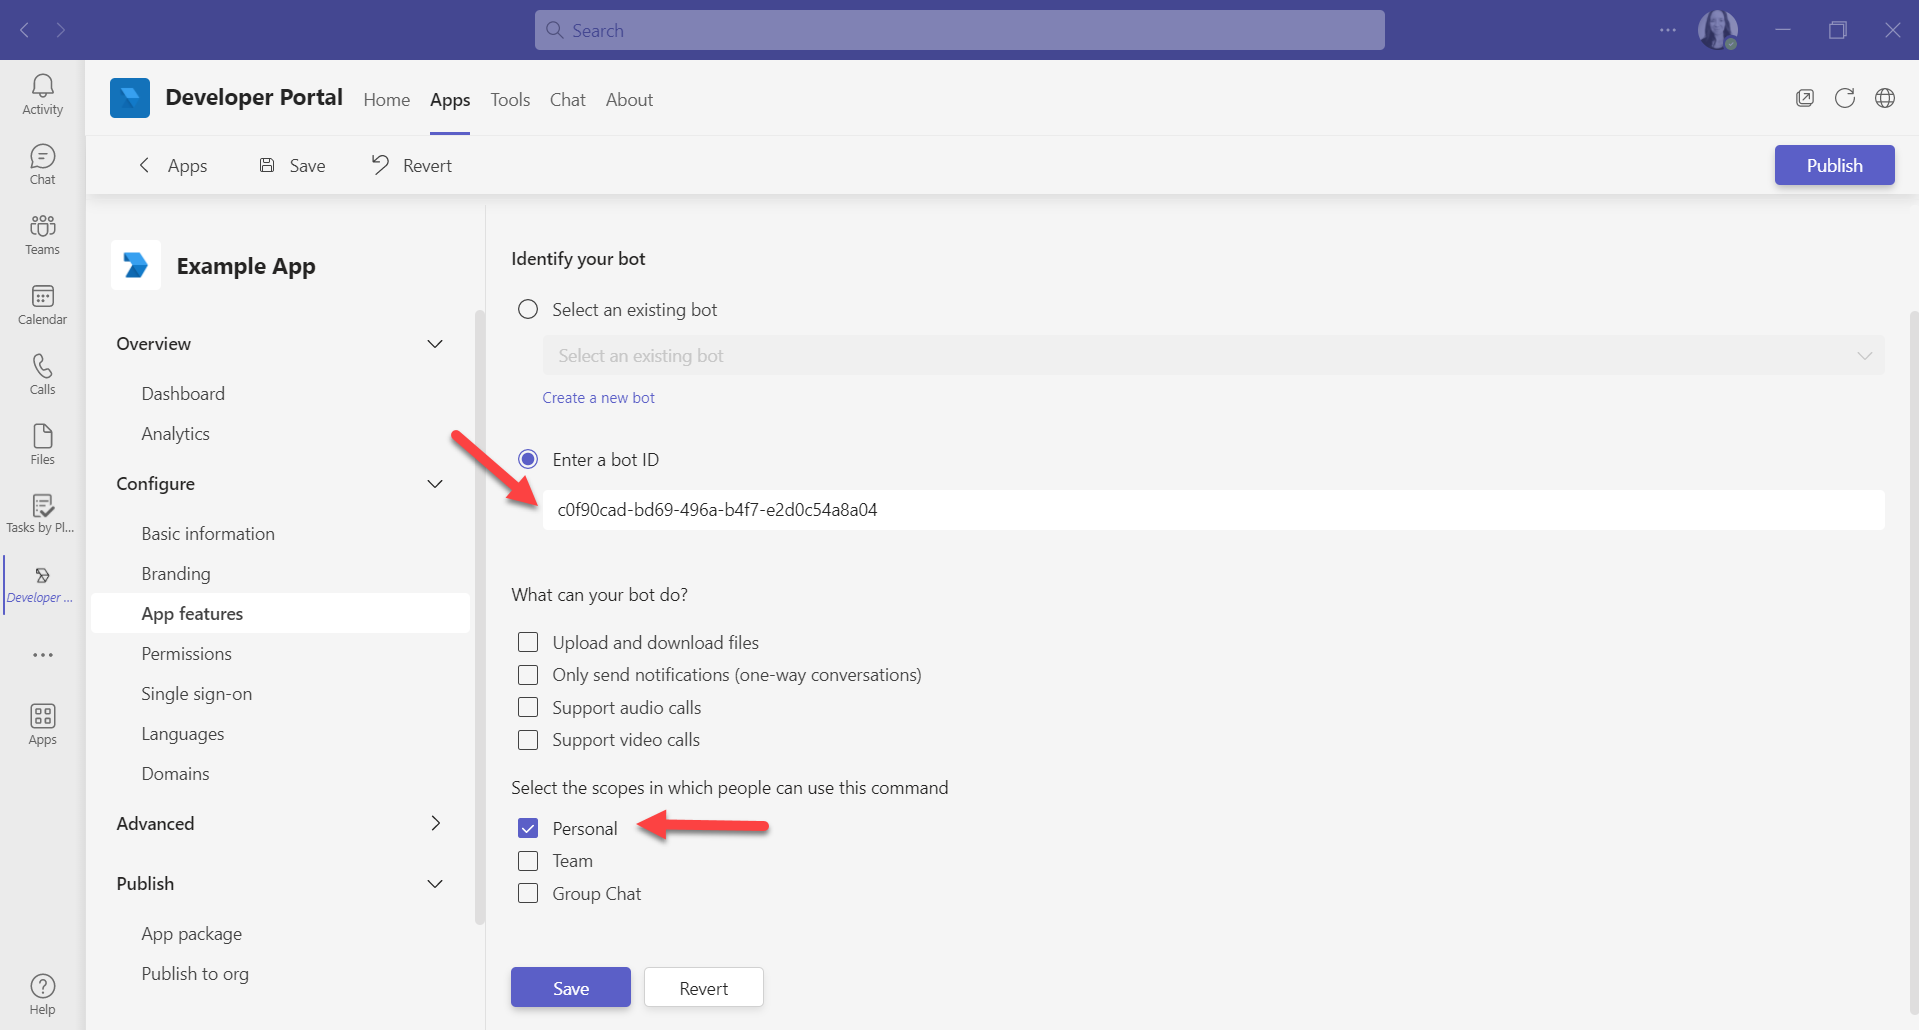
Step 3.6. Fill in the bot details.

field of Enter a bot ID – enter the Application ID from Azure. (Step 2.3)

field of Scope – select personal.

Save the new bot.

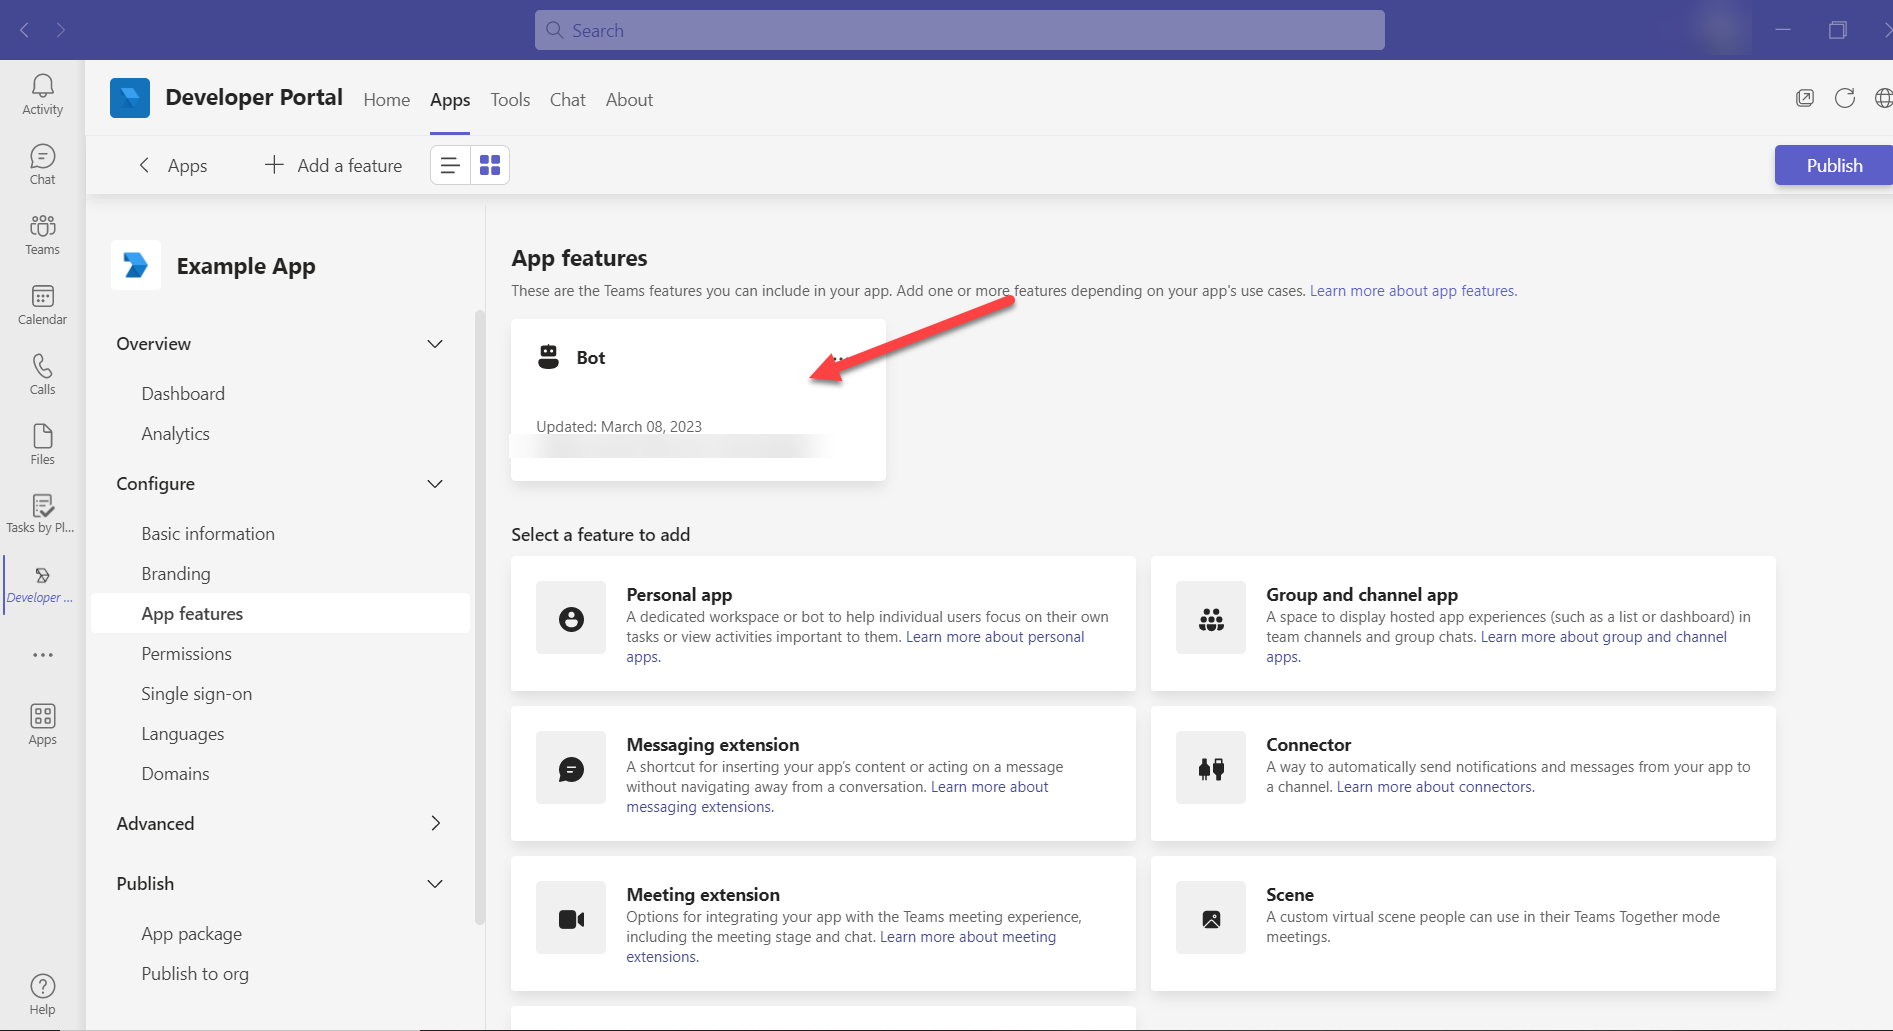
Step 3.7. The newly created bot feature should be now visible:

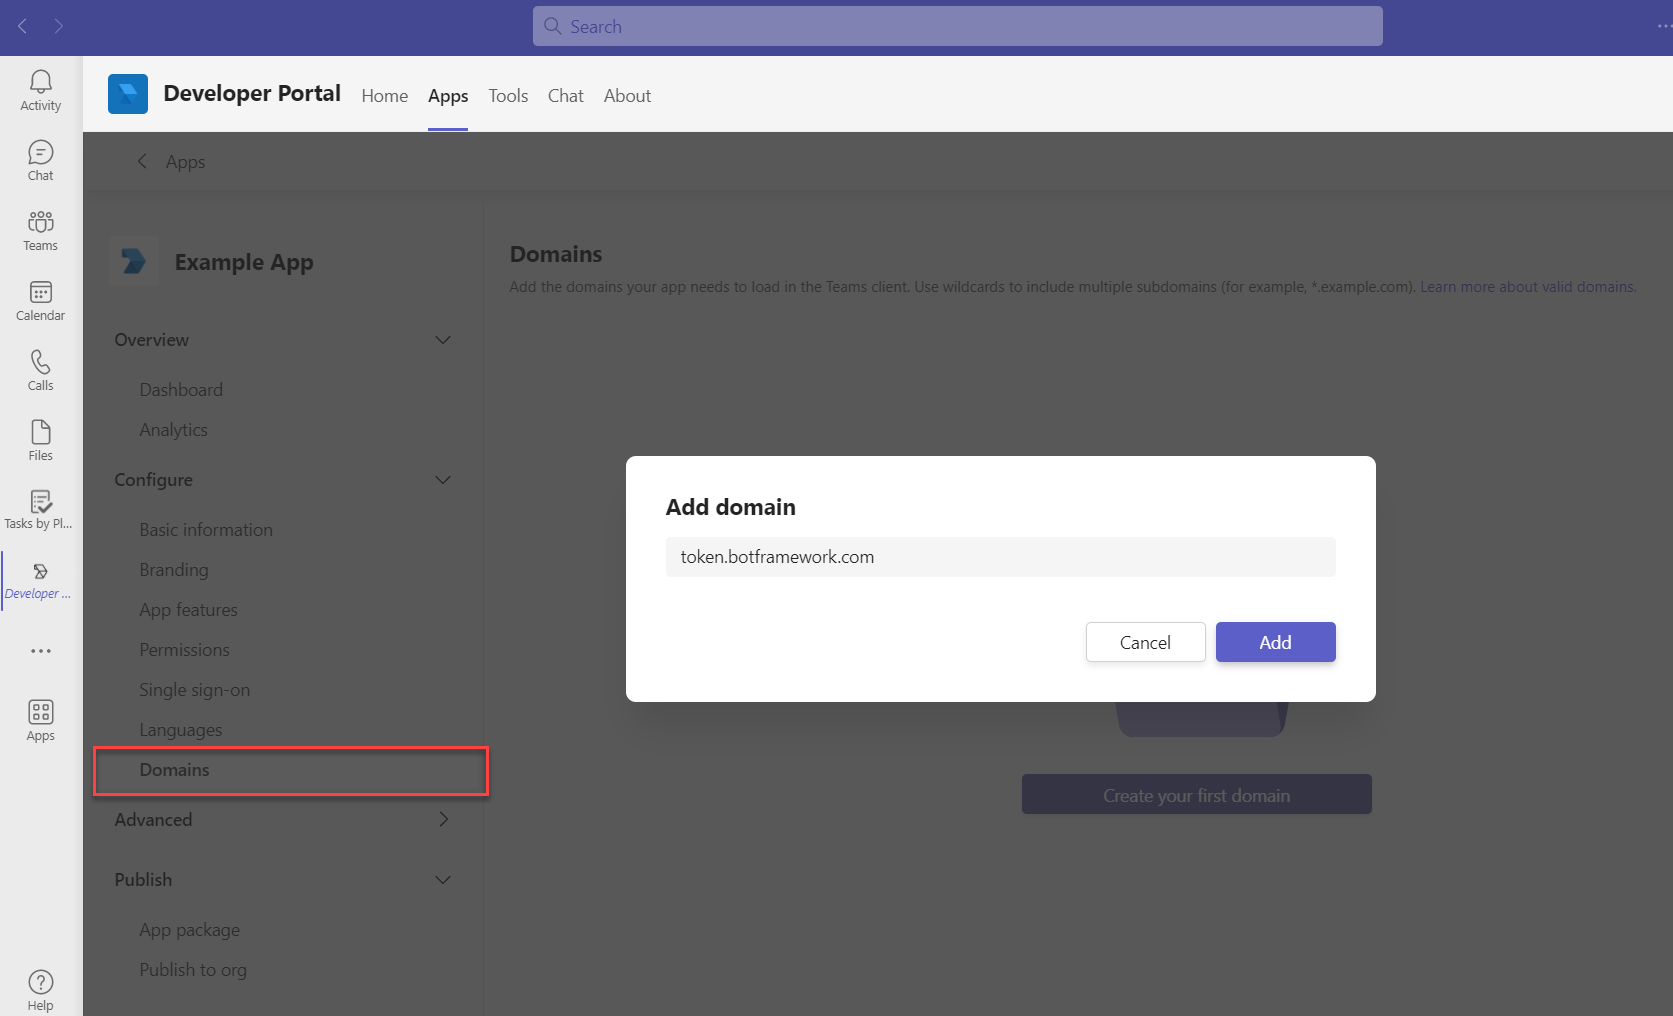
Step 3.8. Add new domain.

Navigate to Configure > Domains . Add the new domain token.botframework.com.

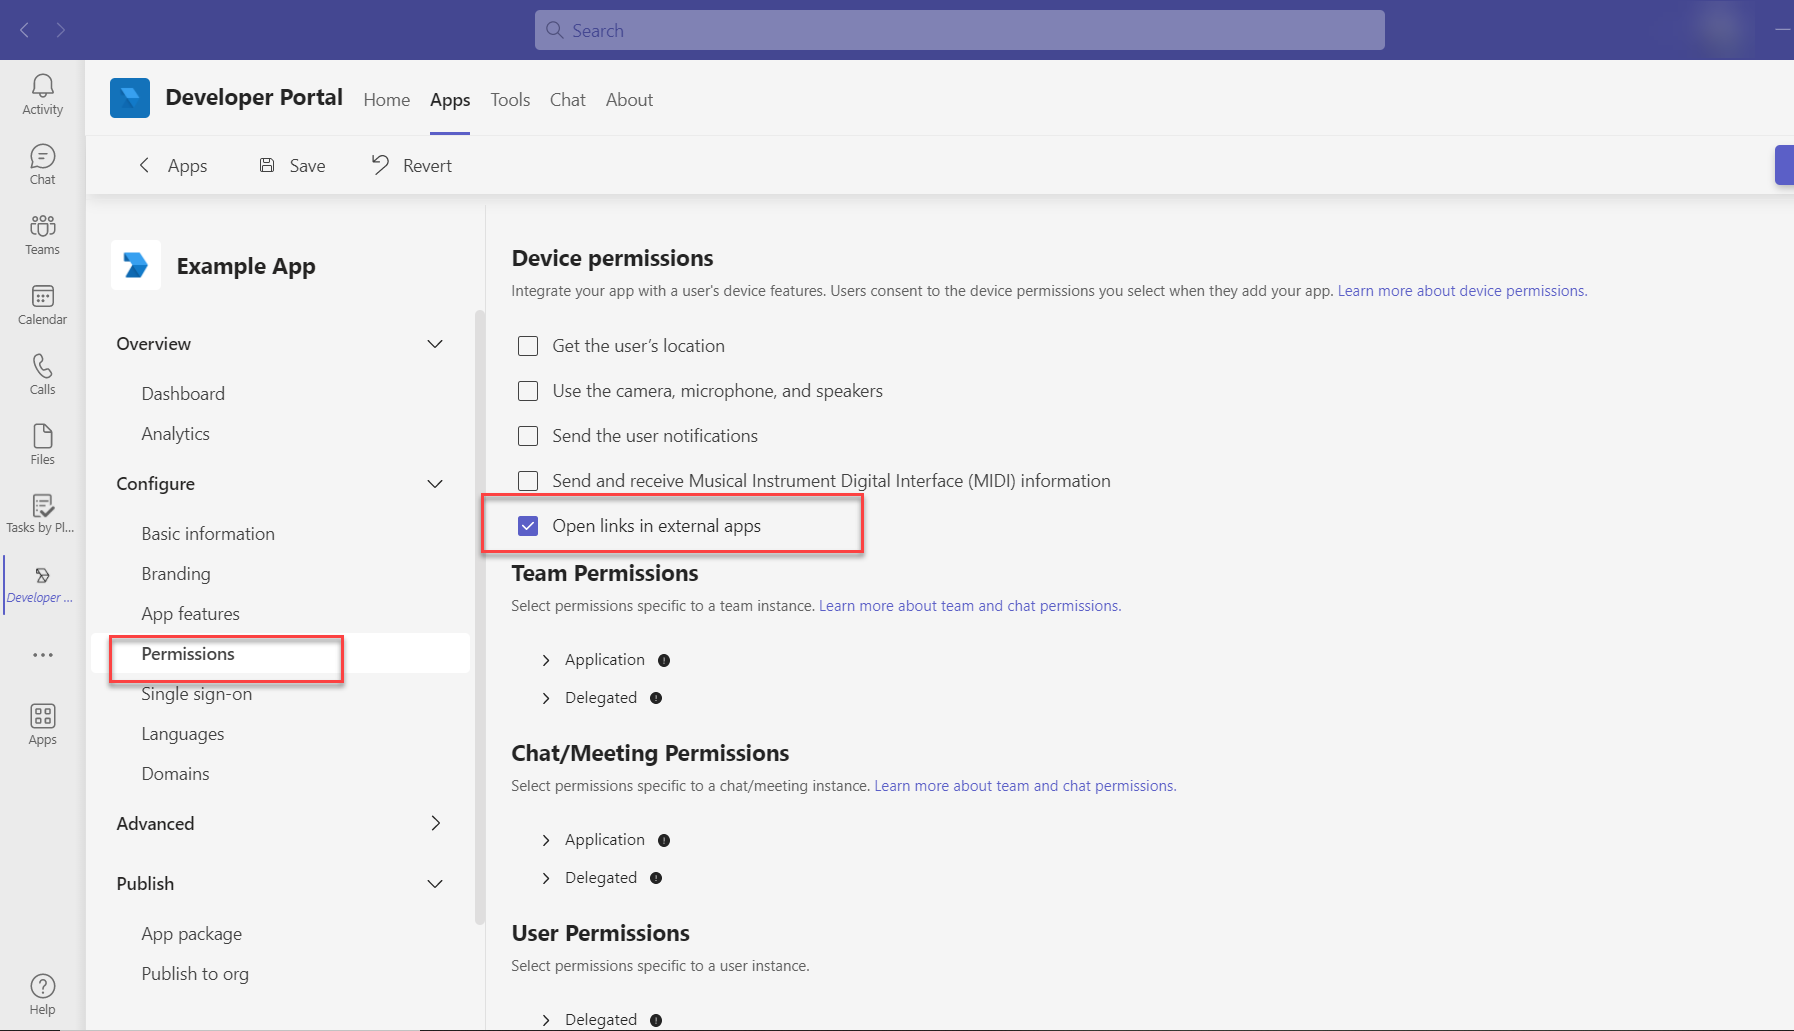
Step 3.9. Edit permissions.

Navigate to Configure > Permissions. In the Device Permissions section tick Open links in external apps.

Step 3.10. Publish your app.

Finally navigate to the Publish section. You can access the app manifest and add the app icons in  the App package section.

There are options to publish either to a store or to an organization.

Select the preferable mode, and click on the Publish button in the top right-hand corner to finish the process.

Was this helpful?

Yes  No
Related Articles
  • Analytics Applications
  • Operator Activity Analytics
  • Exit Survey Analytics
  • Zoom External Configuration
  • Viber External Configuration
  • WhatsApp External Configuration
Copyright 2022 Skybuffer.com. All Rights Reserved.