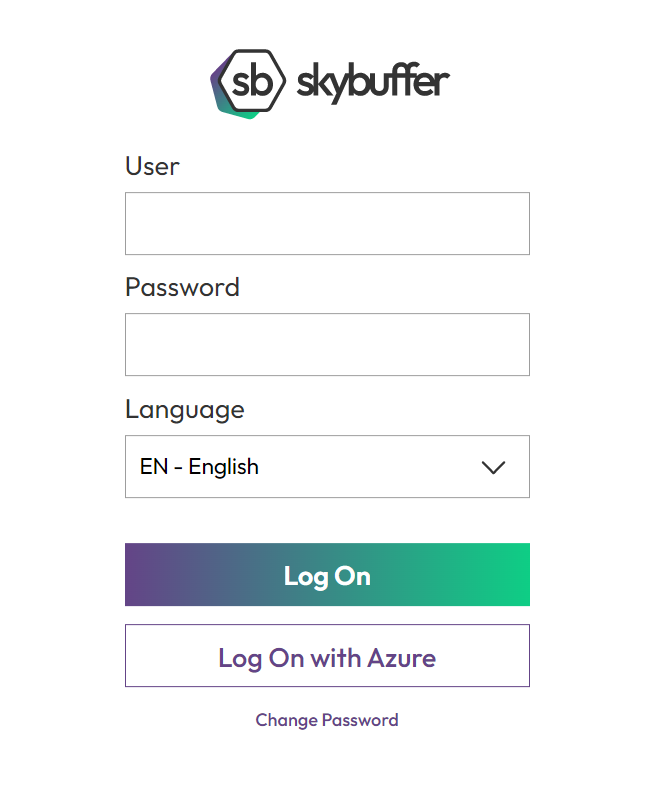
Step 1: Log into the Hybrid Chats application developed by Skybuffer.
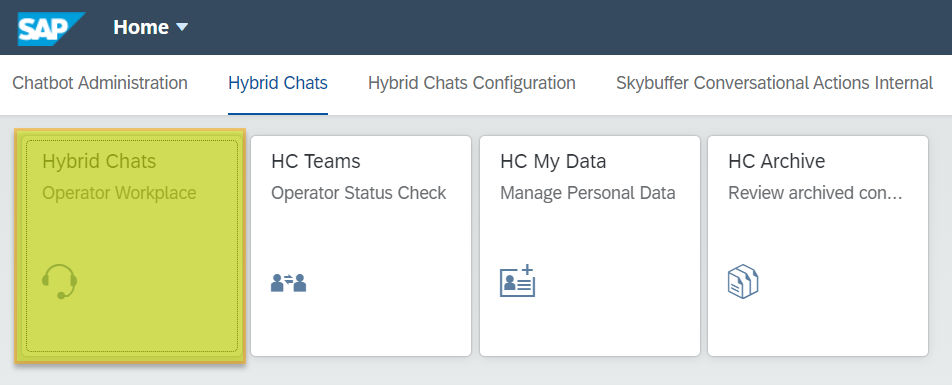
Step 2: You will be able to see four Fiori applications. The highlighted Hybrid Chats Operator Workplace application is specifically designed to enable you to monitor all the conversations in the real-time mode, step in and out any conversation when necessary.
Step 3: Hybrid Chats Dashboard Details. Tools
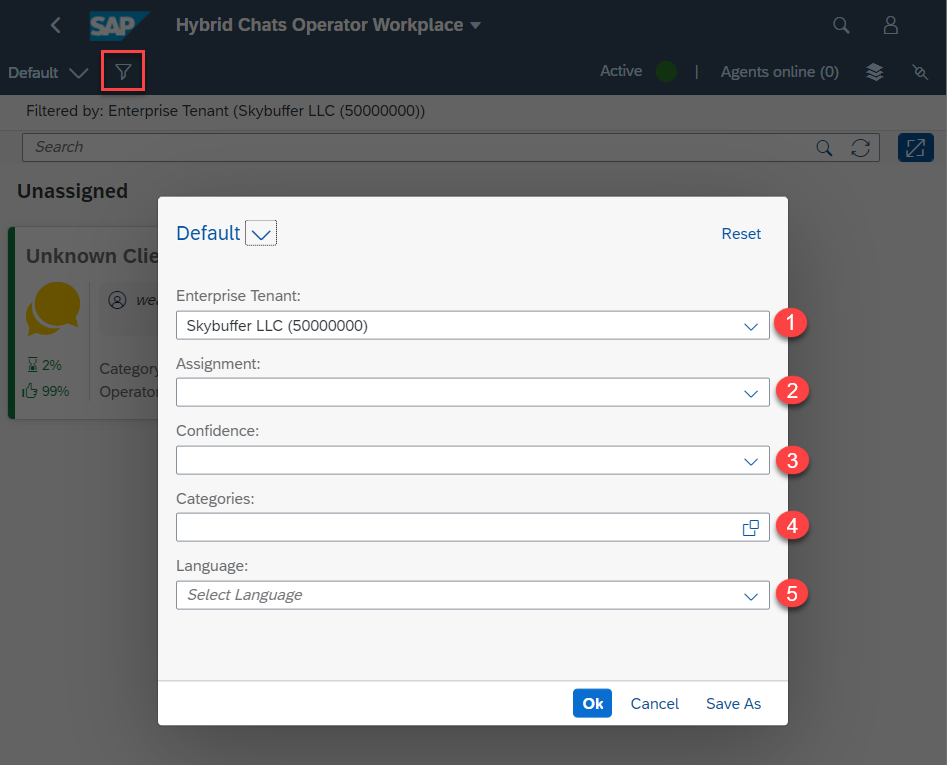
There are filters according to which the operator can view conversations on the dashboard.
There are 4 types of filters:
1) Enterprise tenants
2) Assignment. This filter is based on the operator’s assignment, its absence, or others.
3) Confidence. This filter is based on the conversation confidence level: Reliable, Doubtful or Weak
4) Categories. This filter shows conversations for selected categories only.
5) Language. This filter shows conversations for selected languages only.
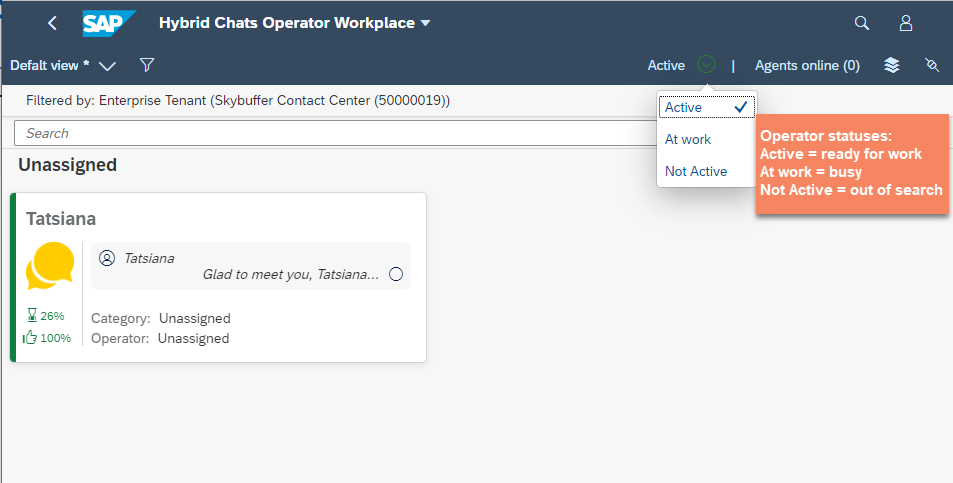
There is an option for the operator to manually change their status of availability:
Other navigation tools include:
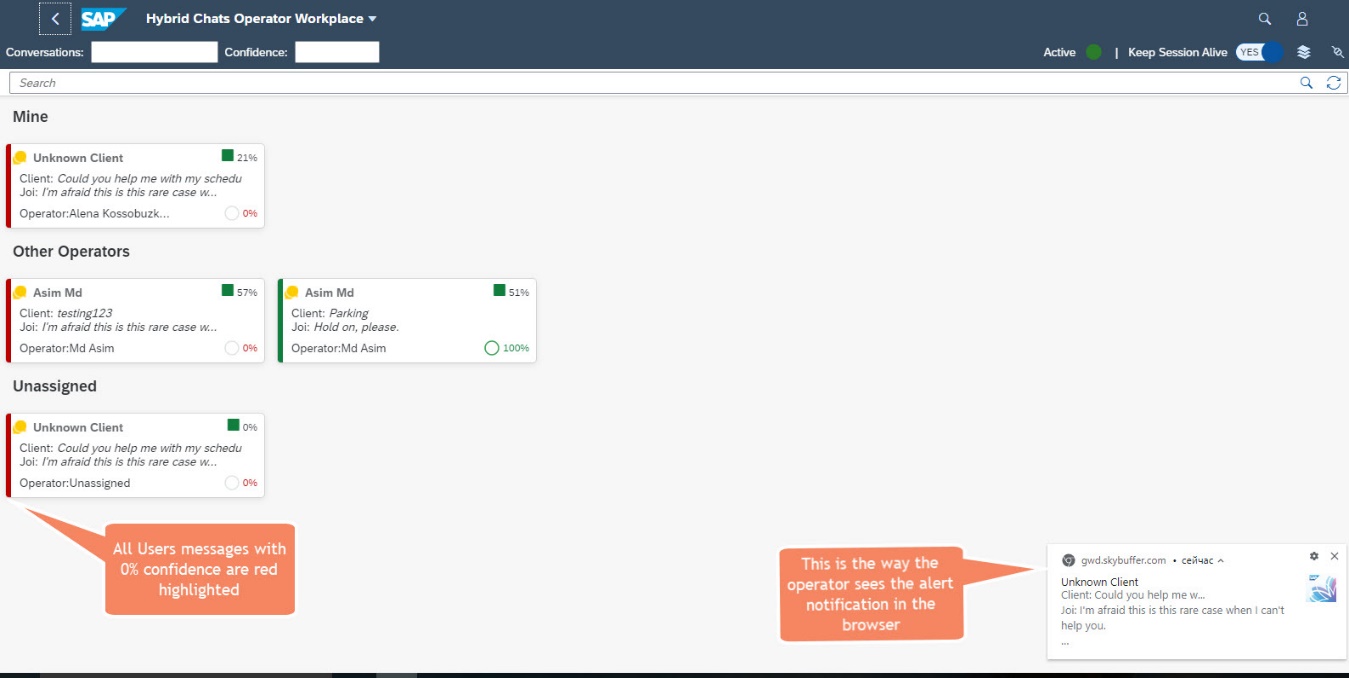
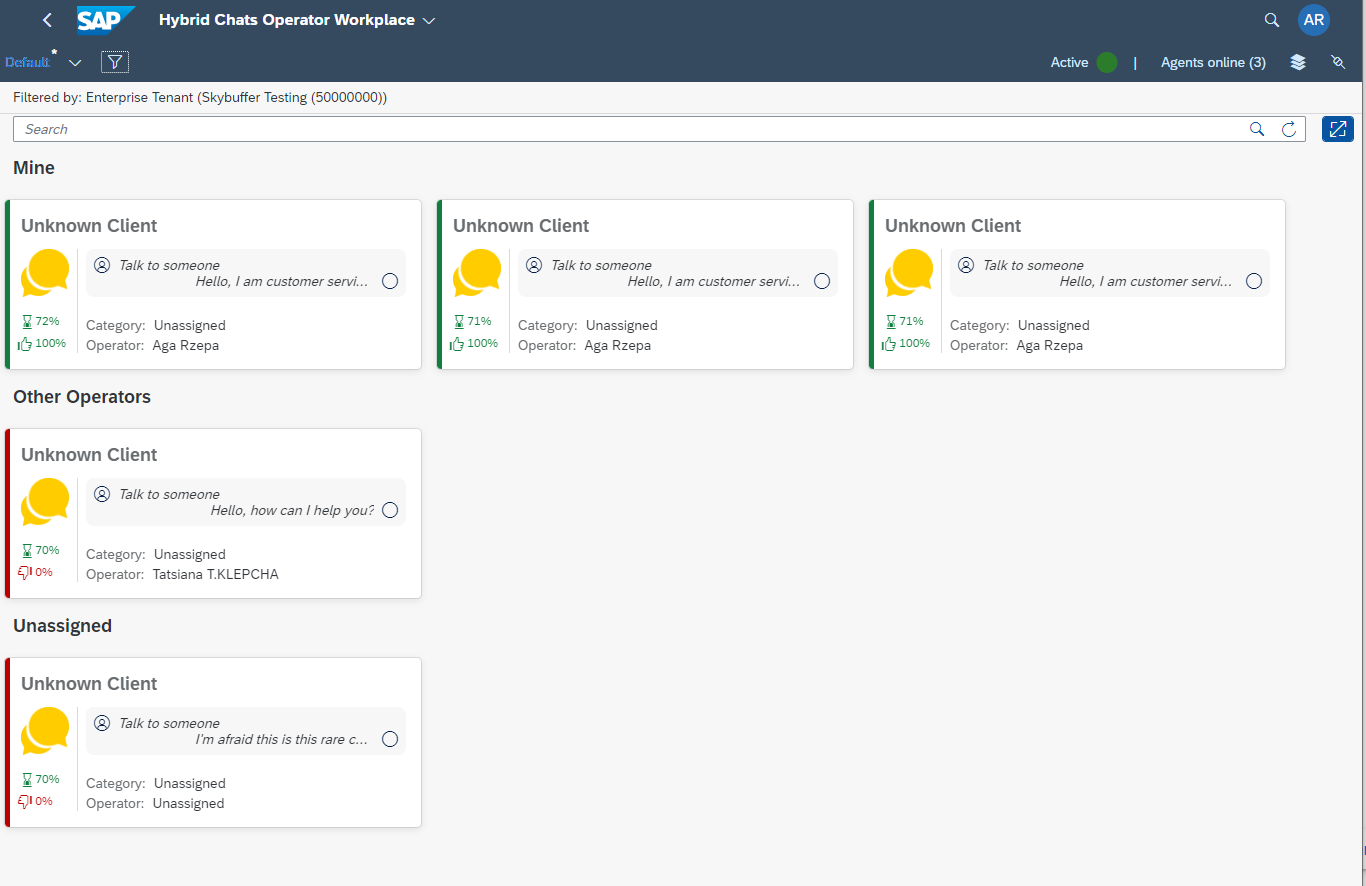
The dashboard shows all the conversations (selected on the basis of certain criteria as described above, or all existing ones), so the operator can monitor the course of all conversations and react immediately should there be any case requiring their involvement – e.g. when the chatbot fails to recognize the request correctly. Such dialogues are immediately highlighted red, and all the operators online are sent an alert notification so that they could promptly join a particular conversation and provide their assistance.
These settings of sending notifications can be customized according to the Customer’s preferences.
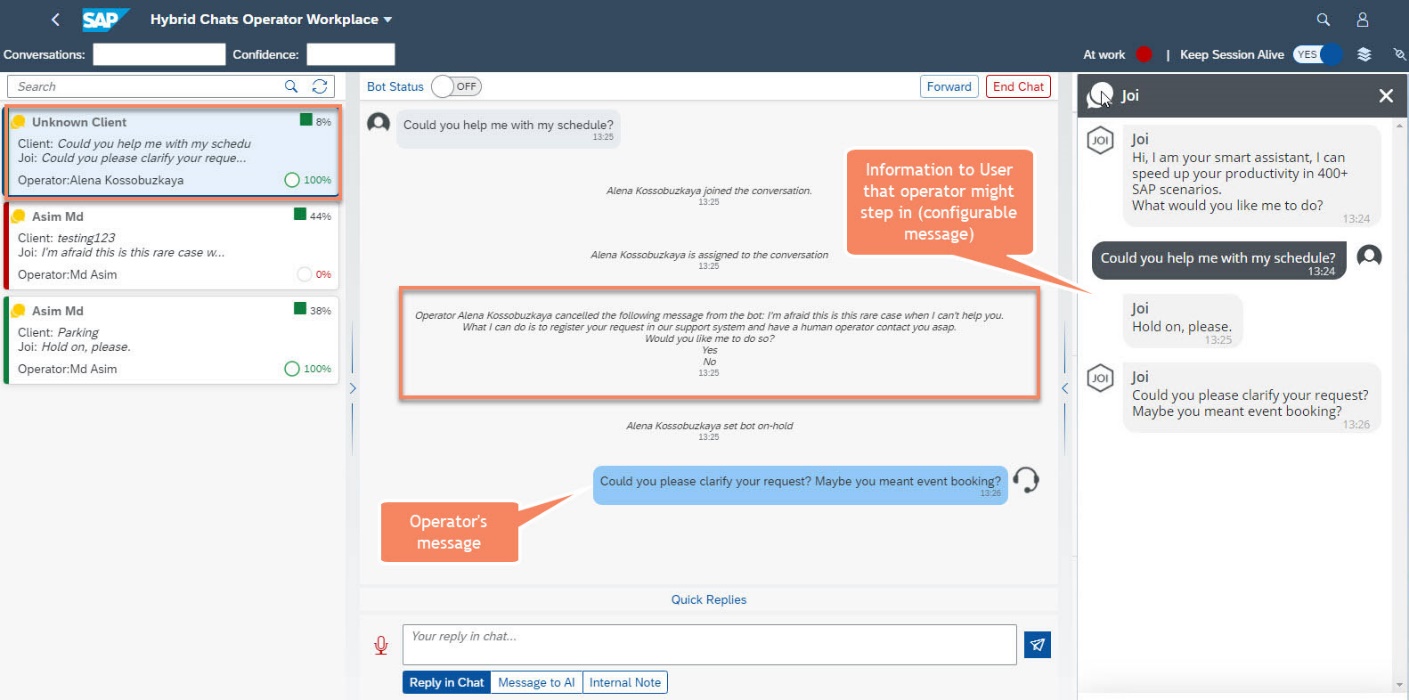
As soon as the operator clicks this pop-up notification, they are immediately in this dialogue in the Hybrid Chats and are automatically assigned to it as the processing operator. The fallback message gets cancelled, the user can only see the phrase “Hold on, please” until the operator provides their reply to the user from the Hybrid Chats, or sends a special message to the bot triggering its necessary skill.
Note: Please make sure you allow the Hybrid Chats application to send notifications (here is how you can manage it in Chrome)
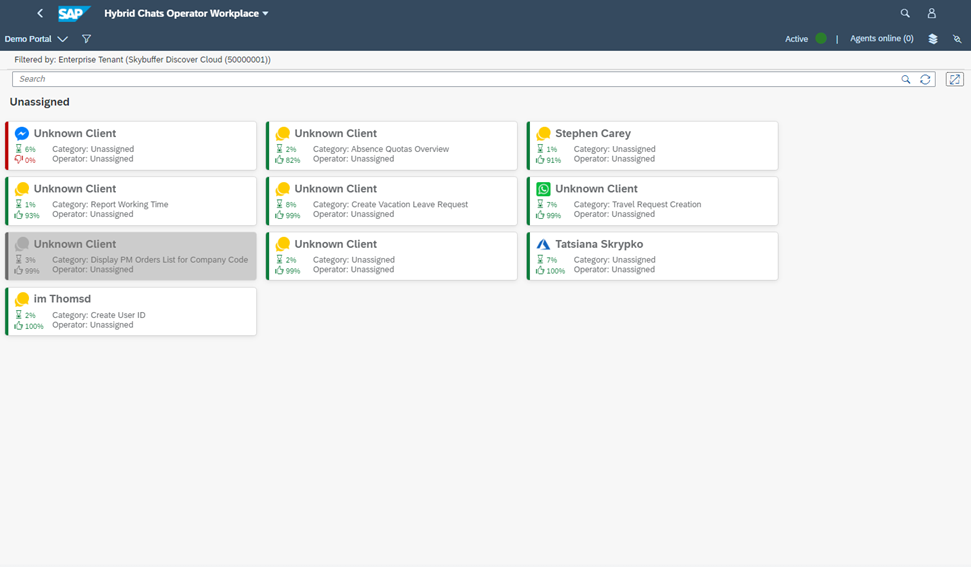
There is a possibility to minimize size of the conversation tiles on the Operator Workplace dashboard. This functionality allows to see the full picture and consistently decide on the item to focus on during the high load period.
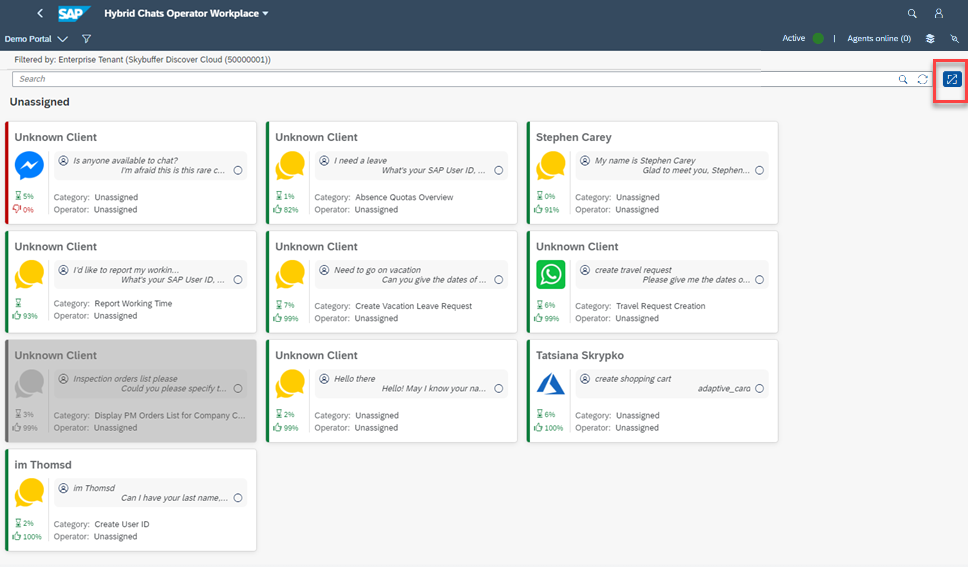
Step 4: Tickets Grouping and Distribution
Hybrid Chats can receive a big amount of conversations at once. Often customer agents/ operators are working online to process the chats. There are a few tools built in to manage tickets distribution between operators.
1) Automatic Tickets Distribution
All incoming conversations are automatically distributed to all operators with status “Active” or “At work”. The algorithm takes current workload into consideration, and tried to evenly share chats between operators. Operators who are still online but will activate status “Not Active” will not be assigned any new conversations.
To view conversations only conversations distributed to me, toggle this option in filters menu.
Mind that switching off distributed filter does not stop distribution process itself. It only affects the view in the page.

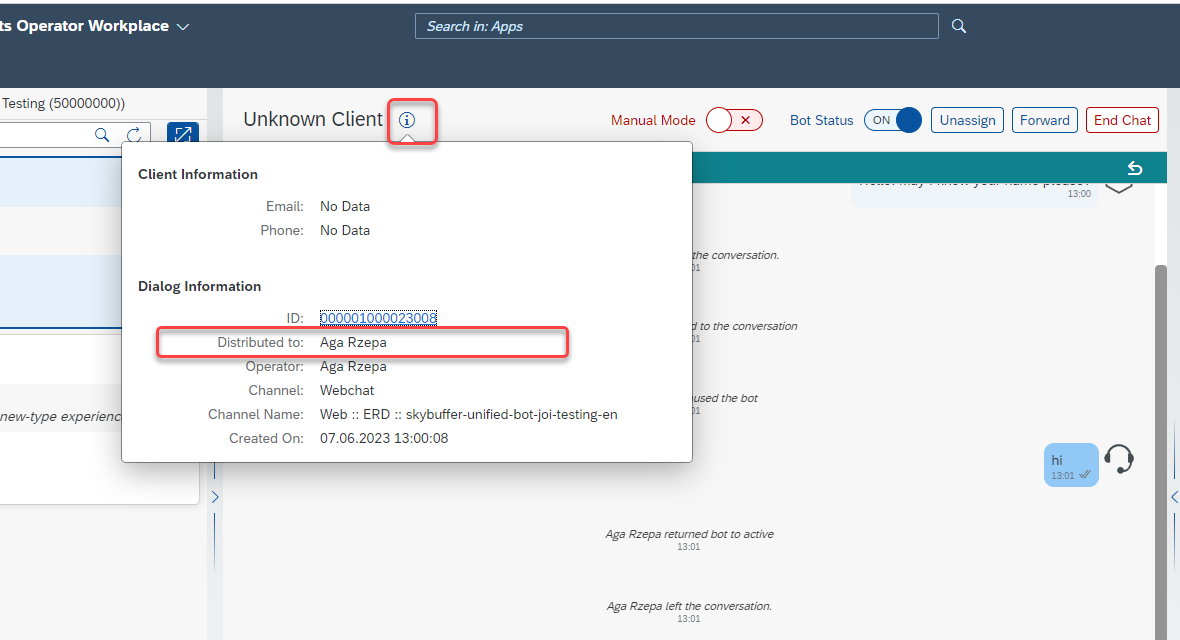
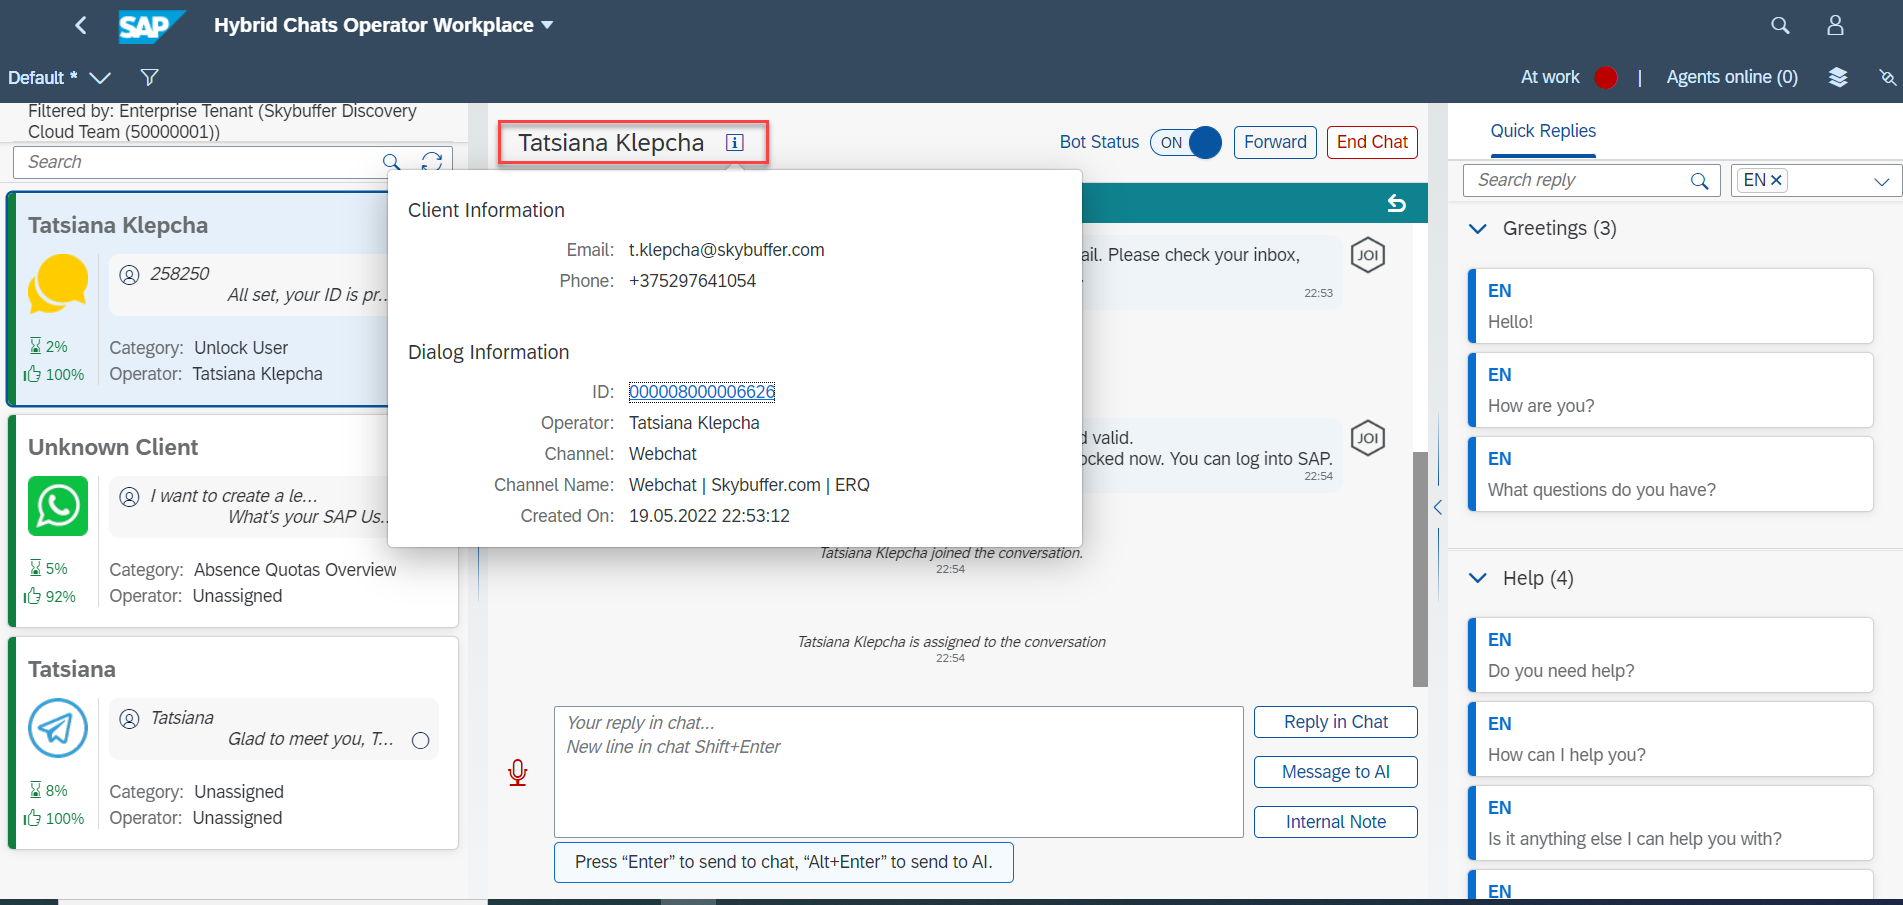
It is possible to view to whom the conversation is distributed, by opening the conversation, clicking on “information” icon to the right of client name, and checking the “Distributed to” field.
Example use case:
There are 50 active conversations on the OWP board. There are 5 active operators currently online. That means that each operator will have 50 / 5 = 10 conversations distributed to him/ her.
Next, additional operator starts work and signs in to OWP. Four new conversations appear. Algorithm will attempt to evenly divide the new chats. In this case the operator who just started working will get all the new 4 conversations distributed to him, because compared to others he had the lowest (zero) chat workload.
2) Ticket Assignment
Just because a conversation is distributed to a certain operator, doesn’t mean this it is assigned to him. While distribution happens automatically, ticket assignment happens only on specific operator action. This can be sending message to user, or clicking on “Assign to me” button.
Assignment status more than distribution specifies which operator is interacting with given conversation.
Note. It is even possible that conversation is distributed to operator A, but is assigned to operator B, for example when conversation was forwarded.
3) Grouping Tickets on OWP Board.
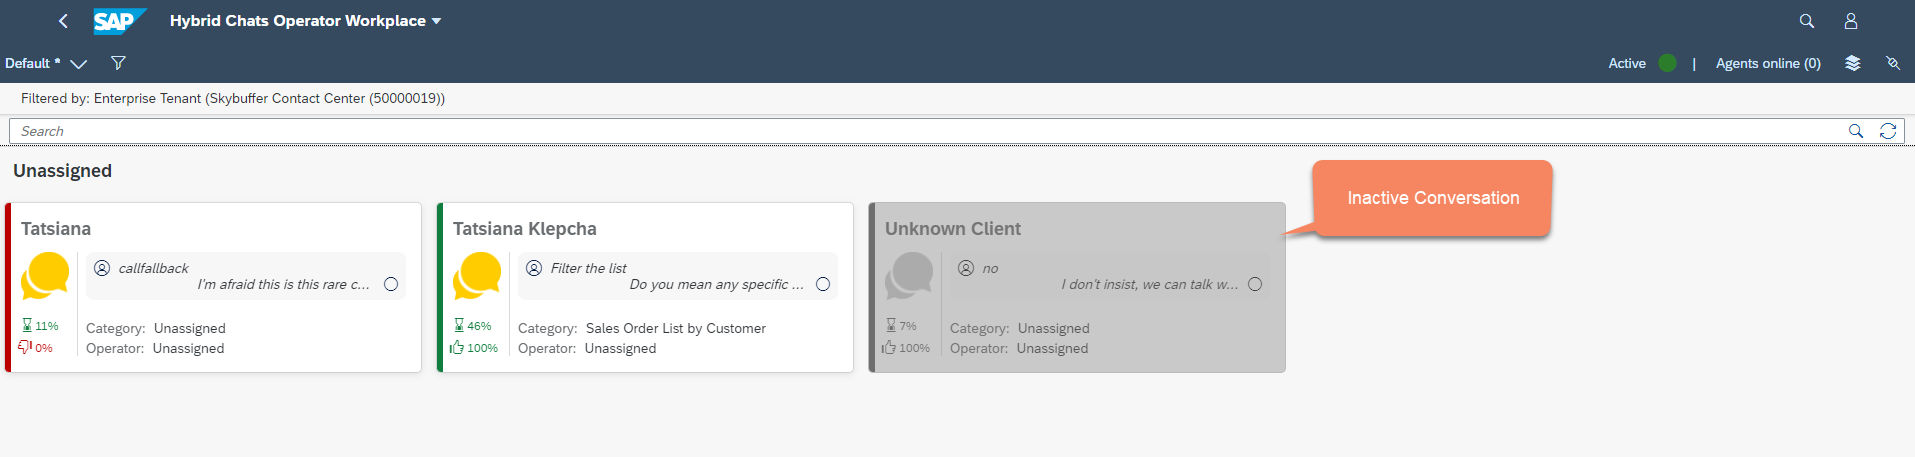
There is possibility to filter tickets based on assignment status. When “Tickets Grouping” is active, conversations are shown in “Mine”, “Other Operators”, “Unassigned” groups.
Step 5: Operator Workplace Dashboard Details
The operator can open any chat and see its detailed information including the following.
In the top left corner of the Dashboard you can see user’s name (if it is already provided). By clicking Information button near it you will receive general data about the user and the request: the user’s email address and telephone number (if they are already provided or found in the backend system), conversation ID by which it can be found and studied later on, the operator assigned to this dialogue (if assignment is already completed), channel type, channel name and creation date and time.
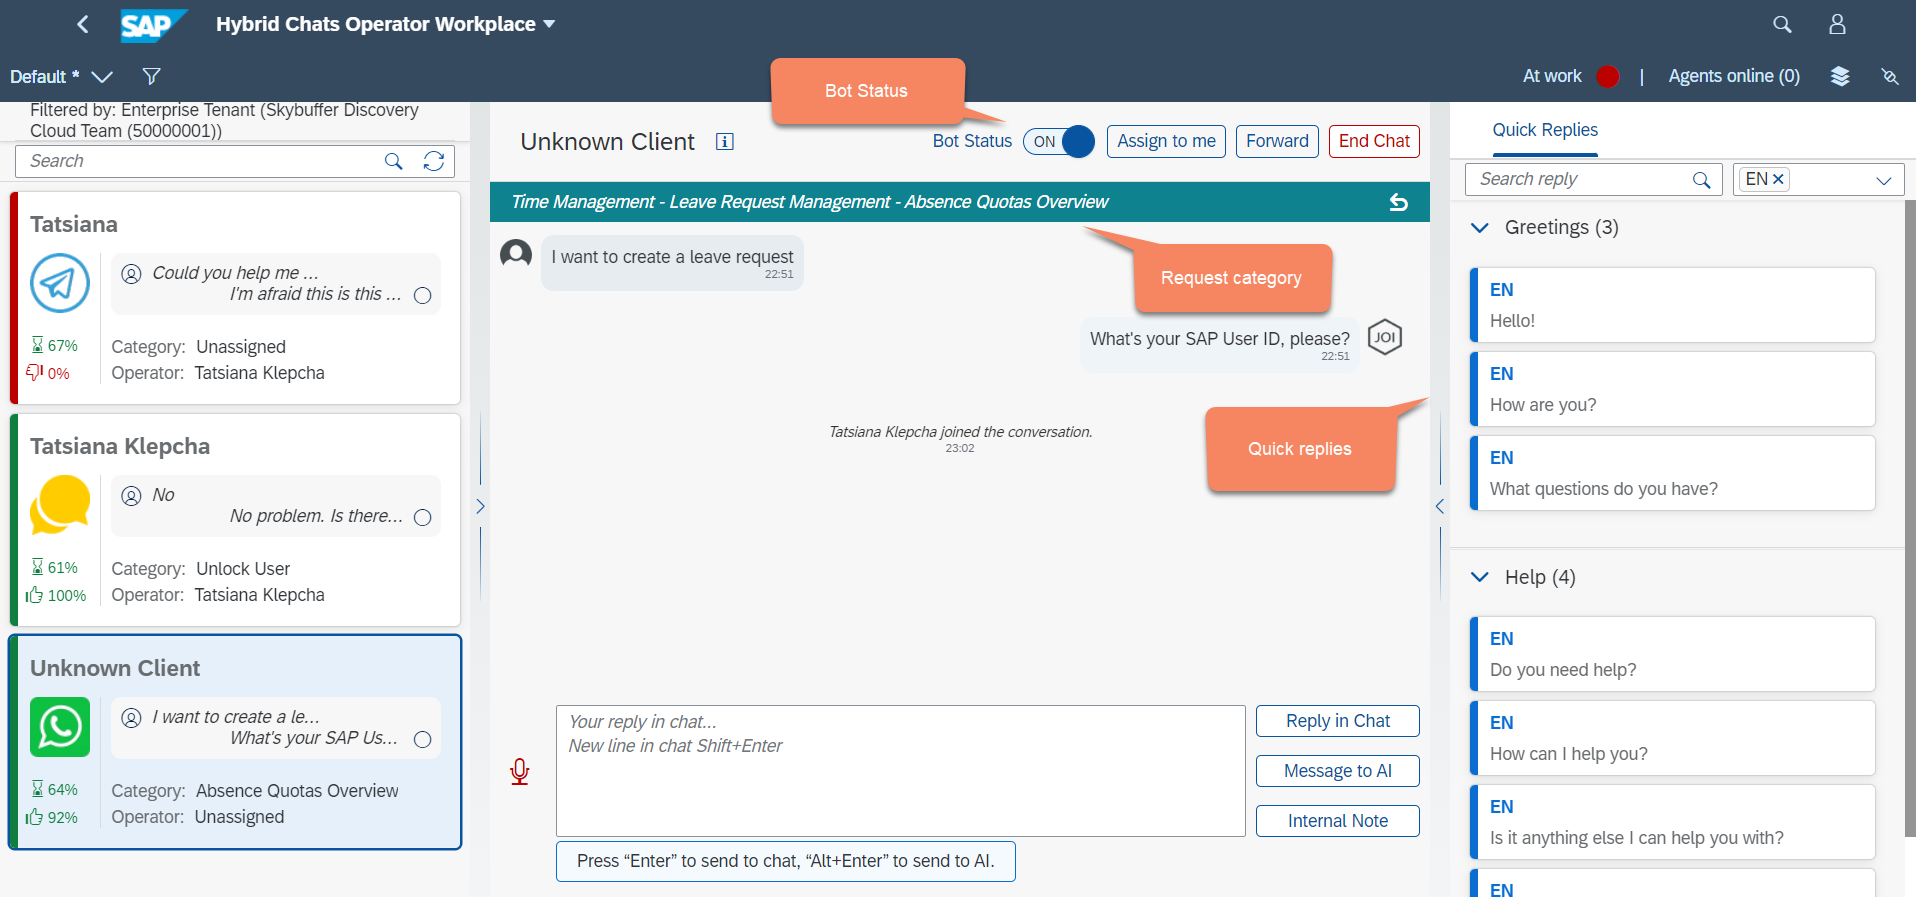
At the top of the Dashboard, you can find the Request categories (up to 4 levels of the request categories detected automatically, can be changed manually). Next there is the Bot status (if it is set to off, no AI is used and the dialogue can be conducted by operators only).
On the right-hand side of the dashboard, you can see the list of quick replies.
Step 6: Assignment Decision
You can assign yourselves as the processing operator to any conversation using the button of Assign to me, or transfer this conversation to any other operator with the button of Forward.
The End Chat button is used to close the current chat – for the user this dialogue will be closed.
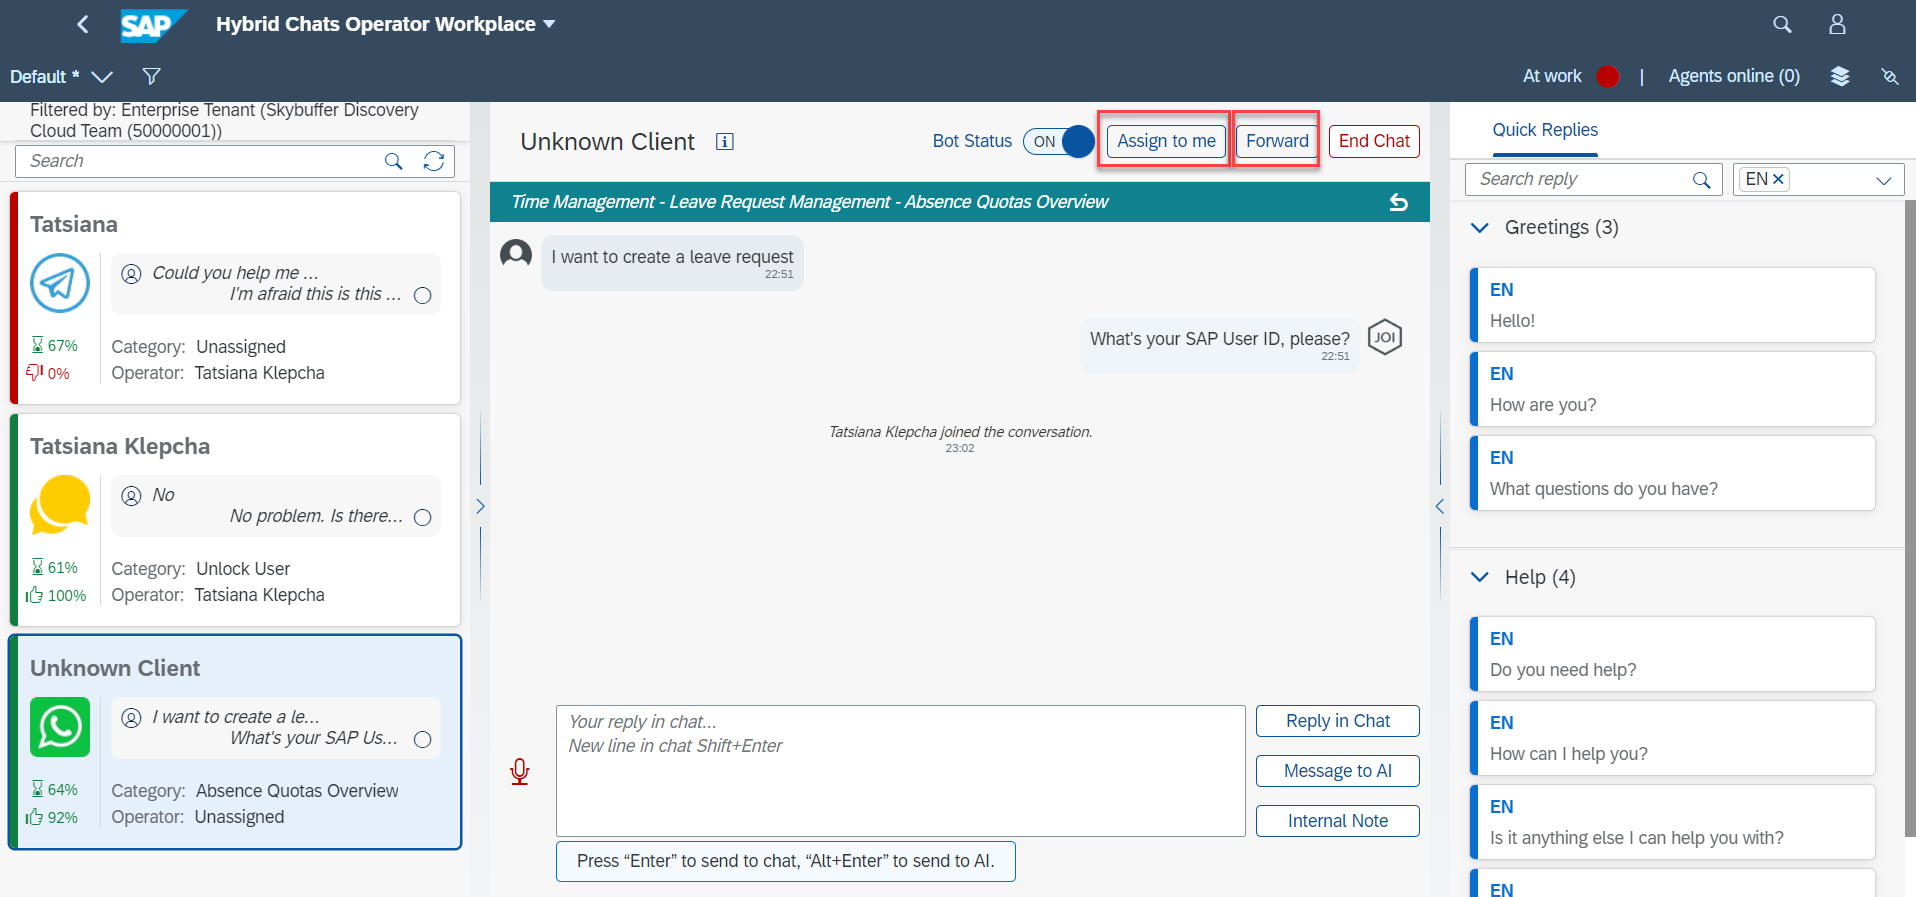
If you call to action the Forward pop-up list, you will be able to see all available operators and their teams to choose from.

Step 7: Operator’s Replies
The operator can message directly to the user from the field of Reply in Chat, and the user will see this message as coming from the chatbot thanks to the implemented seamless integration. There is an option for the operator to send a voice message, too, which will be automatically transferred to text in the chat:
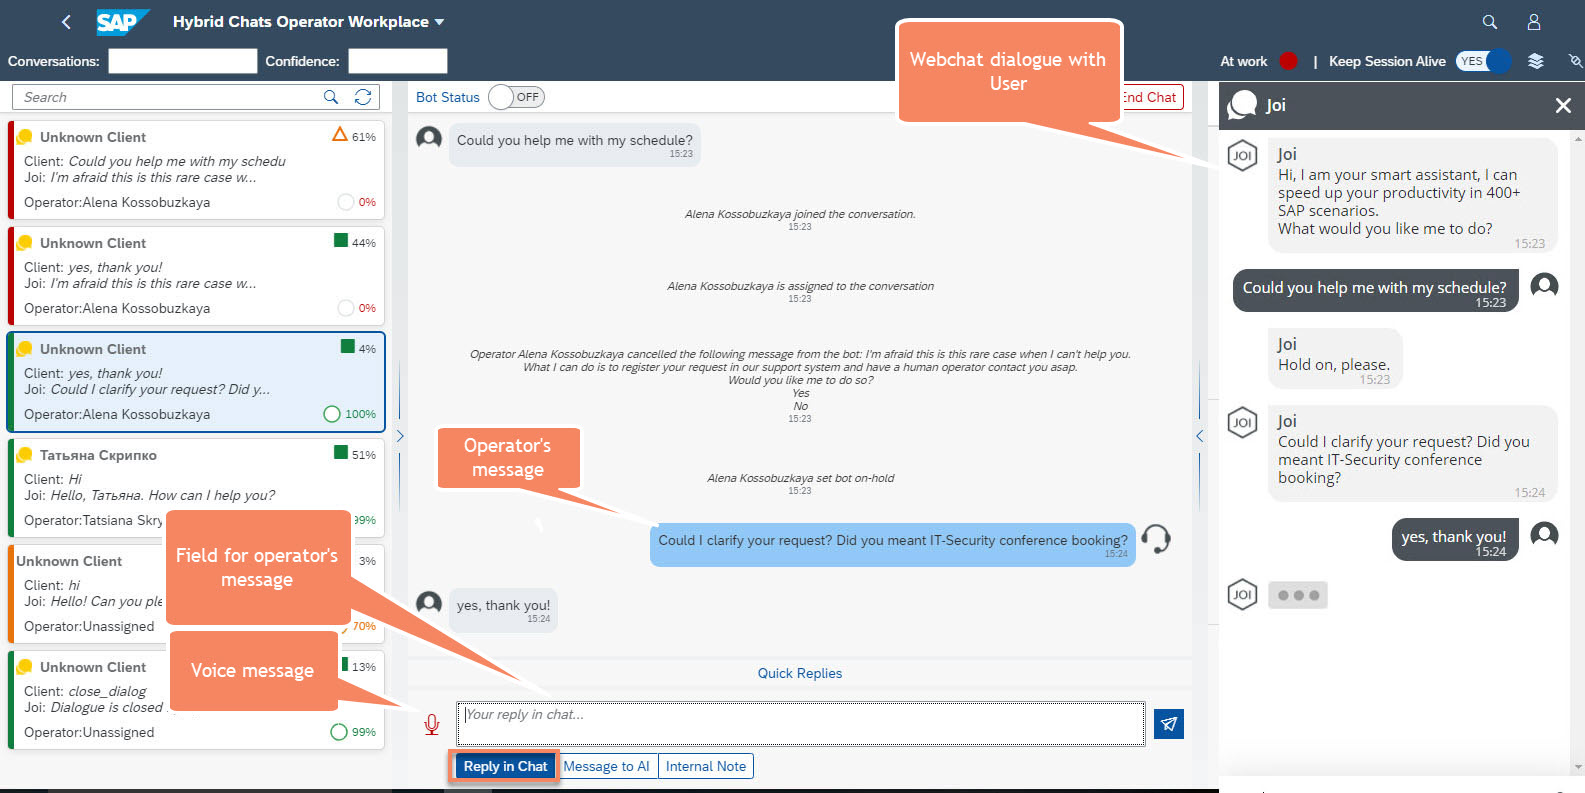
To facilitate and speed up the process of communication, the operator can make use of Quick Replies (frequently used ready-made messages) from the provided list (can be compiled for any group of users), which will be displayed in the chat with the user, too.

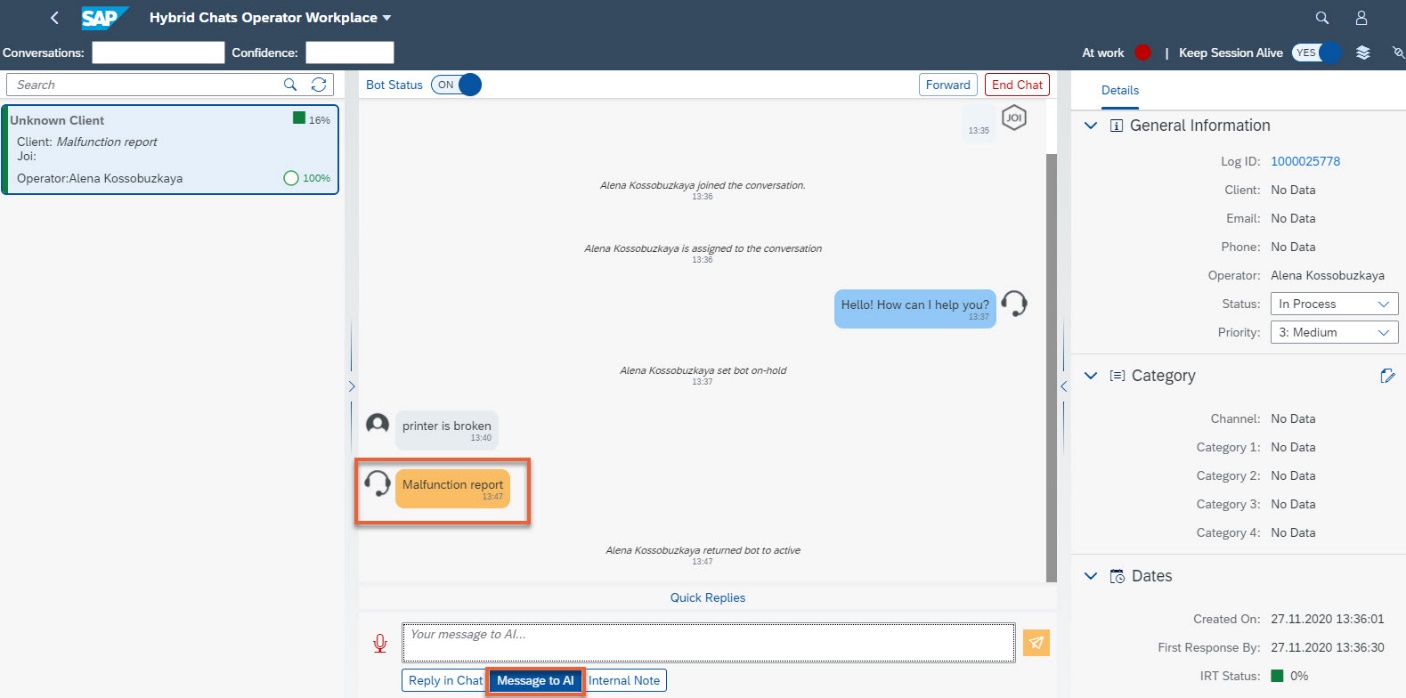
There is another option – to write to the chatbot directly if the operator knows what skill to trigger for the chatbot to successfully continue the dialogue. So, the operator can type a clear request in the field of Message to AI and send it thus activating the chatbot. This procedure will not be visible for the user.
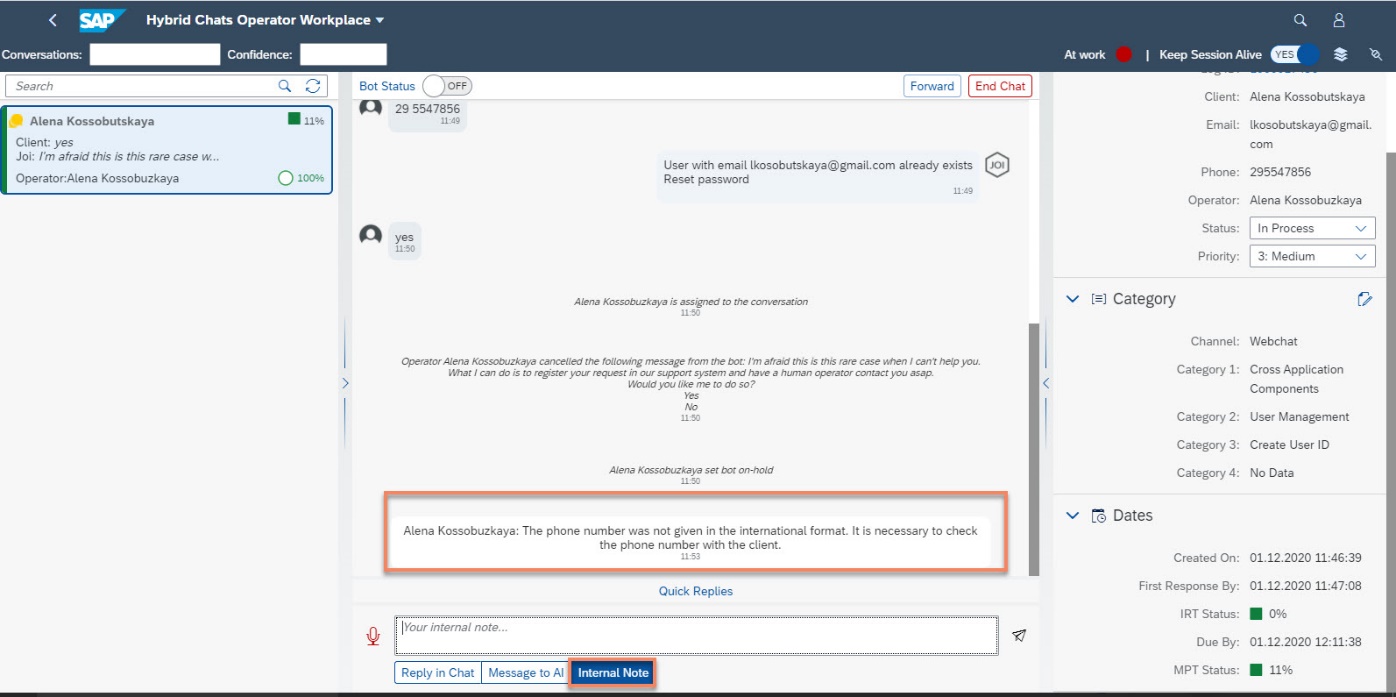
The option of Internal note. This can be some information left by the operator for the attention of the internal team. It will be saved in the system in the user’s ticket, too.
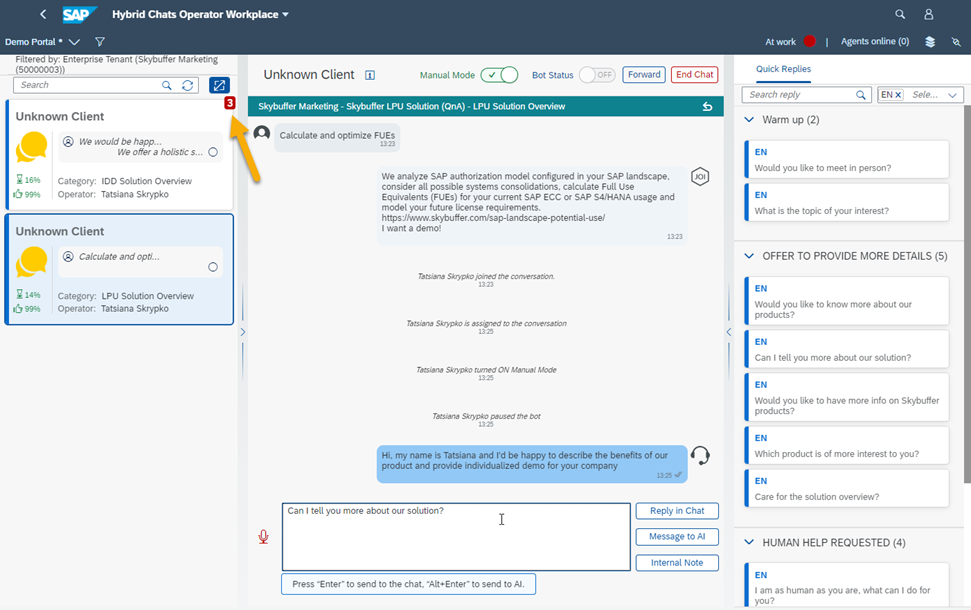
Step 8: Manual Mode
At the top of the Dashboard, you can find the Manual Mode toggle.
If it is disabled, the AI is used in the dialogue, and the Bot Status change function is also possible to use. 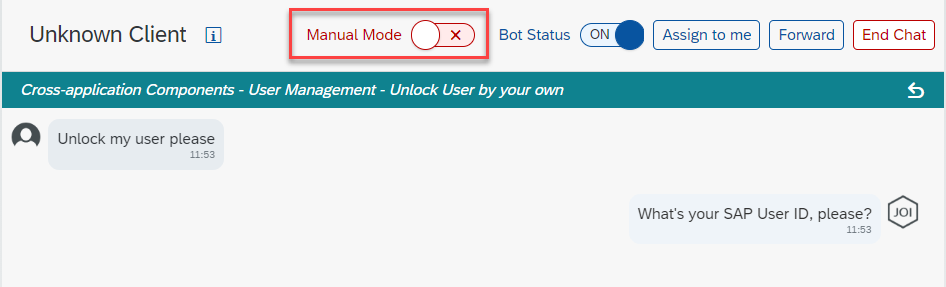
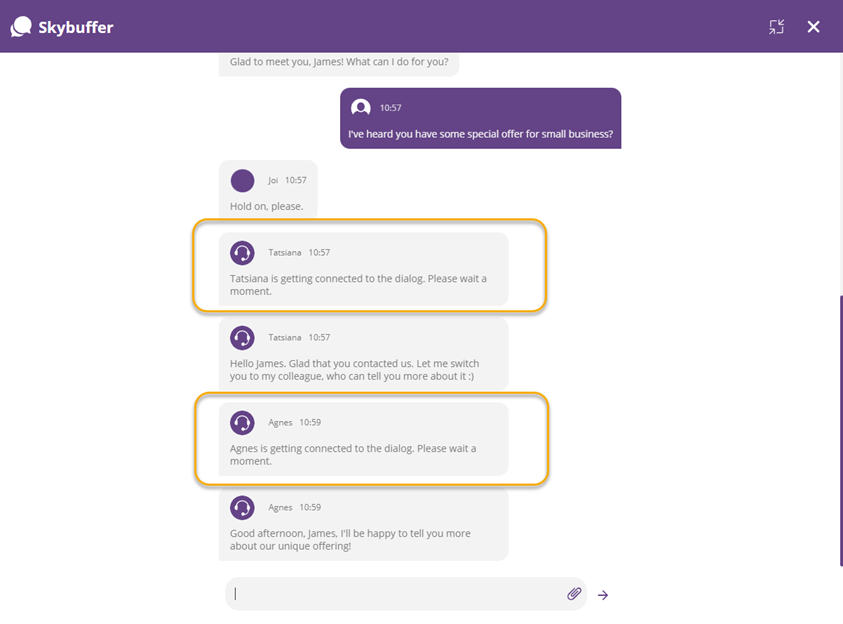
When the dialogue is switched to the manual mode, no AI is used and the dialogue can be conducted by operators only (even when all operators left the chat).
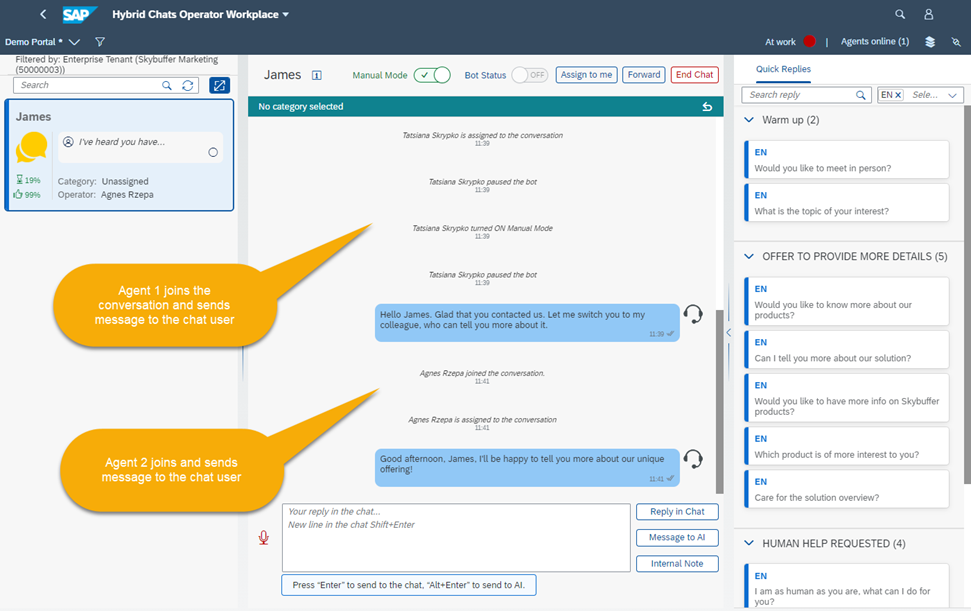
In this case, in the webchat (or other connector) the client will see a message about the operator joining. Also, there is a possibility of tracking this joining of a new operator within the same dialogue in the manual mode.
When this mode is disabled, a corresponding message appears in the user’s dialogue.
To support several conversations with users at the same time, there is a possibility to highlight new user messages on the Operator Dashboard (for My Conversations in Manual Mode). When active in one dialogue, the operator is notified about new messages from the user in another dialogue with a label showing the number of unread messages right on the dialogue tile.
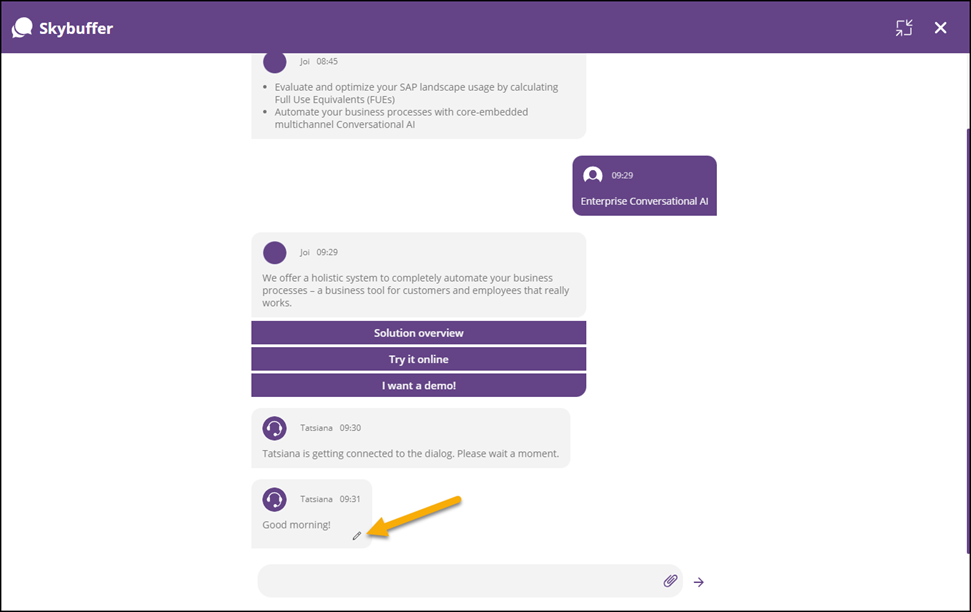
Step 9: Edit Mode and Delete Function for Operator Message
To make communication experience smooth and consistent, there is a possibility to edit and delete messages sent by the operator from HC Operator Workplace. Click the right mouse button on the operator’s message to see the context menu.
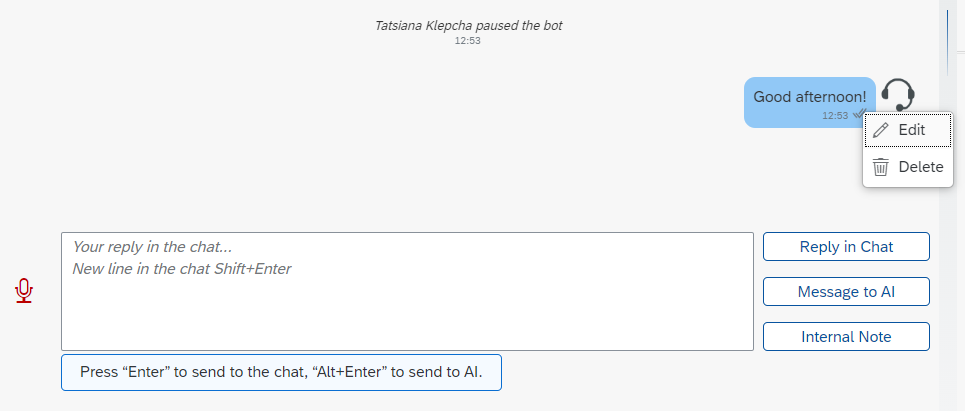
Delete and edit actions are logged in the conversation history.
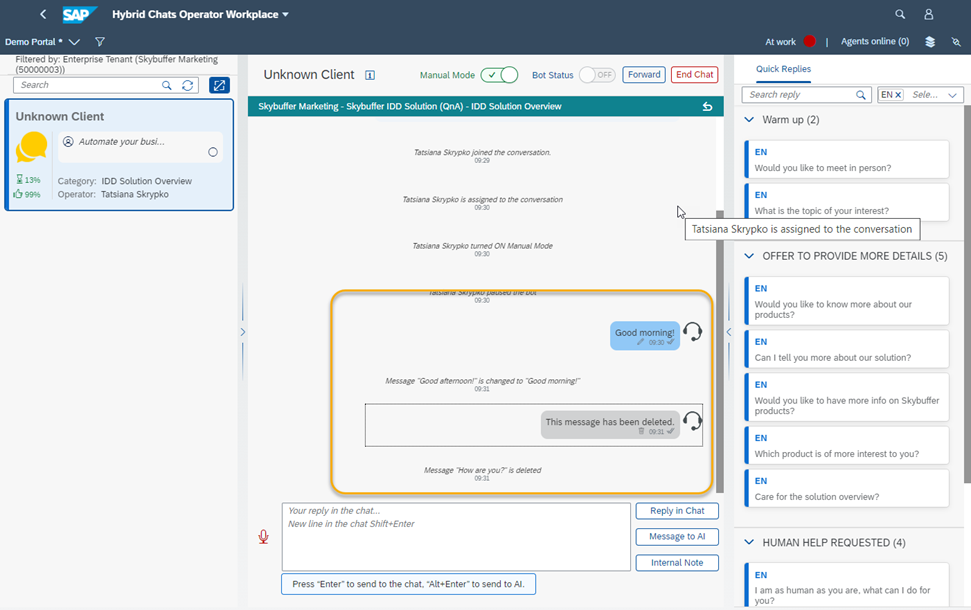
The user is notified of the edited message in the webchat.