• IDD
  • IDD
  • Skybuffer AI
    • Skybuffer AI Installation and Initial Setup
      • On Business Technology Platform (BTP)
        • Skybuffer AI Installation Guide on BTP
      • On Premise: XSA Runtime and SAP HANA EE
        • Installing SAP HANA Including XS Runtime
        • XS Deployment Process
      • Post Installation User Guide
    • AI Agent
      • AI Agent Configurator
        • Register New AI Agent
        • Intents and Entities Creation
        • Skills Creation and Management
          • Standard Action Types
          • Call SAP System Action
          • Generative AI Action
          • Document Grounding Action
          • Log Insight Action
          • Skills Orchestration Action
        • Scheduling
        • Communication Channels
          • Copy the Existing Channel
          • Skills Activation
          • Destination Assignment
          • Webchat Communication Channel Setup
          • Facebook Messenger Communication Channel Setup
          • Zoom Communication Channel Setup
          • MS Teams Communication Channel Setup
          • Slack Communication Channel Setup
          • Telegram Communication Channel Setup
          • Viber Communication Channel Setup
          • WhatsApp Communication Channel Setup
          • Background Execution Communication Channel Setup
        • Monitor Section
      • Business AI Scenarios
      • Document Grounding Hub
      • Destination Management
      • Models Hub
      • Identity Providers
      • Survey Craft
      • Predefined Response Translator
    • AI Connector
      • AI Connector Configurator
      • AI Connector Logs
      • AWS Integration
      • Twilio Integration
    • SAP Backend for Business AI
      • Business AI Scenarios Package Administration
        • Installation Guide
        • Uninstallation Guide
      • Business AI Scenarios Package Maintenance Guide
        • Product License
        • Configuration of Email Sending Mechanism
          • Configuration Settings
          • Setup of Specific Email Sending Control
        • Technical User Setup
          • Central oData Service Authorization Role Maintenance
          • Technical User ID Creation
        • Assigning Business AI Scenarios to ABAP RIK Classes
        • Simplified User Creation Scenario Setup (Without Approval Workflow)
          • Maintain and Assign Reference Users for User Creation Scenario
          • Activate Notification for New User Creation (Optional)
        • User Creation Scenario Setup with Approval Workflow
          • Configure Approval Workflow for User Creation Scenario
          • Set Up Approval Steps for Different User Types Creation
    • HOW-TO Guides
      • MS Teams Integration. Single Sign-On
        • Create Azure Bot Service
        • Configure Azure Bot Service and Connect to the AI Agent MS Teams Channel
        • Create Middleware SSO Application
        • Configure Bot Service Application SSO
        • Create Azure AD Enterprise Application for SAP Backend
        • Configure oAuth2 in SAP System
        • Assign Identity Provider in AI Agent Channel Configuration
        • Deploy Your App into Microsoft Teams
        • Managing Application Keys
      • Skybuffer AI PoC Setup
        • SAP BTP
      • SAP AI Core Integration. Ollama Server Setup
      • MS SharePoint Integration. Add-in Registration
    • Troubleshooting
      • Edge Browser Access Issue
    • Hybrid Chats
      • Hybrid Chats Maintenance Guide
        • Business and Technical Users Setup
          • Create Business and Technical Users
          • Create Business Partners
        • Tenant Configuration
        • Live Pool Management and Configuration
          • Start Live Pool
          • Manage Live Pool
        • System Configuration
          • Configure Status Profile
          • Set Up Technical Messages for Hybrid Chats
        • Hybrid Chats Configuration
        • Hybrid Chats Categorization
          • Categorization Management
          • Categorization Mapping
          • Translate Categories
      • Hybrid Chats User Manual
        • Hybrid Chats
          • HC Archive Mode
          • HC Active Mode
        • HC My Data
          • Edit Personal Data and Profile Picture
          • Default Settings Management
          • Notification and Dialogue Manual Mode Management
          • Quick Replies Management
            • Standard User Mode - Quick Replies
            • Administrator User Mode - Quick Replies
        • HC Analytics
          • HC Analytics
          • Operator Activity Analytics
          • Exit Survey Analytics
        • HC Teams
          • Access HC Teams Application
          • Create New Team
          • Create New Team Member
          • Edit Agent
          • Edit Team Name

Slack Communication Channel Setup

33 views 0

Channel Creation

Step 1. Open the AI Agent Configurator application in the AI Agent group.

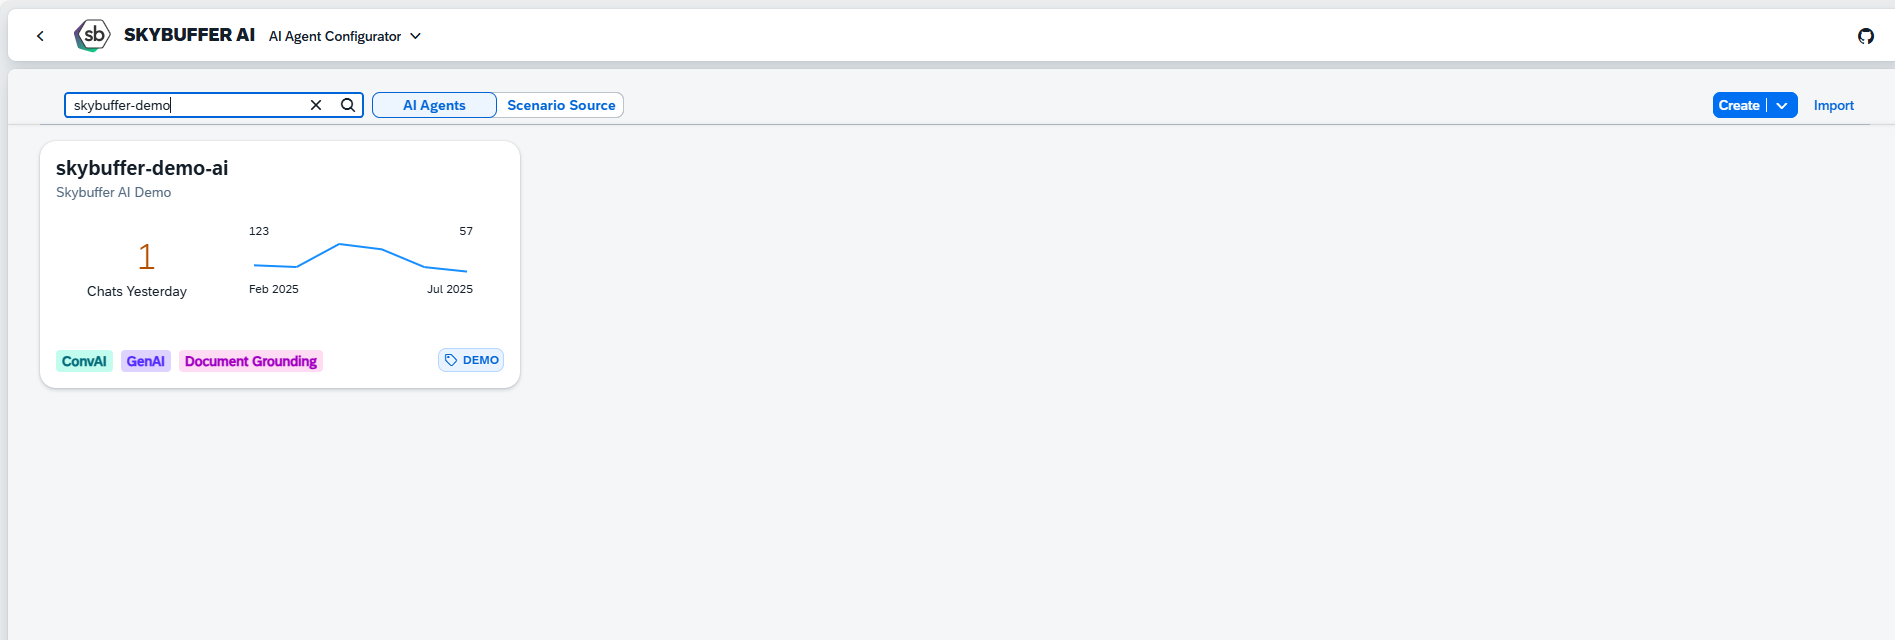
Step 2. After opening the application, you will see a screen displaying all available AI Agents. Each tile represents one Agent, including its name, description, and deployment status. Click on the Agent you want to work with to proceed.

Step 3. Open the Channel management application- Communication Channels.

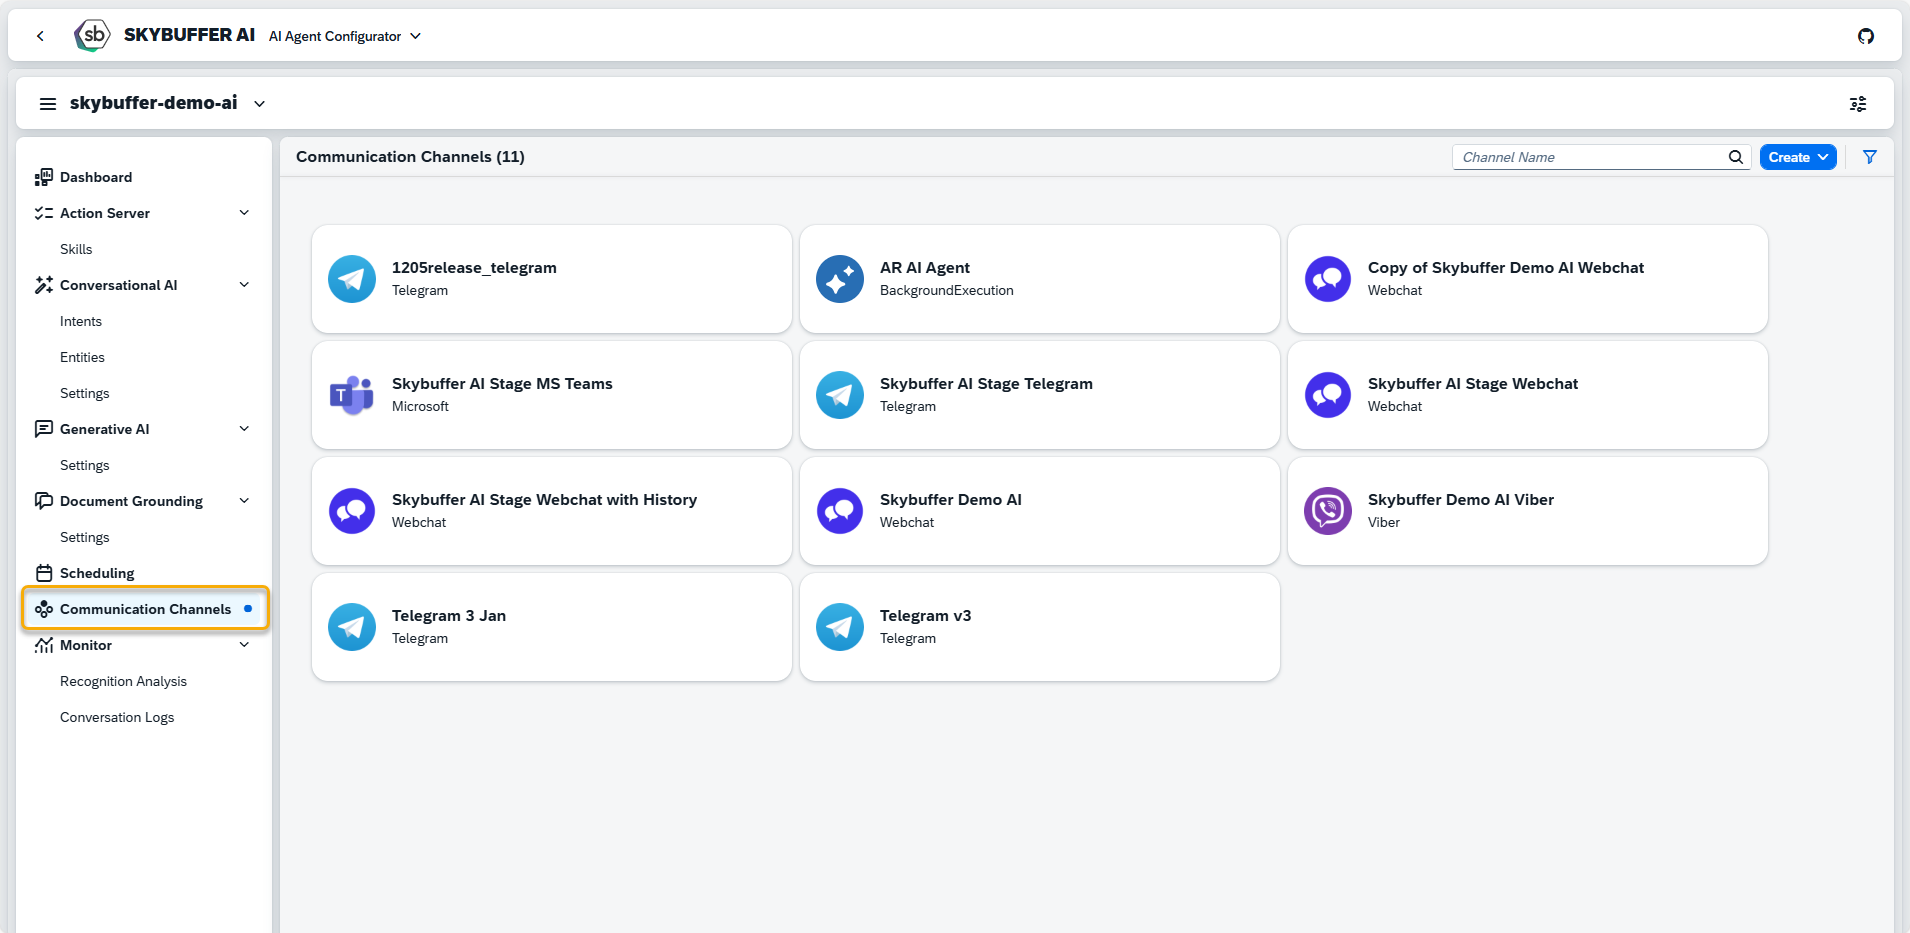
Step 4. Channel creation.

You can create a new Channel from scratch or Copy the Existing Channel.

To create a new Channel, click the Create button:

Step 5. Initial Parameters

Fill in the initial parameters for the new Channel. The form includes:

  • Channel Name — follow your organization’s naming convention.
  • Channel ID — this field is auto-generated.
  • Channel Type — select from a list of available types (e.g., Webchat, Microsoft, Telegram).

To fill out the fields for Slack Integration refer to Steps 6 – 13.

Step 6. Fill in the remaining fields. Those values come from Application Data in Slack. Check up section Setting up Slack Application to learn more about the process on the Slack side.

Slack Application ID – access Basic Information/ App Credentials/ App ID field in Slack for this value.

Verification Token – access Basic Information/ App Credentials/Verification Token field in Slack for this value.

AI Model User OAuth Token – access OAuth & Permissions/Bot User OAuth Token field for Slack for this value.

Setting up Slack Application

Step 7. Go to https://api.slack.com/apps and click Create New App:

Obraz zawierający tekst, zrzut ekranu, oprogramowanie, Ikona komputerowa Opis wygenerowany automatycznie

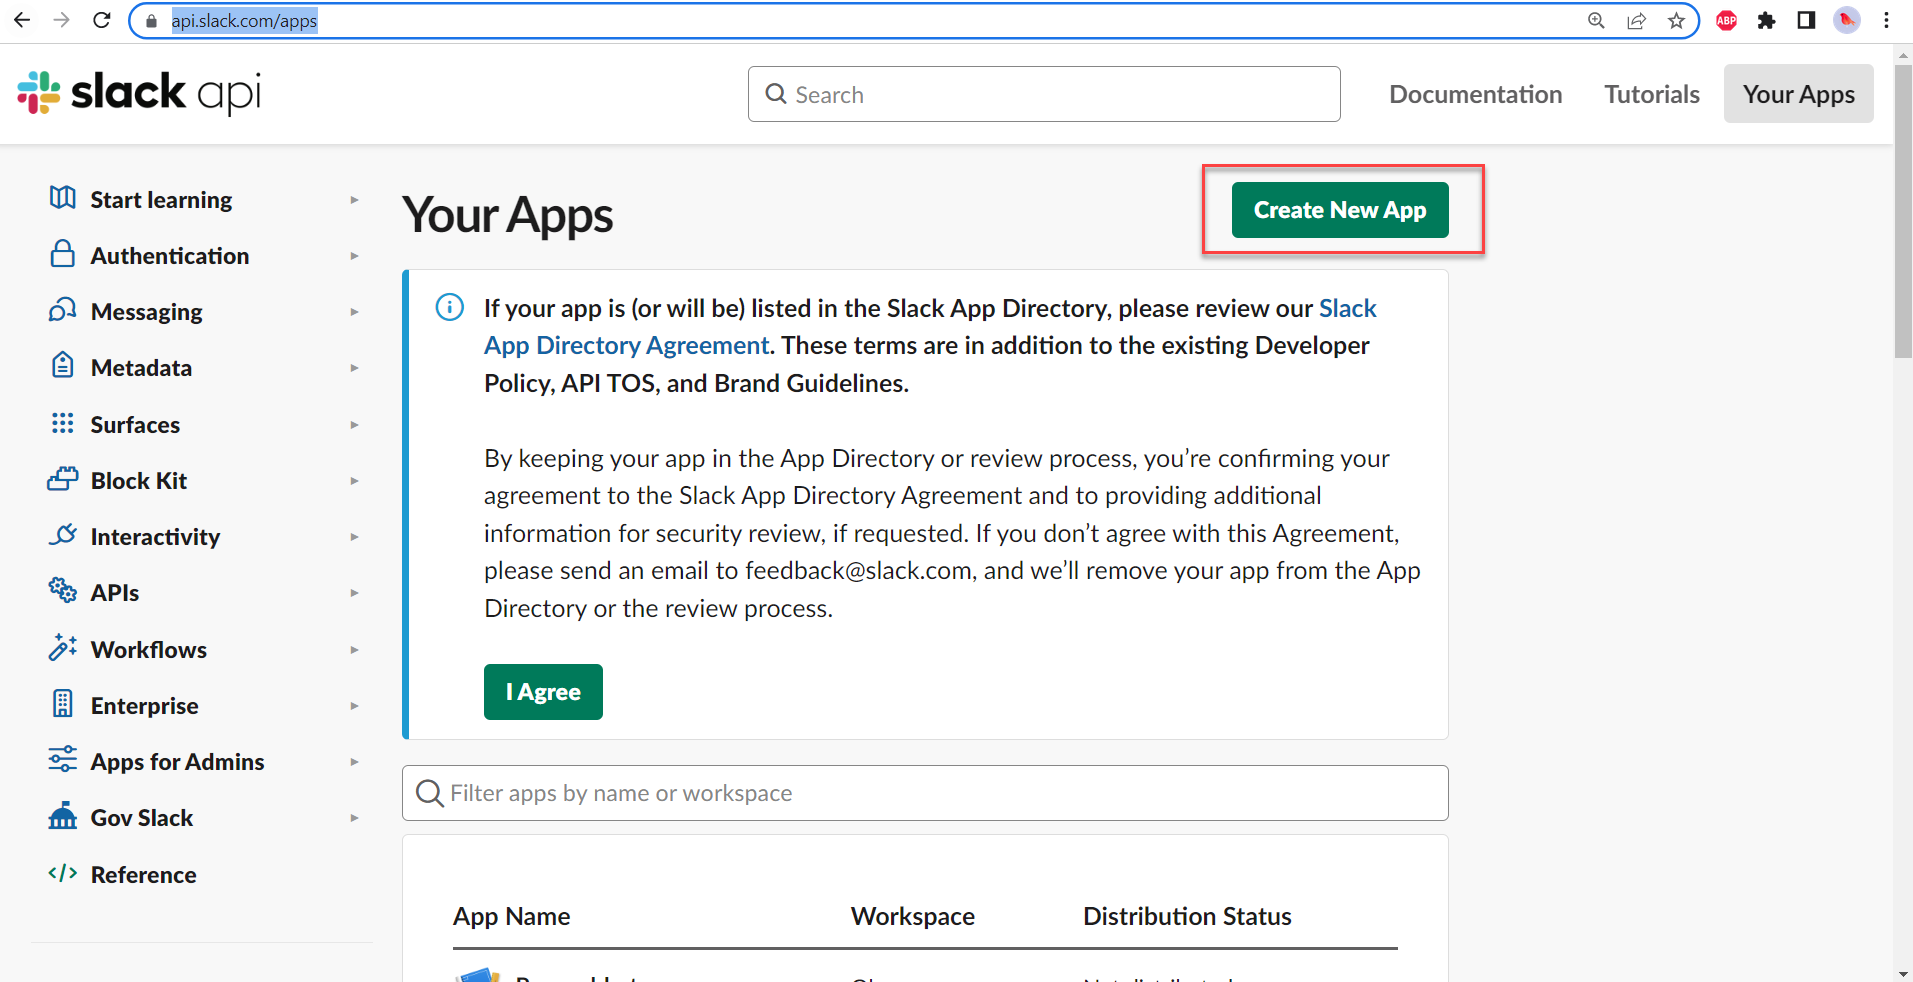
Select the manifest option:

Obraz zawierający tekst, zrzut ekranu, oprogramowanie, Ikona komputerowa Opis wygenerowany automatycznie

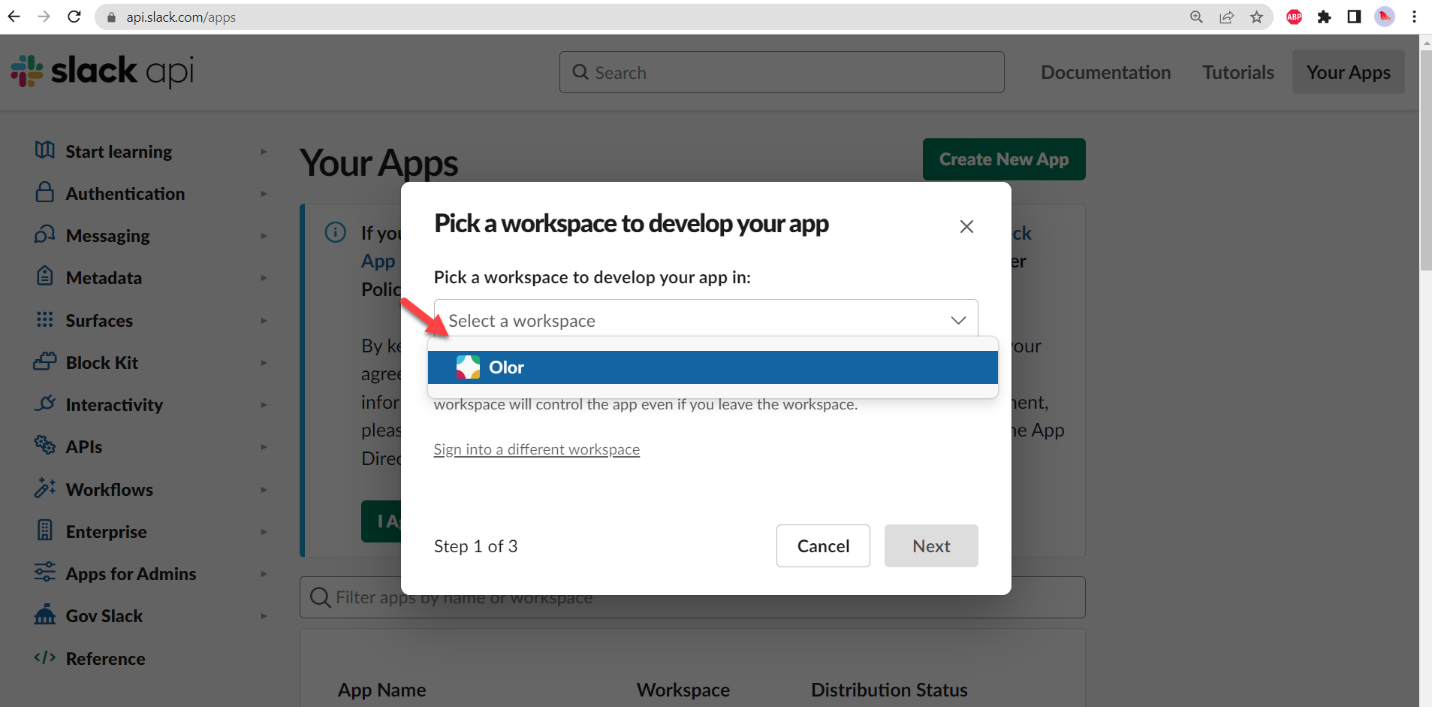
Select the workspace:

Obraz zawierający tekst, oprogramowanie, Ikona komputerowa, Oprogramowanie multimedialne Opis wygenerowany automatycznie

Navigate to JSON tab:

Obraz zawierający tekst, oprogramowanie, Ikona komputerowa, Oprogramowanie multimedialne Opis wygenerowany automatycznie

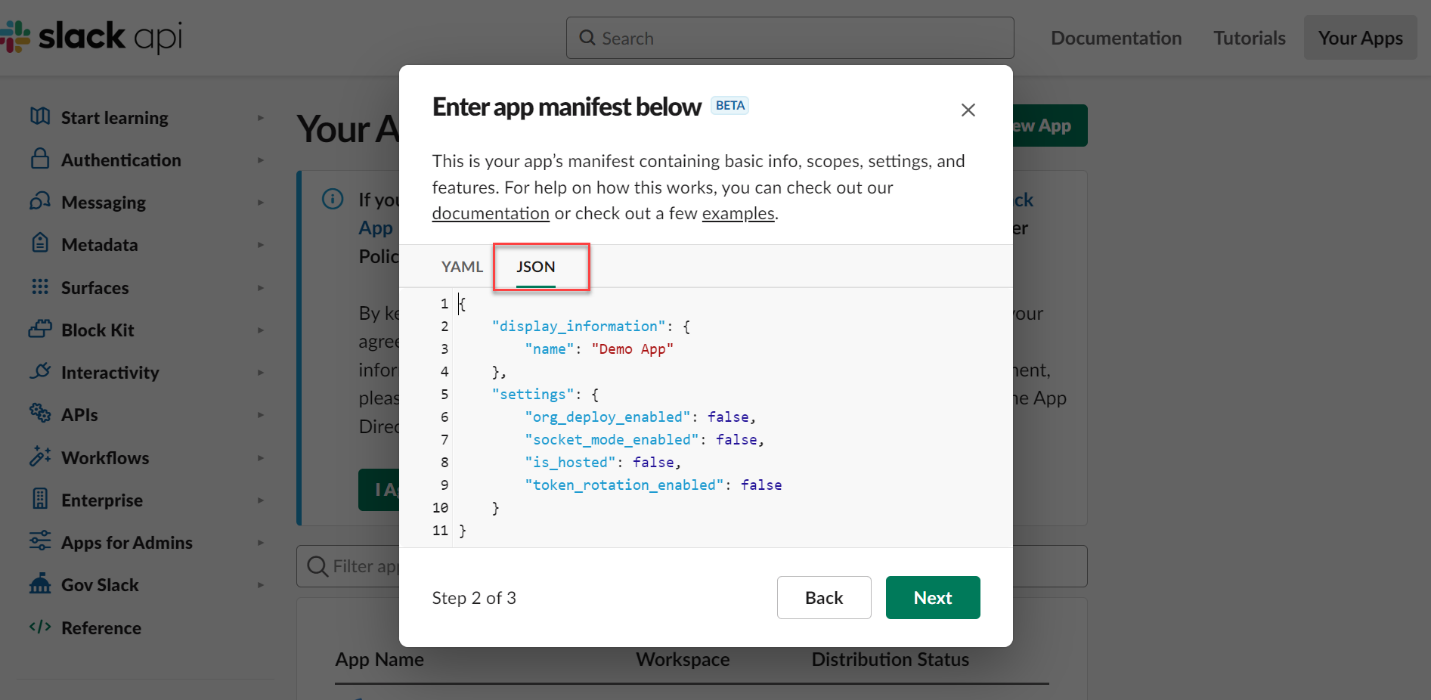
Step 8. Prepare the manifest file.

Here is a sample manifest you can copy and update accordingly:

{
“display_information”: {
“name”: “Slack AI Model”,
“description”: “An example app”,
“background_color”: “#523bd9”,
“long_description”: “An example app that can display actionable notifications in Slack. App contains all the necessary scopes to find a channel for publishing, and to publish a message. Enables Interactivity features to handle use of the interactive elements of the notification. Used with tutorials on api.slack.com/tutorials.”
},
“features”: {
“app_home”: {
“home_tab_enabled”: true,
“messages_tab_enabled”: false,
“messages_tab_read_only_enabled”: false
},
“bot_user”: {
“display_name”: “Skybuffer-Preprod”,
“always_online”: true
}
},
“oauth_config”: {
“redirect_urls”: [
“https://example.com/slack/auth”
],
“scopes”: {
“user”: [
“users:read”
],
“bot”: [
“channels:read”,
“chat:write”,
“chat:write.public”,
“incoming-webhook”,
“links:read”,
“channels:history”,
“im:history”,
“app_mentions:read”,
“files:read”,
“users:read”
]
}
},
“settings”: {
“event_subscriptions”: {
“request_url”: “https://example.skybuffer.com/123123-abcd-1234-1234-aa11aaa1f502/slack”,
“user_events”: [
“user_profile_changed”
],
“bot_events”: [
“app_mention”,
“channel_created”,
“channel_deleted”,
“channel_rename”,
“file_created”,
“file_public”,
“file_shared”,
“link_shared”,
“message.channels”,
“message.im”,
“user_profile_changed”
]
},
“interactivity”: {
“is_enabled”: true,
“request_url”: “https://example.skybuffer.com/123123-abcd-1234-1234-aa11aaa1a111/slack”
},
“org_deploy_enabled”: false,
“socket_mode_enabled”: false,
“token_rotation_enabled”: false
}
}

NOTE: The fields in bold are the ones that most probably will need updating (but you can change all the fields according to your preferences):

name, display_name , request_url.

How to change request_url:

“https://example.skybuffer.com/123123-abcd-1234-1234-aa11aaa1a111/slack” – sample link for reference

“https://example.skybuffer.com/” – this part can be found in Skybuffer AI Platform, look for base URL or AI Connector url.

123123-abcd-1234-1234-aa11aaa1a111 – this part after slash is the Channel ID. It can be taken from the Skybuffer AI, during channel creation.

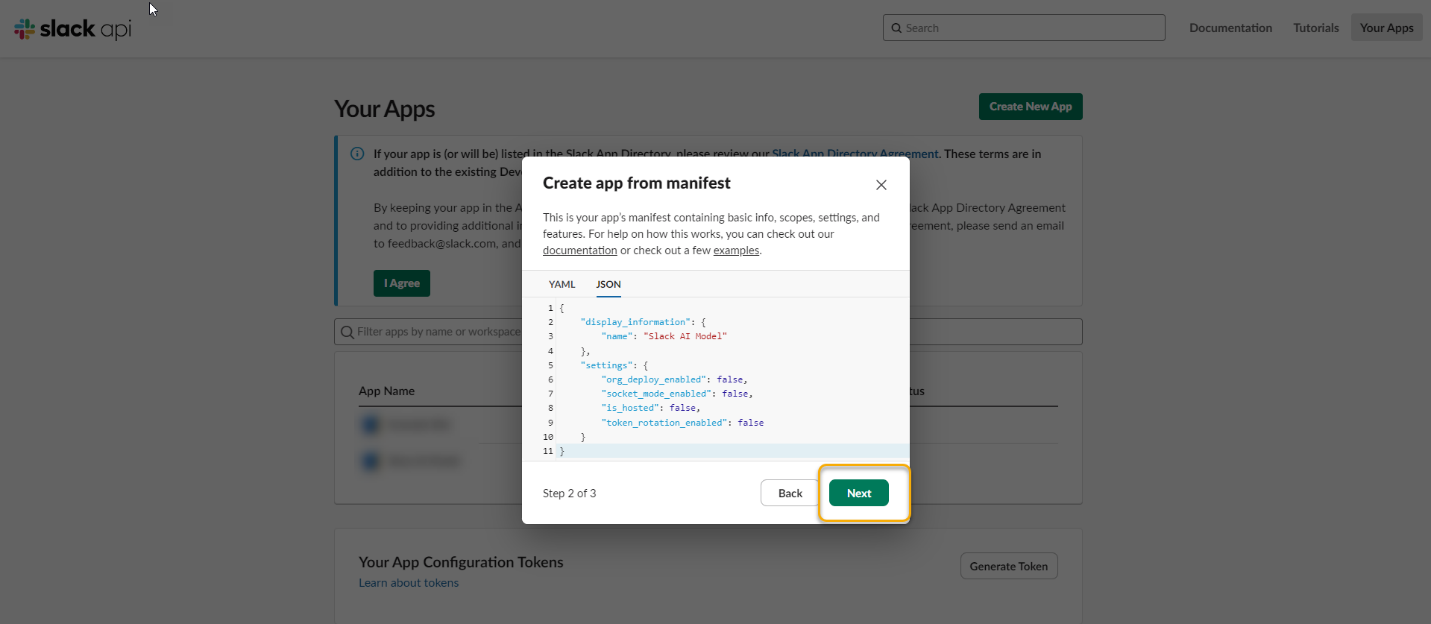
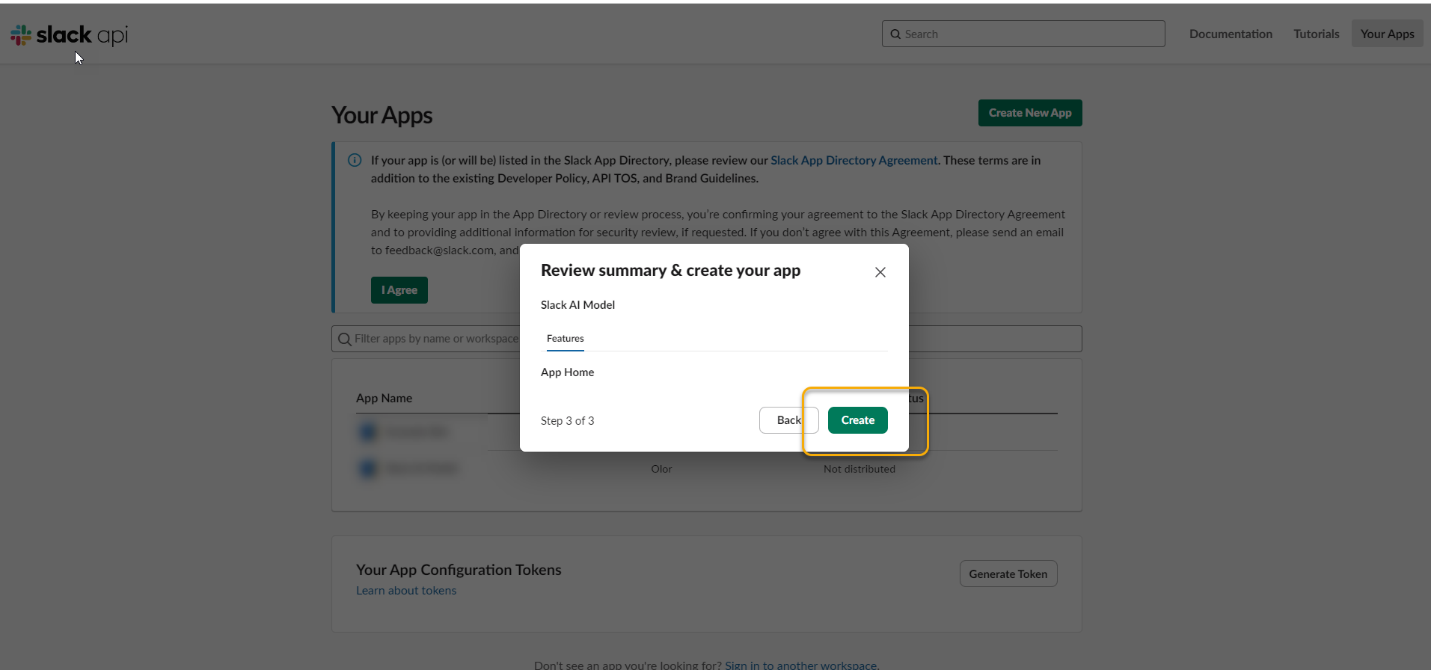
Step 9. Finish your creation.

Click Next on JSON Manifest screen.

Obraz zawierający tekst, oprogramowanie, Oprogramowanie multimedialne, Ikona komputerowa Opis wygenerowany automatycznie

Click Create on the summary screen.

Obraz zawierający tekst, oprogramowanie, Oprogramowanie multimedialne, Ikona komputerowa Opis wygenerowany automatycznie

Step 10. Get the Application ID and the Verification Token.

Now after the application has been created, you can retrieve all the necessary tokens needed for the channel setup in Skybuffer AI.

You should see the new application page with the Basic Information tab open:

Obraz zawierający tekst, zrzut ekranu, oprogramowanie, Strona internetowa Opis wygenerowany automatycznie

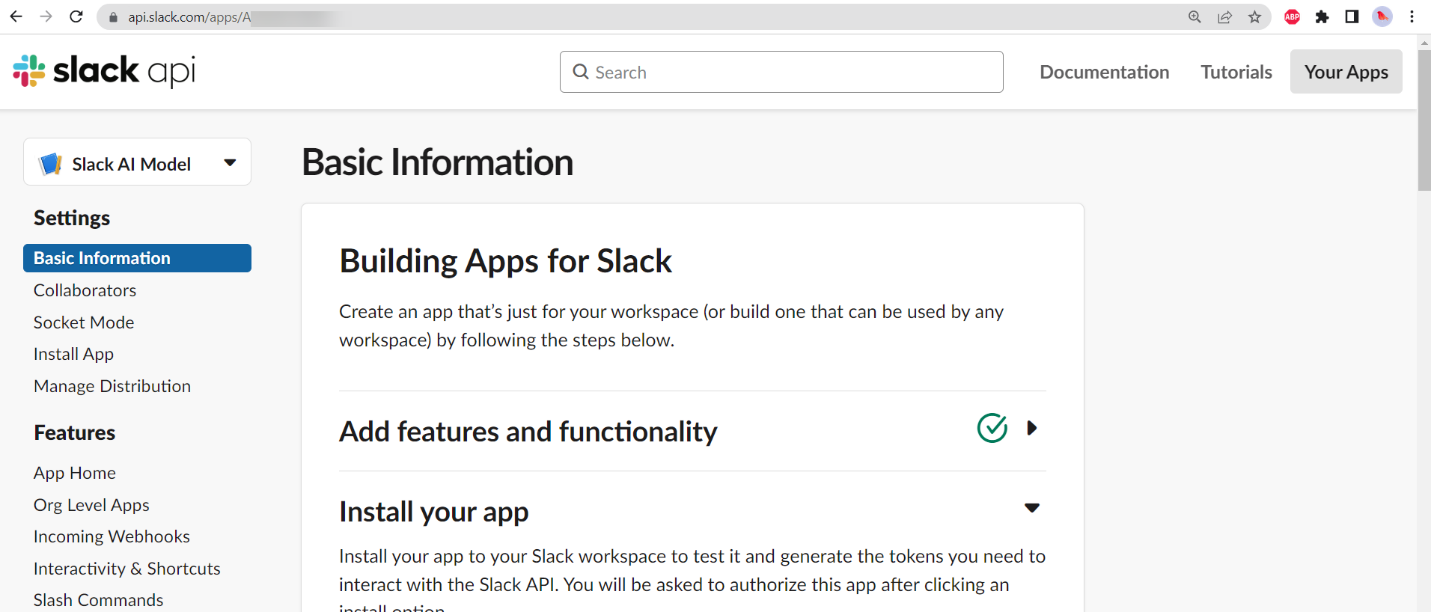
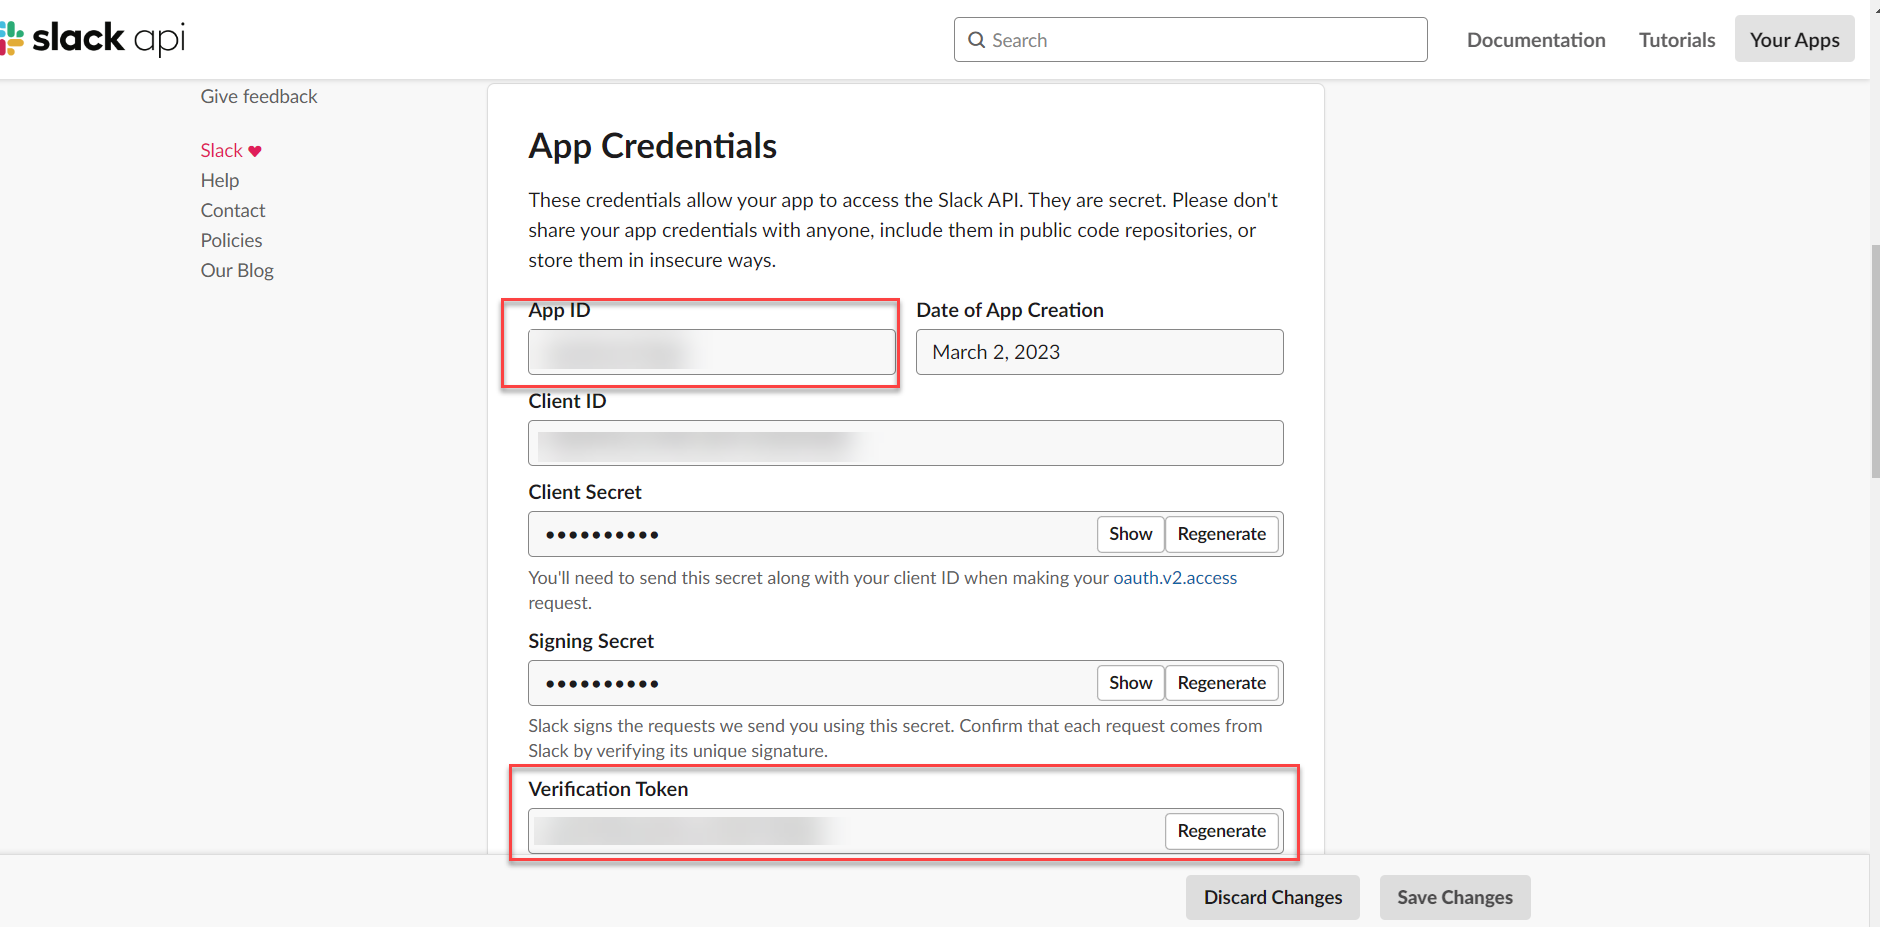
Scroll down to the App Credentials section:

App ID – this is needed for the Slack Application ID field in Skybuffer AI, when new Slack channel is created there.

Verification Token – this field is also needed for channel creation in Skybuffer AI.

Obraz zawierający tekst, zrzut ekranu, oprogramowanie, numer Opis wygenerowany automatycznie

Step 11. Install to workspace.

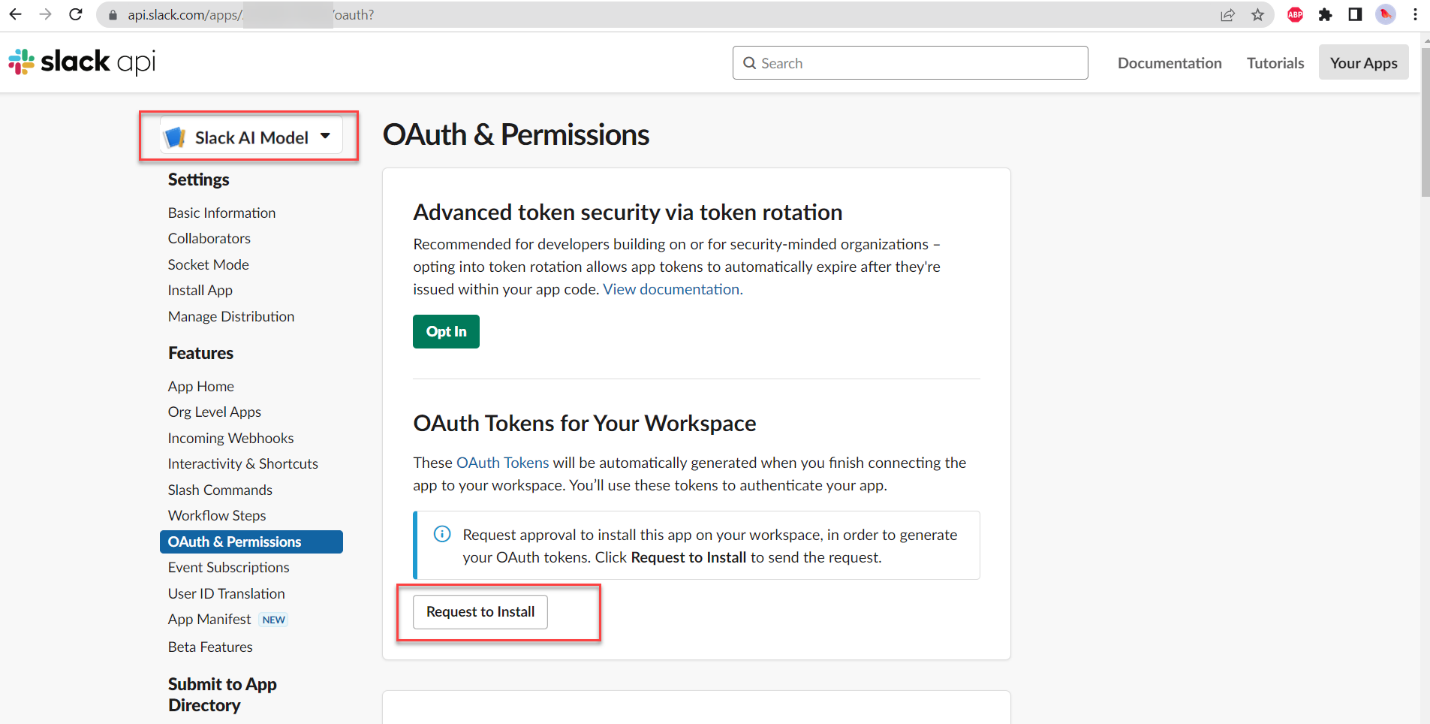
Navigate to the OAuth & Permissions tab, and make sure you have the correct application selected at the top left-hand corner.

Click on the Request to Install button/ Install button.

If you don’t have permissions, your install request will have to be accepted by the workspace owner first. Once your request is accepted, the text on the button will change to Install to workspace.

Obraz zawierający tekst, zrzut ekranu, oprogramowanie, Ikona komputerowa Opis wygenerowany automatycznie

You will get a page with “[App name] is requesting permission to access the [Space Name] workspace “.

Allow access or ask your workspace admin to do so.

Step 12. Copy OAuth Token.

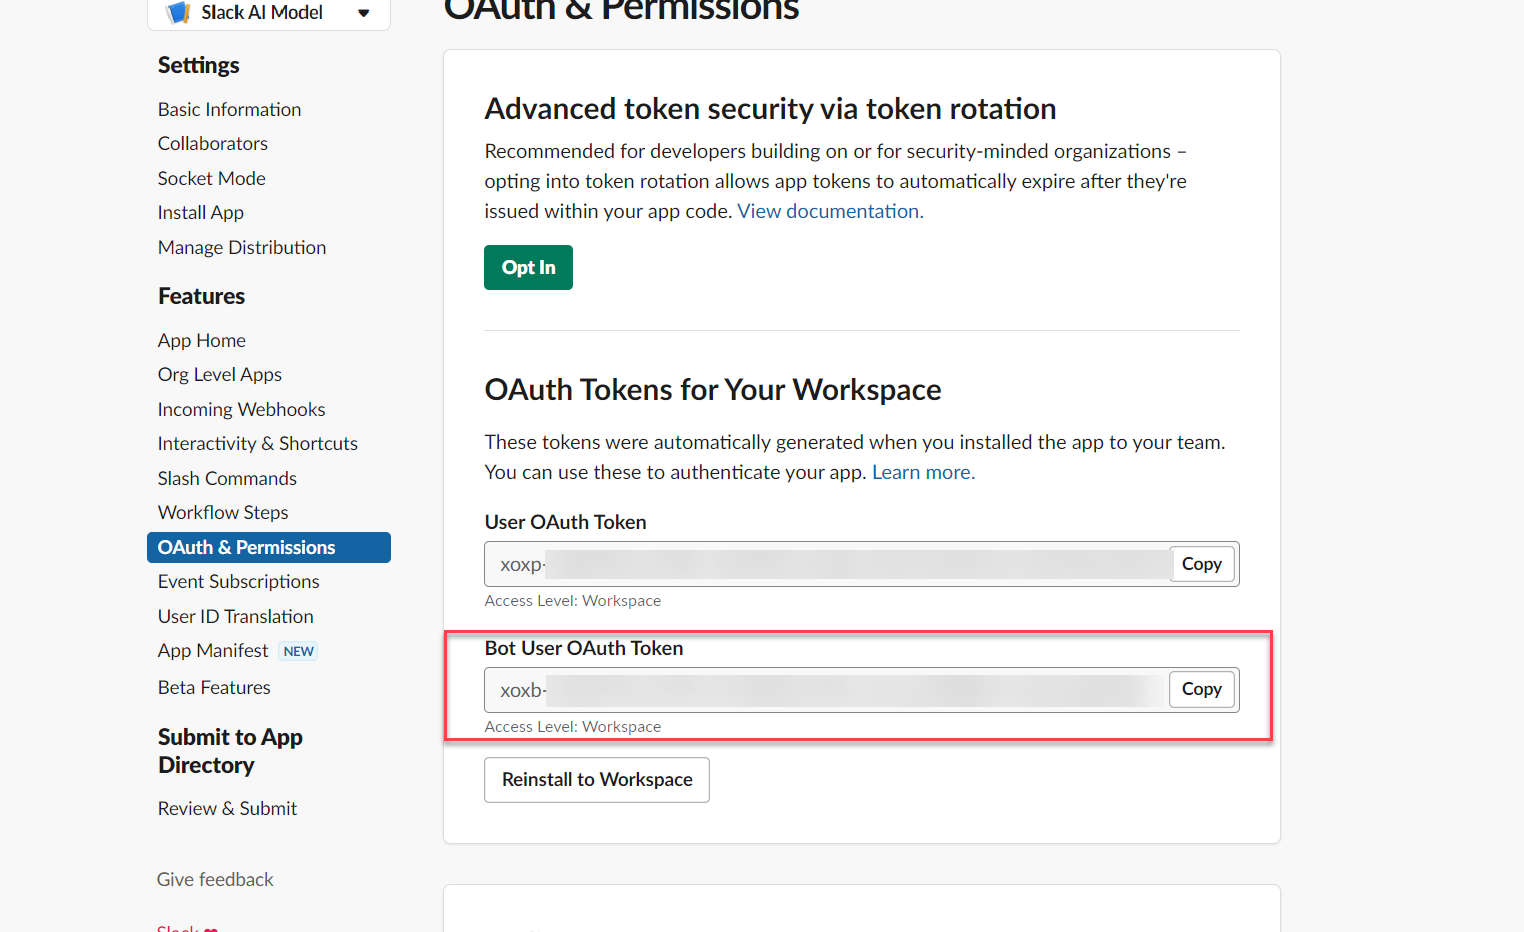
After the app is successfully installed into your workspace, you can now see the OAuth Tokens generated in the OAuth & Permissions tab.

Bot User OAuth Token – this value needs to be pasted into Skybuffer AI during the channel creation.

Obraz zawierający tekst, zrzut ekranu, oprogramowanie, numer Opis wygenerowany automatycznie

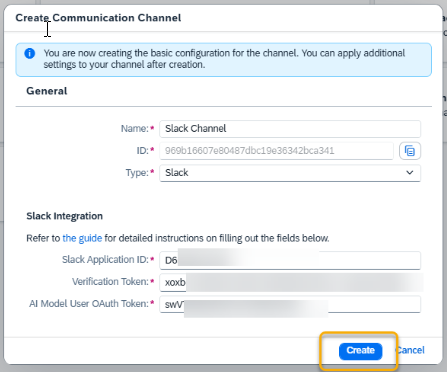
Step 13.  Finish Channel Creation

Fill in Slack Application ID, Verification Token and AI Model User OAuth Token fields to complete channel creation.

Step 14. Skills Activation

Once your Channel is created, you can activate or deactivate skills defined within your AI Agent.
For more information, visit: Skills Activation.

Step 15. Destination Assignment

This setting allows you to assign destinations to skills that have backend-connected actions.
For more information, visit: Destination Assignment.

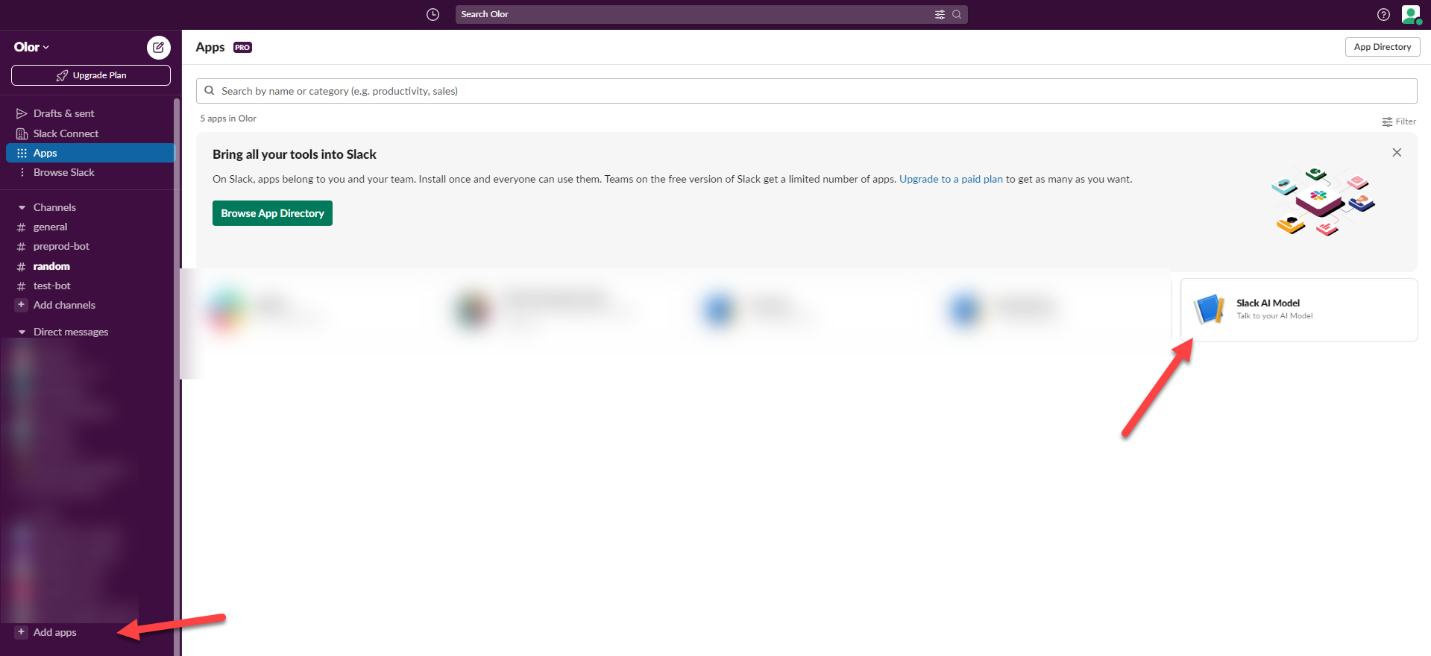
Step 16. Add the application to the workspace

Open your Slack workspace, in the left-side menu click Add app at the bottom of the page. You will see the Apps page. You are supposed to see your new app there, click on it.

Obraz zawierający tekst, oprogramowanie, Oprogramowanie multimedialne, Ikona komputerowa Opis wygenerowany automatycznie

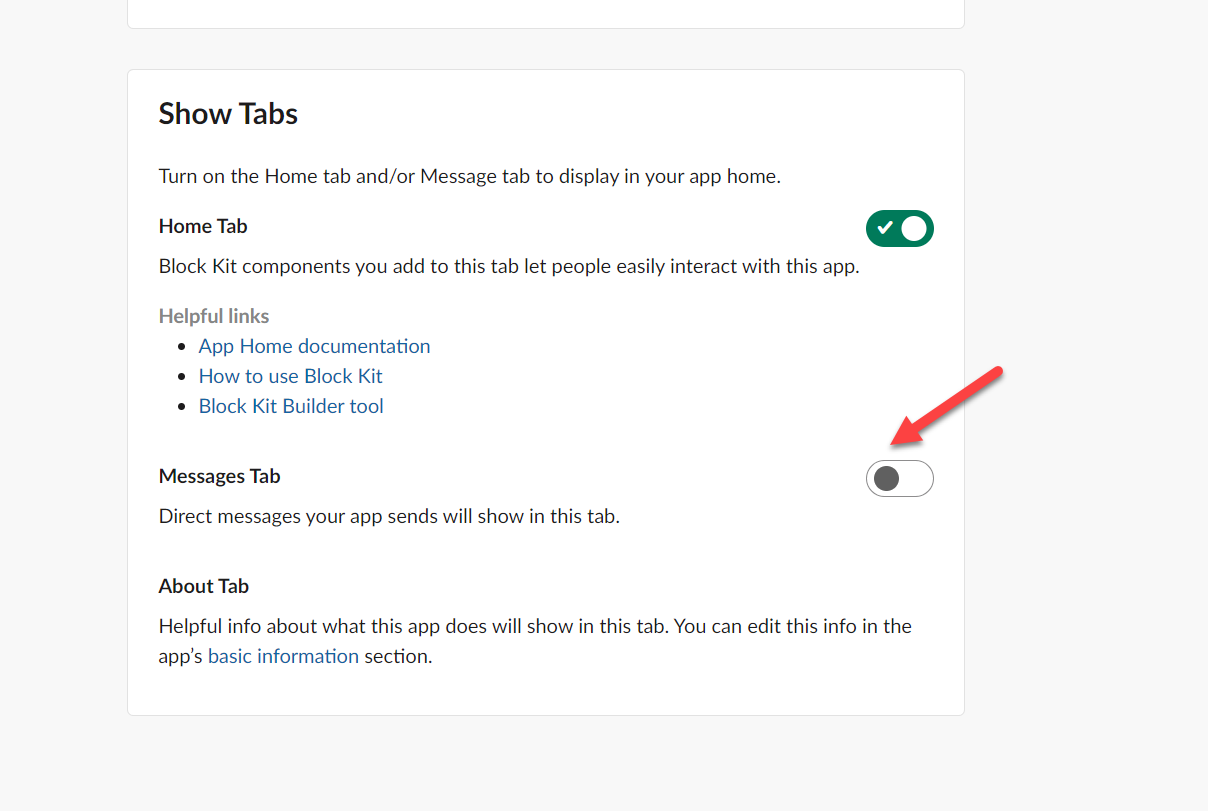
Step 17. Messages Tab Activation

Go to https://api.slack.com/apps , navigate to your app page, and then to Features > App Home.

Find the Show Tabs section, and toggle on Messages Tab.

Obraz zawierający tekst, zrzut ekranu, Czcionka Opis wygenerowany automatycznie

Step 18. Now you can use your AI model.

You can use the Messages tab in the app itself, or talk in the channel once the app is added.

Was this helpful?

Yes  No
Related Articles
  • SAP BTP
  • Call SAP System Action
  • Skills Orchestration Action
  • Skybuffer AI PoC Setup
  • Copy the Existing Channel
  • Destination Assignment
Copyright 2022 Skybuffer.com. All Rights Reserved.