Log Insight Action
Log Insight Action enables the AI Agent to analyze logs. It retrieves data from AI Agent logs based on specified filters such as date/time offset and tags (e.g., conversation topics). The extracted log data is then provided to a selected Generative AI Agent, along with the user input and instructions.
Step 1. Create a Log Insight Action by pressing the button Add AI Action at the bottom of an Action Group:
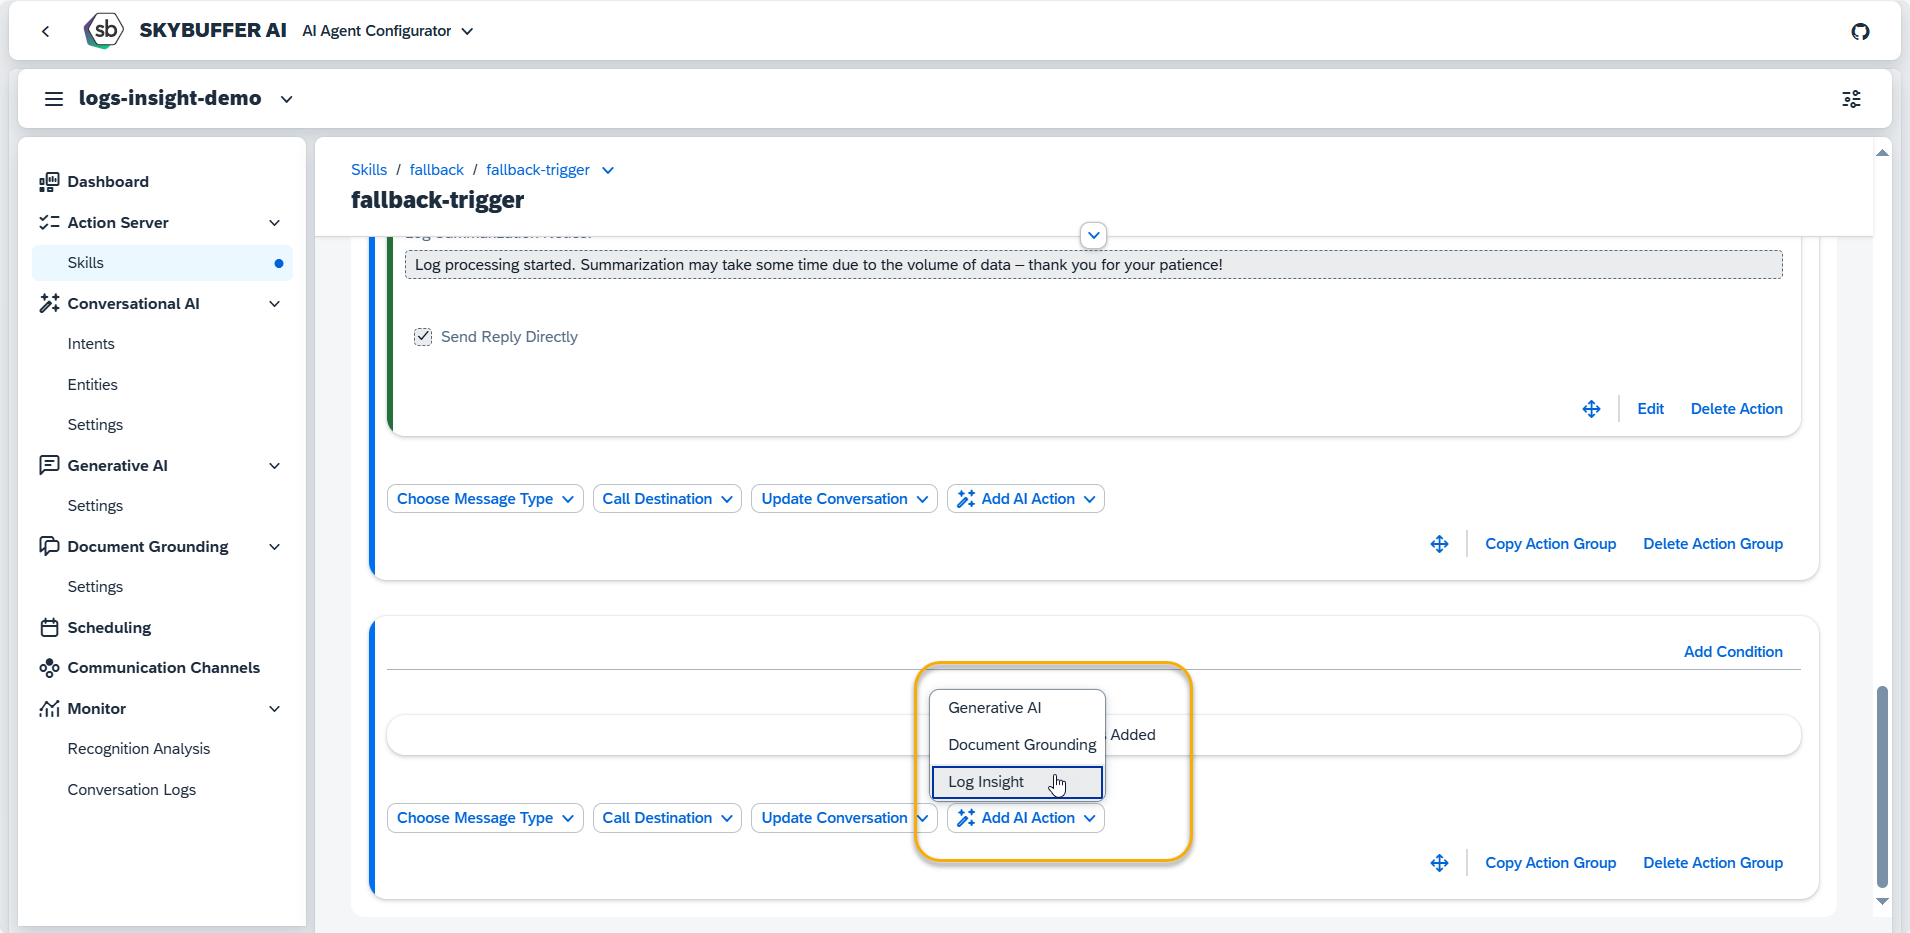
Step 2. A new Log Insight Action will appear and be ready to be filled in. Let’s set up this block step by step.
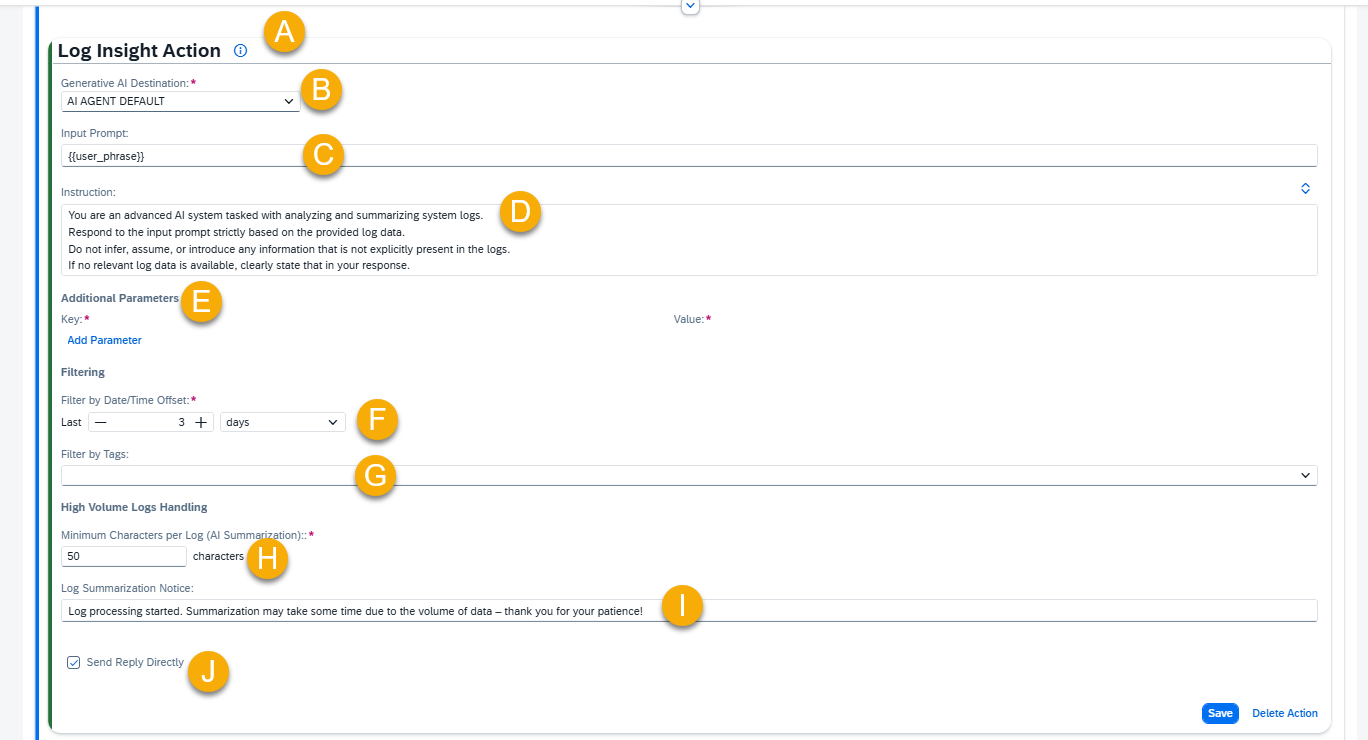
A – Help Dialog
For guidance on the action setup, click the Information Icon. A help dialogue with instructions and examples will appear.
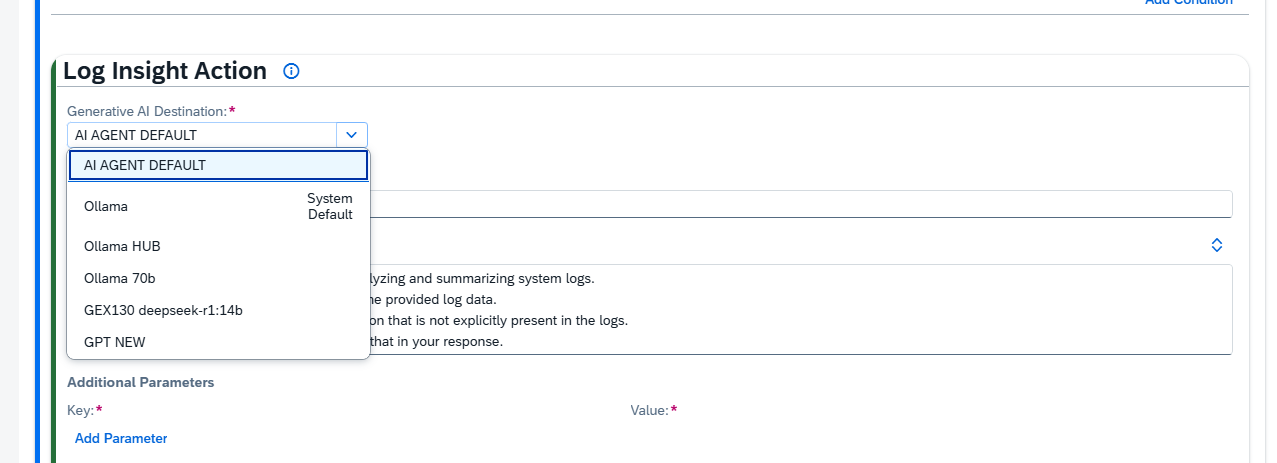
B – Select the Generative AI Destination
This field defines the AI model used to generate responses. By default, when you create an Action, it is set to use a hardcoded mask called “AI AGENT DEFAULT”. This is not the name of a specific model and does not exist in the model hub.
Instead, “AI AGENT DEFAULT” is a placeholder that always points to the default AI model assigned to the AI Agent. In the picture, we see AI AGENT DEFAULT is selected, and it points to “Ollama” model that is marked as “System Default”.
You can override this by selecting a specific model for your Action (e.g., Ollama). If you do, the Action will always use that model—even if the AI Agent’s default changes later.
C – Input Prompt
Input Prompt is where you include the user phrase, which is combined with the Instruction and filtered logs in order to create the context for Generative AI. You can enhance the {{user_phrase}} by adding additional text or memory parameters, or you can choose to remove the {{user_phrase}} entirely. If removed, the Generative AI will generate output based solely on the instructions provided.
D – Instruction
The Instruction field helps Generative AI craft its response. It uses the Logs object and any filters applied to them to form the context for analysis.
Each log is structured as follows:
{“LogGUID”: “string”,”LogCreationDate”: “timestamp”,”Tags”: “string”,”LogMessages”: [{ “Type”: “user” | “bot”, “Message”: “text” }]}
Use the Logs object to reference the entire log. Use LogMessages to analyze the conversation flow (user vs AI Agent messages). Tags are prefiltered and only used if specific logic depends on them (e.g. for tag-based queries like “greetings”).
Examples:
- General Analysis: “Summarize user intent from all user LogMessages in the Logs.”
- Tag-based Logic: “If Tags = ‘greetings’, check the AI Agent’s greeting message and suggest improvements.”
Example Instruction 1:
“You are an advanced AI system tasked with analyzing and summarizing system logs.
Respond to the input prompt strictly based on the provided log data.
Do not infer, assume, or introduce any information that is not explicitly present in the logs.
If no relevant log data is available, clearly state that in your response.”
Example Instruction 2:
“You are an advanced AI system specialized in analyzing and summarizing system logs.
Respond strictly based on the provided log data. Do not infer, assume, or introduce any information that is not explicitly present in the logs. If no relevant log data is available, clearly state that in your response.
Format each log record as follows:
Date, Time: [Extracted directly from the log entry]
Topic: [Clearly stated or identifiable subject from the log]
Content: [Factual summary strictly based on the log’s content]
Do not include greetings, commentary, or any content beyond the structured output requested above.”
E – Additional Parameters:
Parameters for the Generative AI Destination are applied by default. You can view these parameters in the AI Agent Configurator application for the respective connected Generative AI. To customize the AI’s behavior further, you can redefine existing parameters or add new ones using the Add Parameter function.
Available Parameters:
- Ollama Models: This link provides a comprehensive list of valid parameters and values for Ollama models.
- OpenAI Models: This link provides a comprehensive list of valid parameters and values for OpenAI models.
For other Generative AI models refer to the respective documentation of the model provider.
NOTE: Changing default parameters can significantly influence the AI Agent’s performance and responses. Therefore, it is recommended to proceed with caution when making changes.
F , G – Filtering
- Filter by Date/Time Offset: Defines the period for which logs of current AI Agent should be extracted.
NOTE: The log processing capacity is limited by the maximum number of tokens the model can handle. We recommend selecting the Date/Time Offset carefully to ensure the total log size does not exceed the model’s content limit.
For example, a 2048-token limit (~8,192 characters) roughly equates to 1-2 pages of text in a standard Word document (11-point font). - Filter by Tags: Filters logs based on assigned tags. Only logs with matching tags will be considered in the analysis.
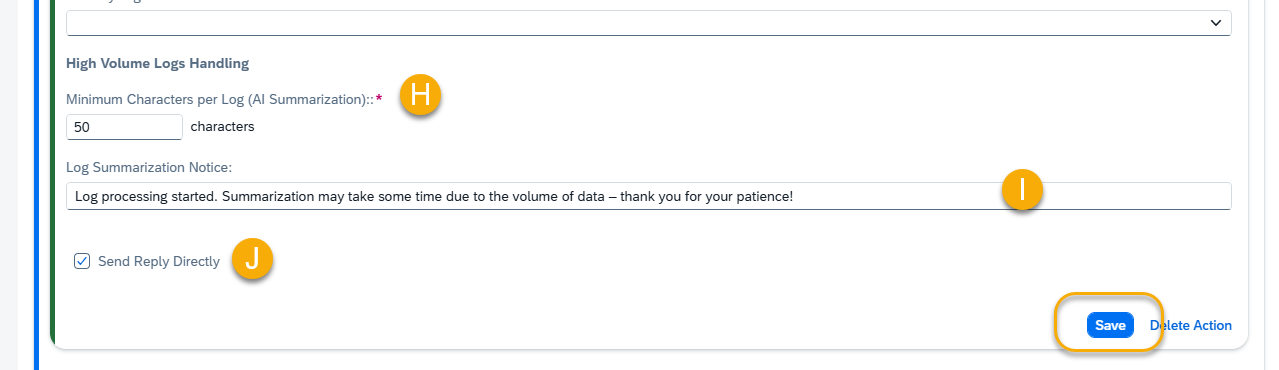
H – High Volume Logs Handling
Minimum Characters per Log (AI Summarization)
(only used when total log size exceeds model input limit)
Defines the minimum number of characters allocated per log entry when logs are summarized using Generative AI due to input size constraints. If the average characters per log entry fall below this threshold, a technical message will be returned instead, indicating that the output has been truncated.
I – Log Summarization Notice
(only used when log size exceeds model limit)
The message is shown to users when the number of logs is too large to process directly. It informs them that summarization is in progress and may take some time.
Example 1: {{memory.rt_log summary_notice}}
Example 2: The log is quite large, so summarization might take a bit longer. This may take up to 10 minutes — thanks for your patience!
J – Send Reply Directly
Selecting this checkbox sends the generated reply directly to the chat with the end user.
Alternative: If left unchecked, the reply is stored in the memory parameter specified in Output Parameter (default: rt_log_insight_output). To reference this response in future messages, use: {{memory.rt_log_insight_output}}.
Example Message:
“Please use the following information: {{memory.rt_log_insight_output}}.”
Step 3. Remember to save your entries once you finish editing.
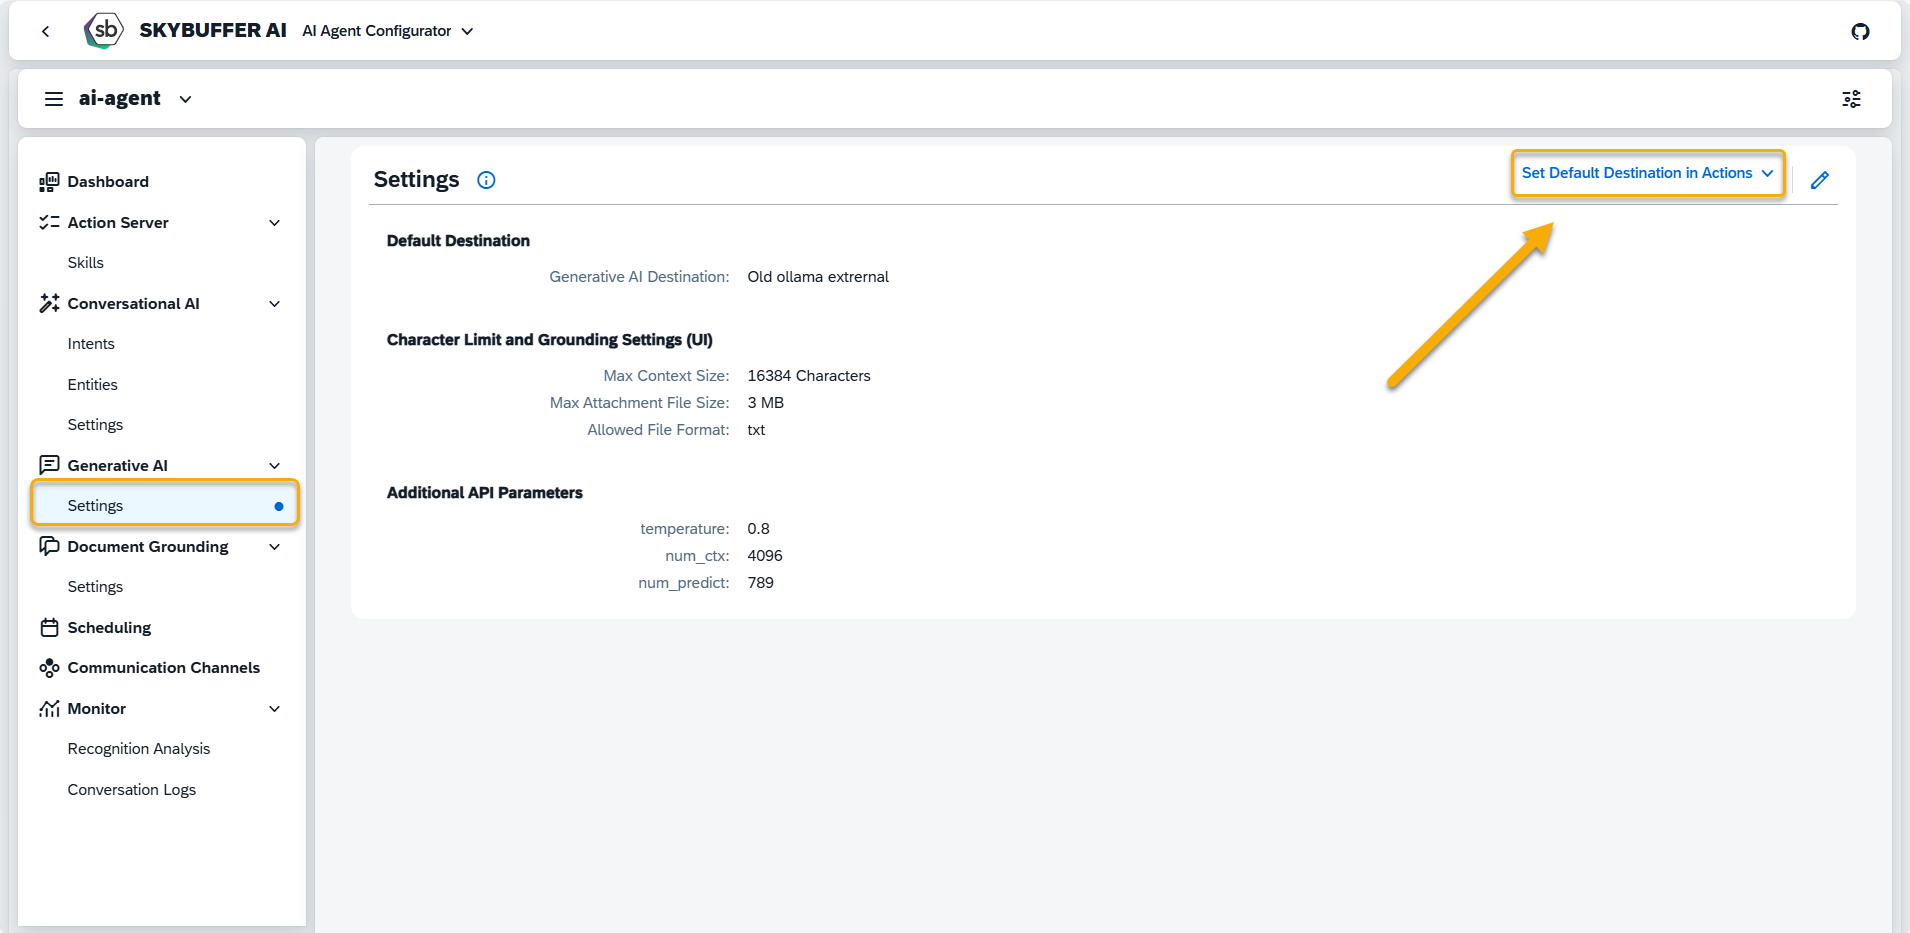
NOTE: In Generative AI Settings section you can set default destinations for all your AI Action at once.