• IDD
  • IDD
  • Skybuffer AI
    • Skybuffer AI Installation and Initial Setup
      • On Business Technology Platform (BTP)
        • Skybuffer AI Installation Guide on BTP
      • On Premise: XSA Runtime and SAP HANA EE
        • Installing SAP HANA Including XS Runtime
        • XS Deployment Process
      • Post Installation User Guide
    • AI Agent
      • AI Agent Configurator
        • Register New AI Agent
        • Intents and Entities Creation
        • Skills Creation and Management
          • Standard Action Types
          • Generative AI Action
          • Document Grounding Action
          • Log Insight Action
        • Scheduling
        • Communication Channels
          • Copy the Existing Channel
          • Skills Activation
          • Webchat Communication Channel Setup
          • Destination Assignment
          • Facebook Messenger Communication Channel Setup
          • Zoom Communication Channel Setup
          • MS Teams Communication Channel Setup
          • Slack Communication Channel Setup
          • Telegram Communication Channel Setup
          • Viber Communication Channel Setup
          • WhatsApp Communication Channel Setup
          • AI Agent Communication Channel Setup
        • Monitor Section
      • Destination Management
      • AI Translate
      • Survey Craft
      • Identity Providers
      • Business AI Scenarios
      • Models Hub
      • Document Grounding Hub
    • AI Connector
      • AI Connector Configurator
      • AI Connector Logs
      • AWS Integration
      • Google Services Integration
      • Twilio Integration
      • Yandex Services Integration
    • SAP Backend for Business AI
      • Business AI Scenarios Package Administration
        • Installation Guide
        • Uninstallation Guide
      • Business AI Scenarios Package Maintenance Guide
        • Product License
        • Configuration of Email Sending Mechanism
          • Configuration Settings
          • Setup of Specific Email Sending Control
        • Technical User Setup
          • Central oData Service Authorization Role Maintenance
          • Technical User ID Creation
        • Assigning Business AI Scenarios to ABAP RIK Classes
        • Simplified User Creation Scenario Setup (Without Approval Workflow)
          • Maintain and Assign Reference Users for User Creation Scenario
          • Activate Notification for New User Creation (Optional)
        • User Creation Scenario Setup with Approval Workflow
          • Configure Approval Workflow for User Creation Scenario
          • Set Up Approval Steps for Different User Types Creation
    • HOW-TO Guides
      • SAP AI Core Integration. Ollama Server Setup
      • MS SharePoint Integration. Add-in Registration
      • MS Teams Integration. Single Sign-On
        • Create Azure Bot Service
        • Configure Azure Bot Service and Connect to Bot Management App
        • Create Middleware SSO Application
        • Configure Bot Service Application SSO
        • Create Azure AD Enterprise Application for SAP Backend
        • Configure oAuth2 in SAP System
        • Assign Identity Provider and Push Nodejs Configuration
        • Deploy Your App into Microsoft Teams
        • Managing Application Keys
    • Troubleshooting
      • Edge Browser Access Issue
    • Hybrid Chats
      • Hybrid Chats Maintenance Guide
        • Business and Technical Users Setup
          • Create Business and Technical Users
          • Create Business Partners
        • Tenant Configuration
        • Live Pool Management and Configuration
          • Start Live Pool
          • Manage Live Pool
        • System Configuration
          • Configure Status Profile
          • Set Up Technical Messages for Hybrid Chats
        • Hybrid Chats Configuration
        • Hybrid Chats Categorization
          • Categorization Management
          • Categorization Mapping
          • Translate Categories
      • Hybrid Chats User Manual
        • Hybrid Chats
          • HC Archive Mode
          • HC Active Mode
        • HC My Data
          • Edit Personal Data and Profile Picture
          • Default Settings Management
          • Notification and Dialogue Manual Mode Management
          • Quick Replies Management
            • Standard User Mode - Quick Replies
            • Administrator User Mode - Quick Replies
        • HC Analytics
          • HC Analytics
          • Operator Activity Analytics
          • Exit Survey Analytics
        • HC Teams
          • Access HC Teams Application
          • Create New Team
          • Create New Team Member
          • Edit Agent
          • Edit Team Name

MS Teams Communication Channel Setup

54 views 0

Channel Creation

Step 1. Open the AI Agent Configurator application in the AI Agent group.

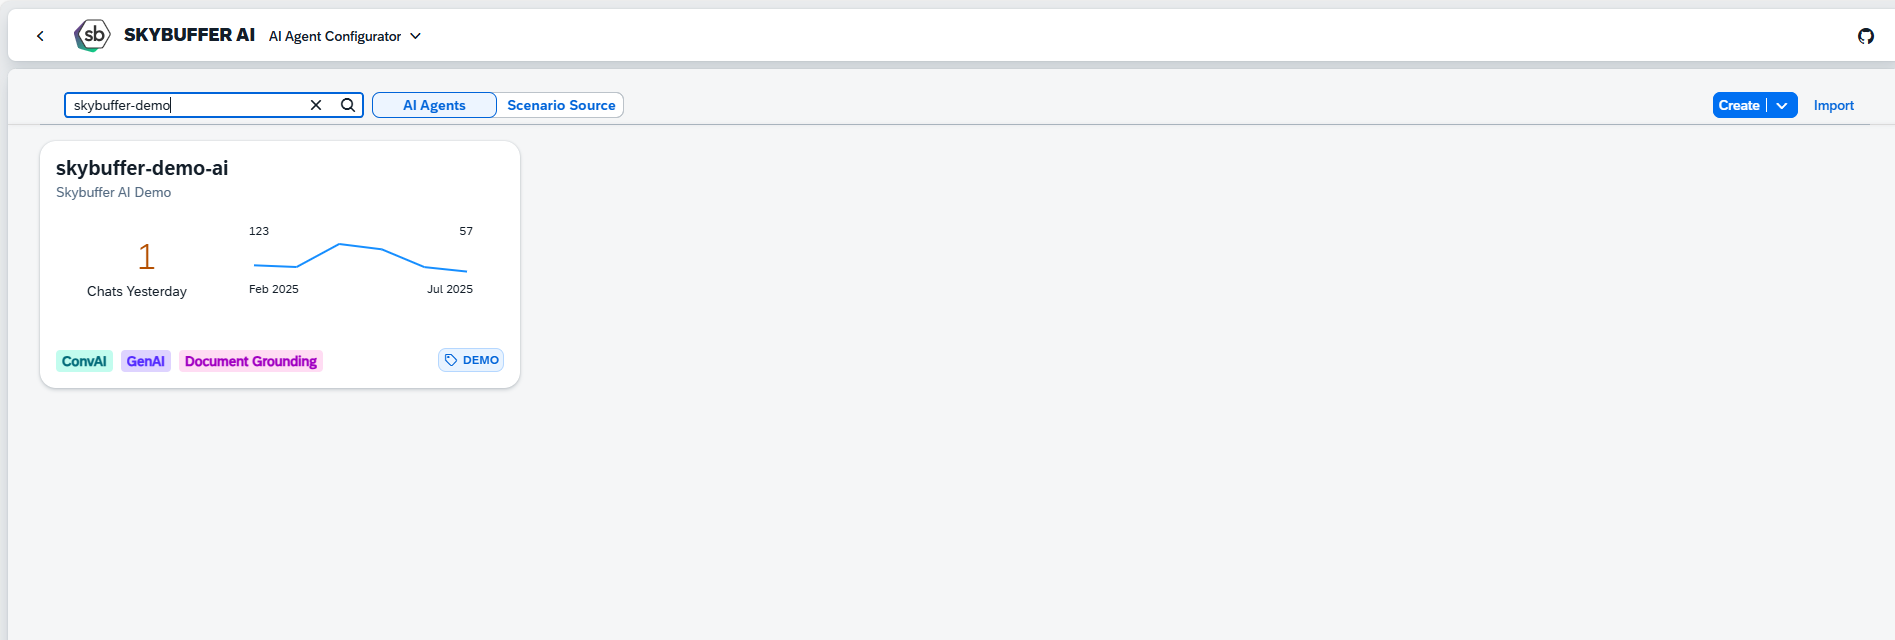
Step 2. After opening the application, you will see a screen displaying all available AI Agents. Each tile represents one Agent, including its name, description, and deployment status. Click on the Agent you want to work with to proceed.

Изображение выглядит как снимок экрана, текст, программное обеспечение, Значок на компьютере Автоматически созданное описание

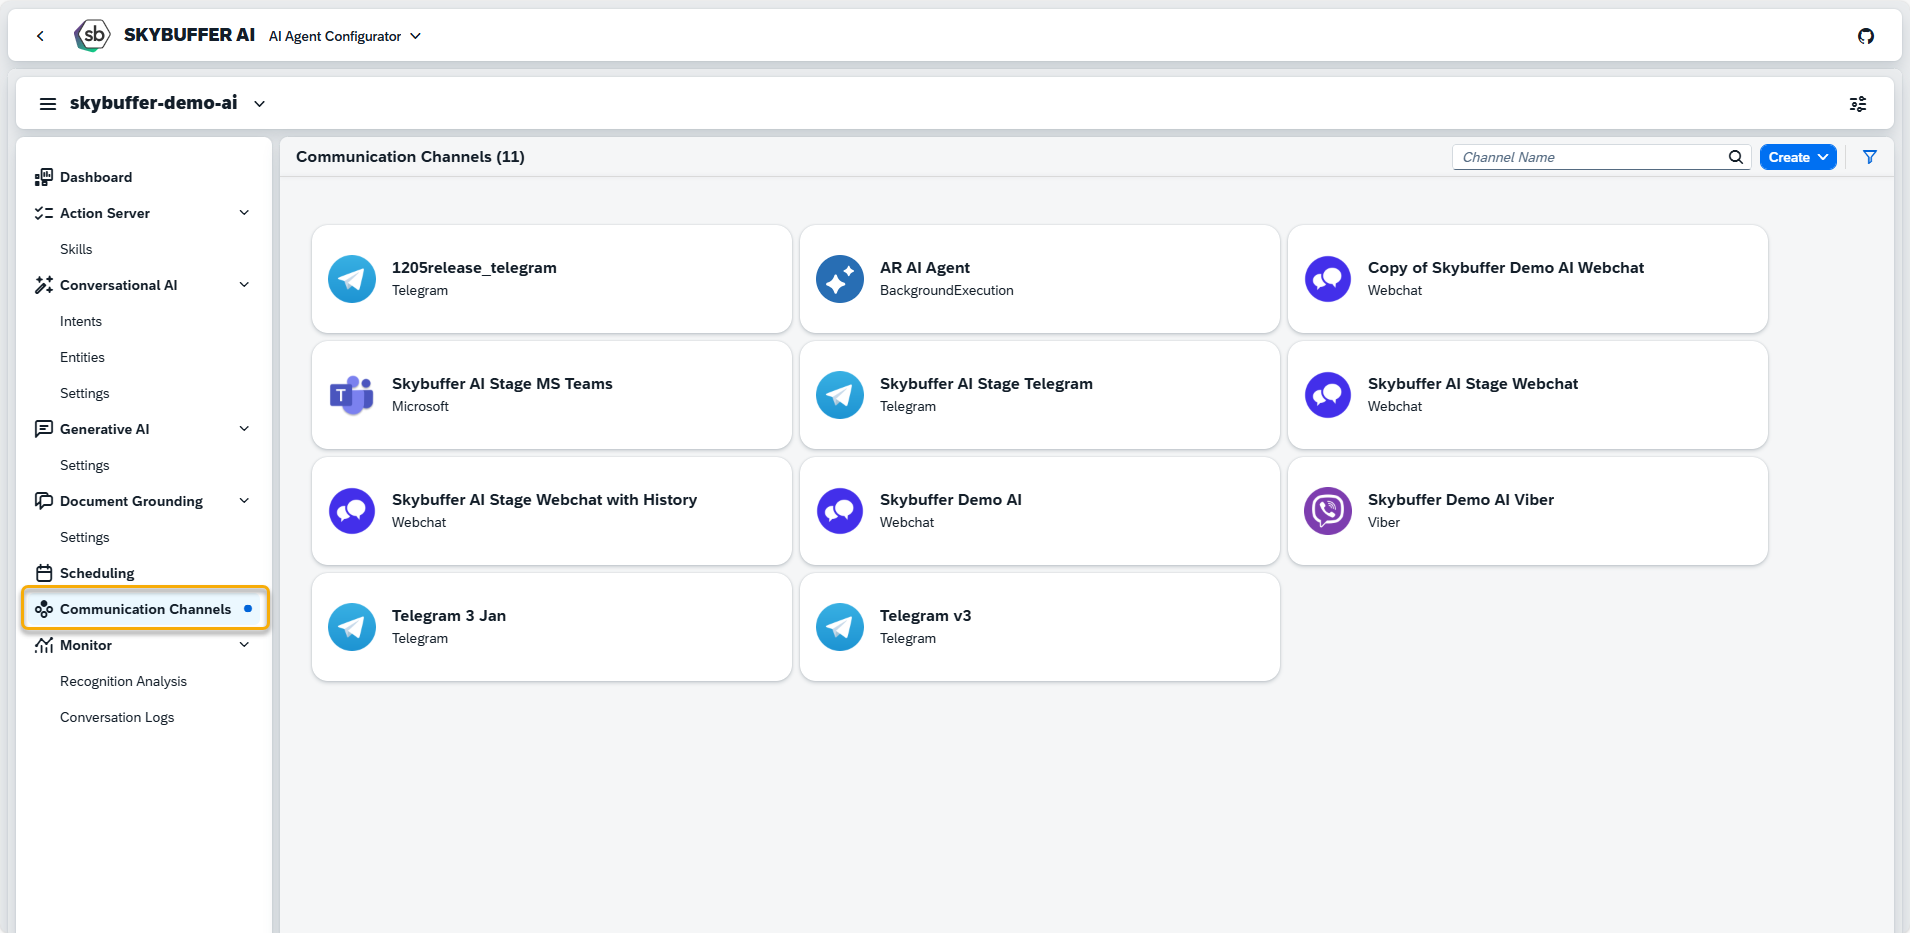
Step 3. Open the Channel management application- Communication Channels.

Изображение выглядит как текст, программное обеспечение, Значок на компьютере, число Автоматически созданное описание

Step 4. Channel creation.

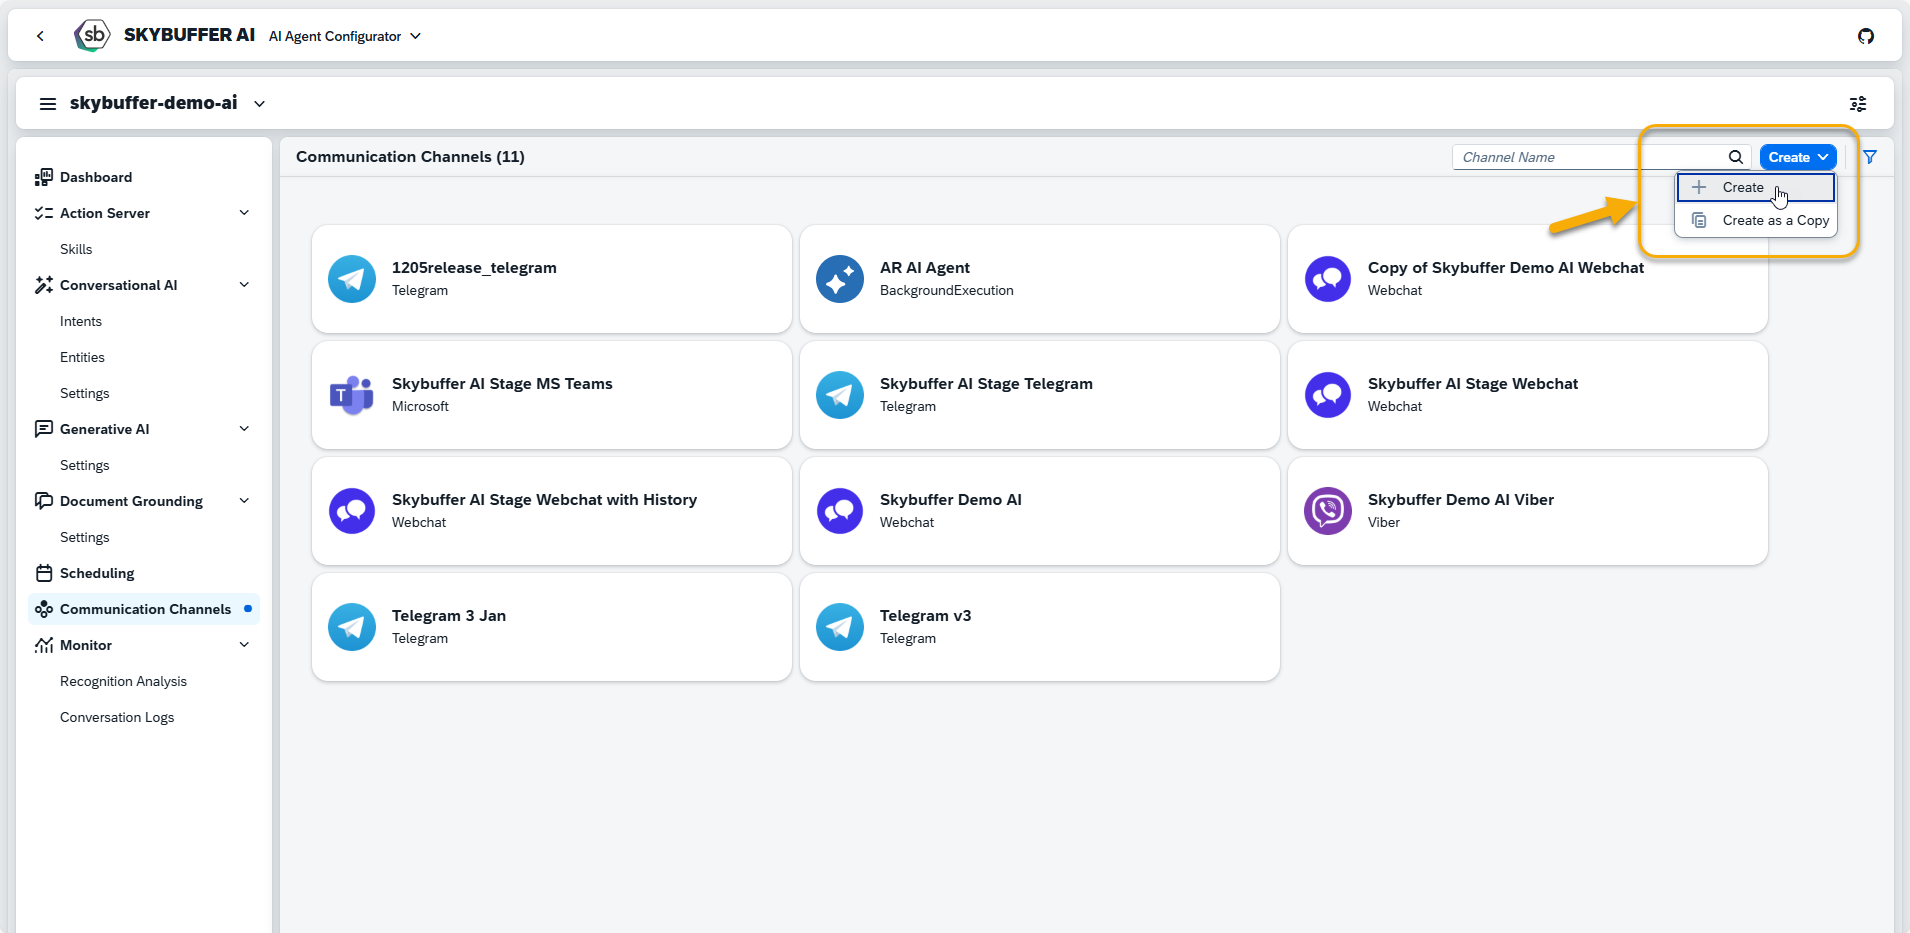
You can create a new Channel from scratch or Copy the Existing Channel.

To create a new Channel, click the Create button:

Изображение выглядит как текст, программное обеспечение, Значок на компьютере, число Автоматически созданное описание

Step 5. Initial Parameters

Fill in the initial parameters for the new Channel. The form includes:

  • Channel Name — follow your organization’s naming convention.
  • Channel ID — this field is auto-generated.
  • Channel Type — select from a list of available types (e.g., Webchat, Microsoft, Telegram).

Изображение выглядит как текст, программное обеспечение, Значок на компьютере, Мультимедийное программное обеспечение Автоматически созданное описание

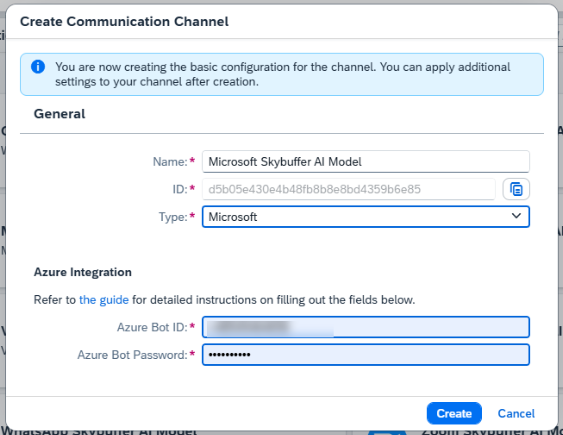
To fill out the fields for Azure Integration refer to Step 6.

Step 6. Create and Configure Azure Bot Service

NOTE: You can access the full tutorial on Azure/ MS Teams configuration below. It also explains the SSO configuration process:

HOW-TO: MS Teams Channel with SSO

Copy the Microsoft App ID and the Client Secret values, they should be in the Settings Tab of your Azure Application.

ID and secret

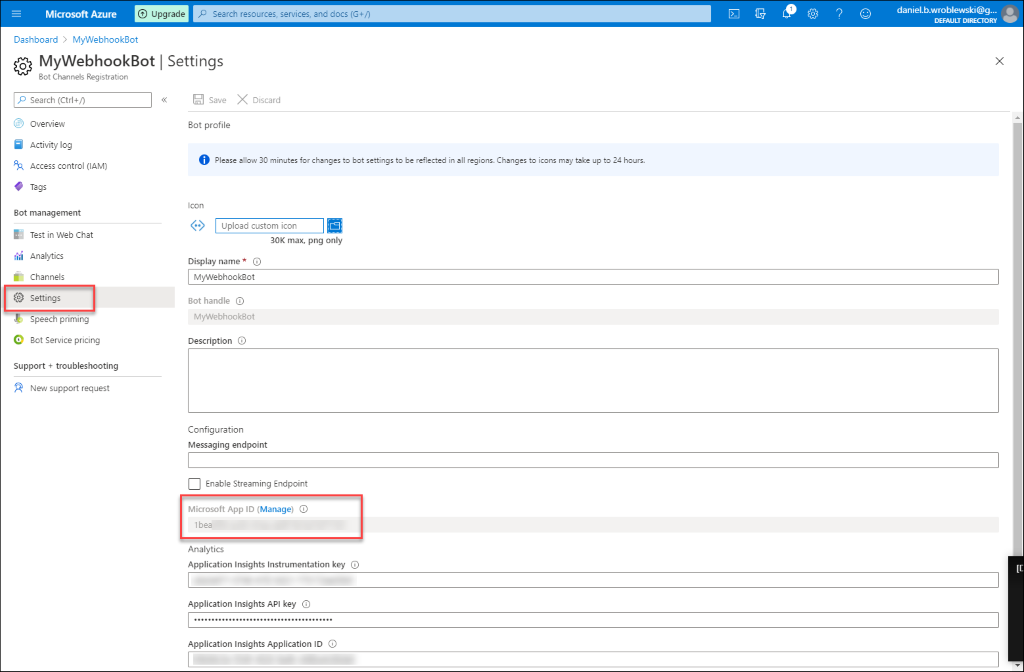
Paste your copied App ID and Client Secret into the fields: Azure Bot ID and Azure Bot Password in the Skybuffer AI app.

Изображение выглядит как текст, программное обеспечение, Значок на компьютере, Мультимедийное программное обеспечение Автоматически созданное описание

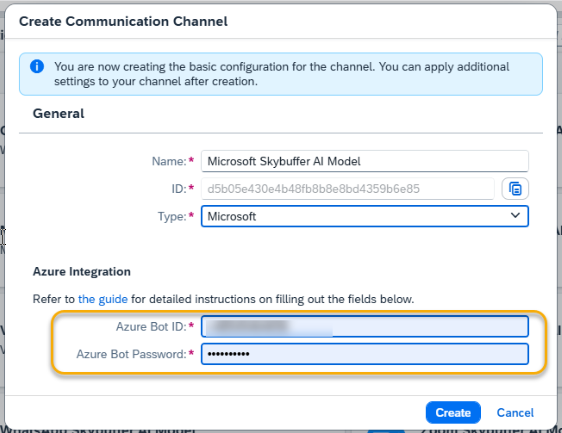
Press Create to finish the initial setup in the Communication Channels application.

Step 7. Skills Activation

Once your Channel is created, you can activate or deactivate skills defined within your AI Agent.
For more information, visit: Skills Activation.

Step 8. Destination Assignment

This setting allows you to assign destinations to skills that have backend-connected actions.
For more information, visit: Destination Assignment.

Step 9. Add the new app to MS Teams.

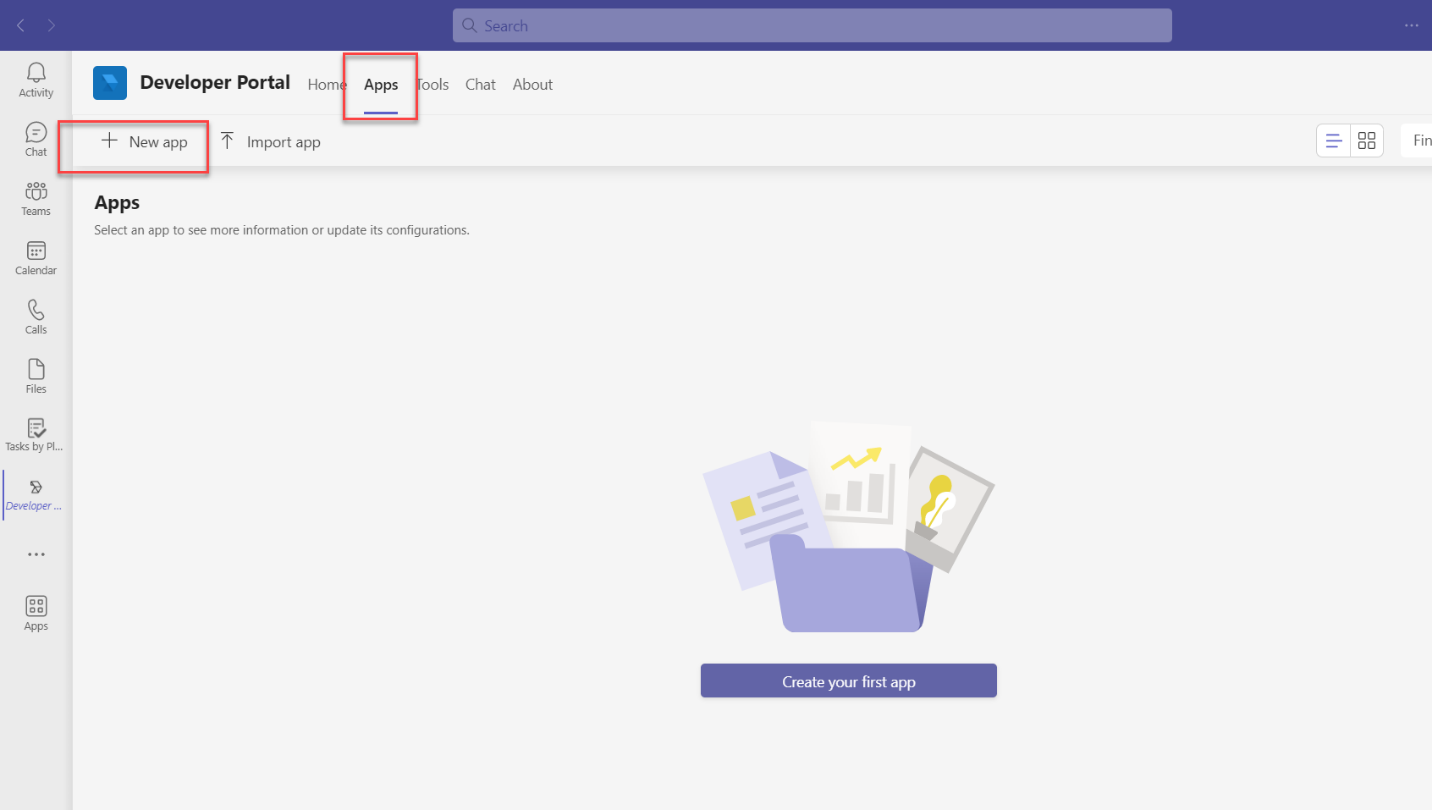
Open MS Teams, navigate to the Apps tab, and search for the Developer Portal app. Open the app:

Obraz zawierający tekst, oprogramowanie, Ikona komputerowa, Strona internetowa Opis wygenerowany automatycznie

Open the Apps tab inside the Developer Portal. There are two options to add a new app. You can import an existing application with the help of manifest or create a new application.

For this tutorial, let us use the New App option:

Obraz zawierający tekst, zrzut ekranu, oprogramowanie, Ikona komputerowa Opis wygenerowany automatycznie

Name the application:

Obraz zawierający zrzut ekranu, tekst, oprogramowanie, Oprogramowanie multimedialne Opis wygenerowany automatycznie

 Fill in the application details – page url, descriptions (optional step).

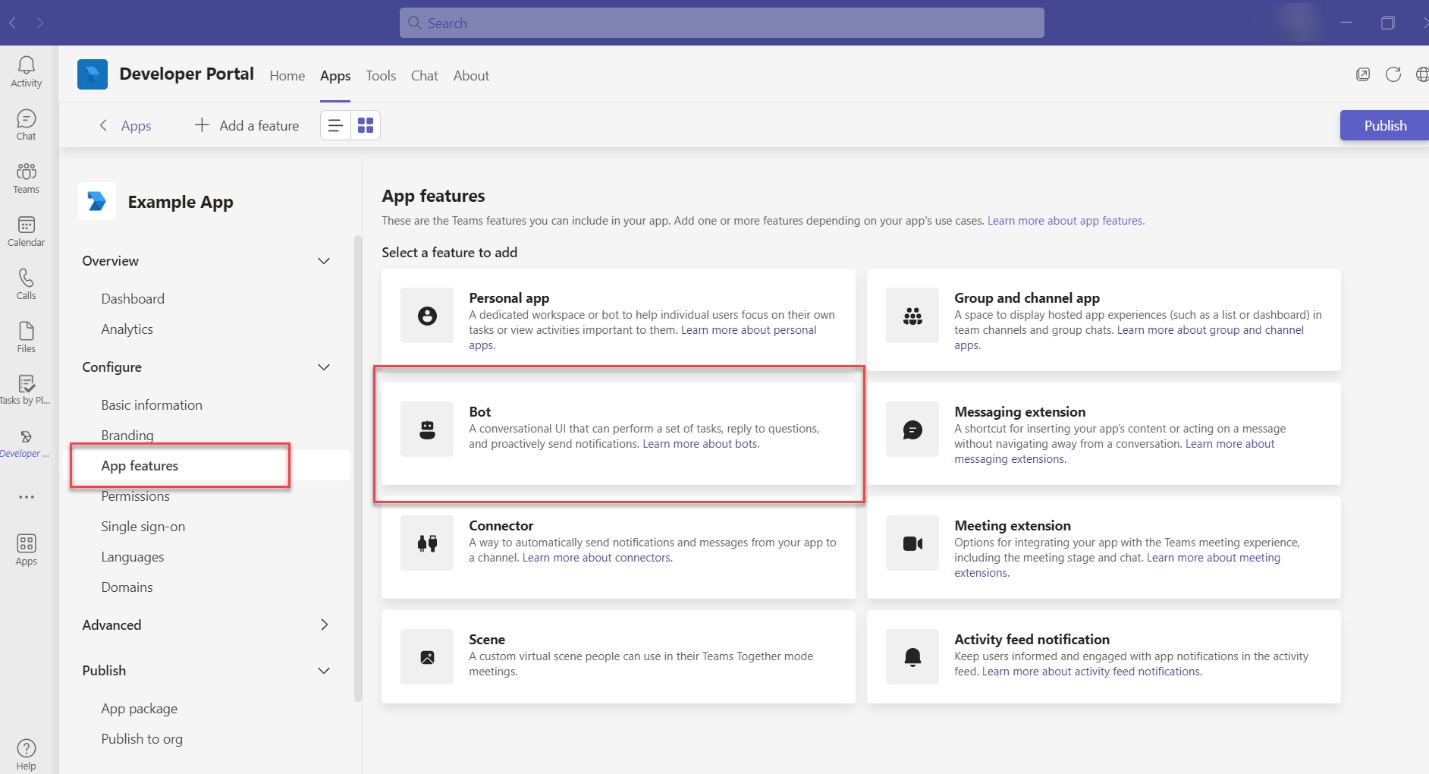
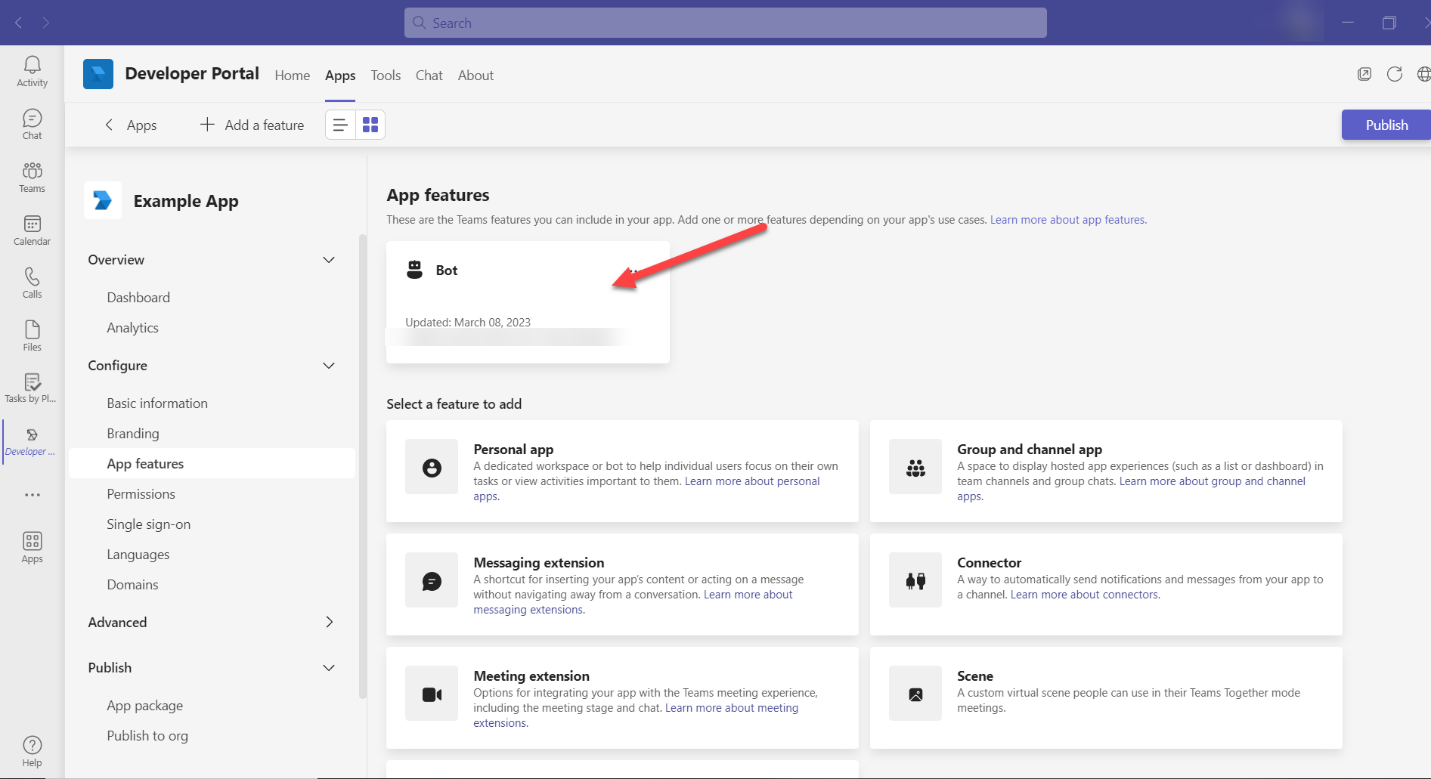
 Add the Bot feature.

Navigate to Configure > App features. Select new Bot feature.

Obraz zawierający tekst, oprogramowanie, Ikona komputerowa, Strona internetowa Opis wygenerowany automatycznie

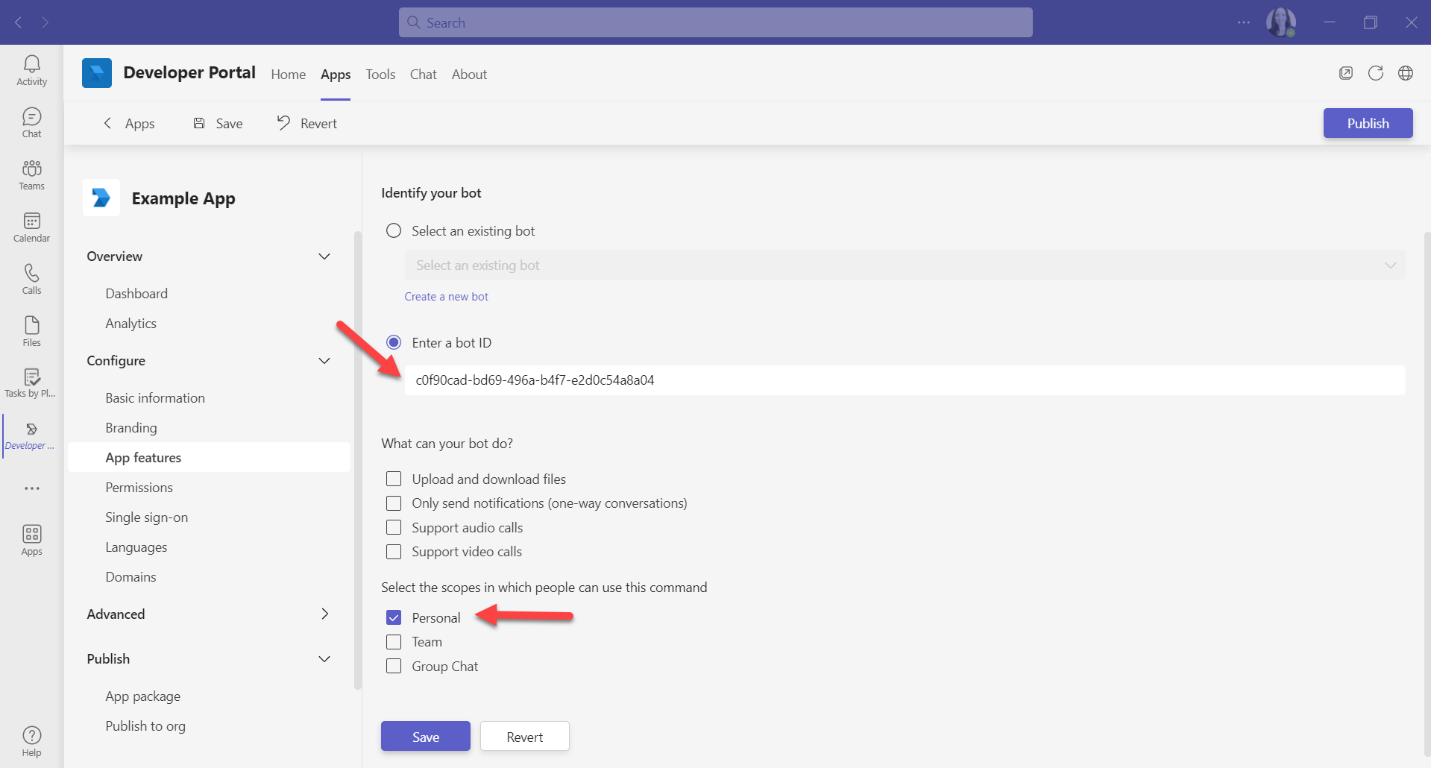
Fill in the bot details:

Enter a bot ID – enter the Application ID from Azure. (Step 2)

Scope – select personal.

Save the new bot.

Obraz zawierający tekst, oprogramowanie, Ikona komputerowa, Strona internetowa Opis wygenerowany automatycznie

The newly created bot feature should be now visible:
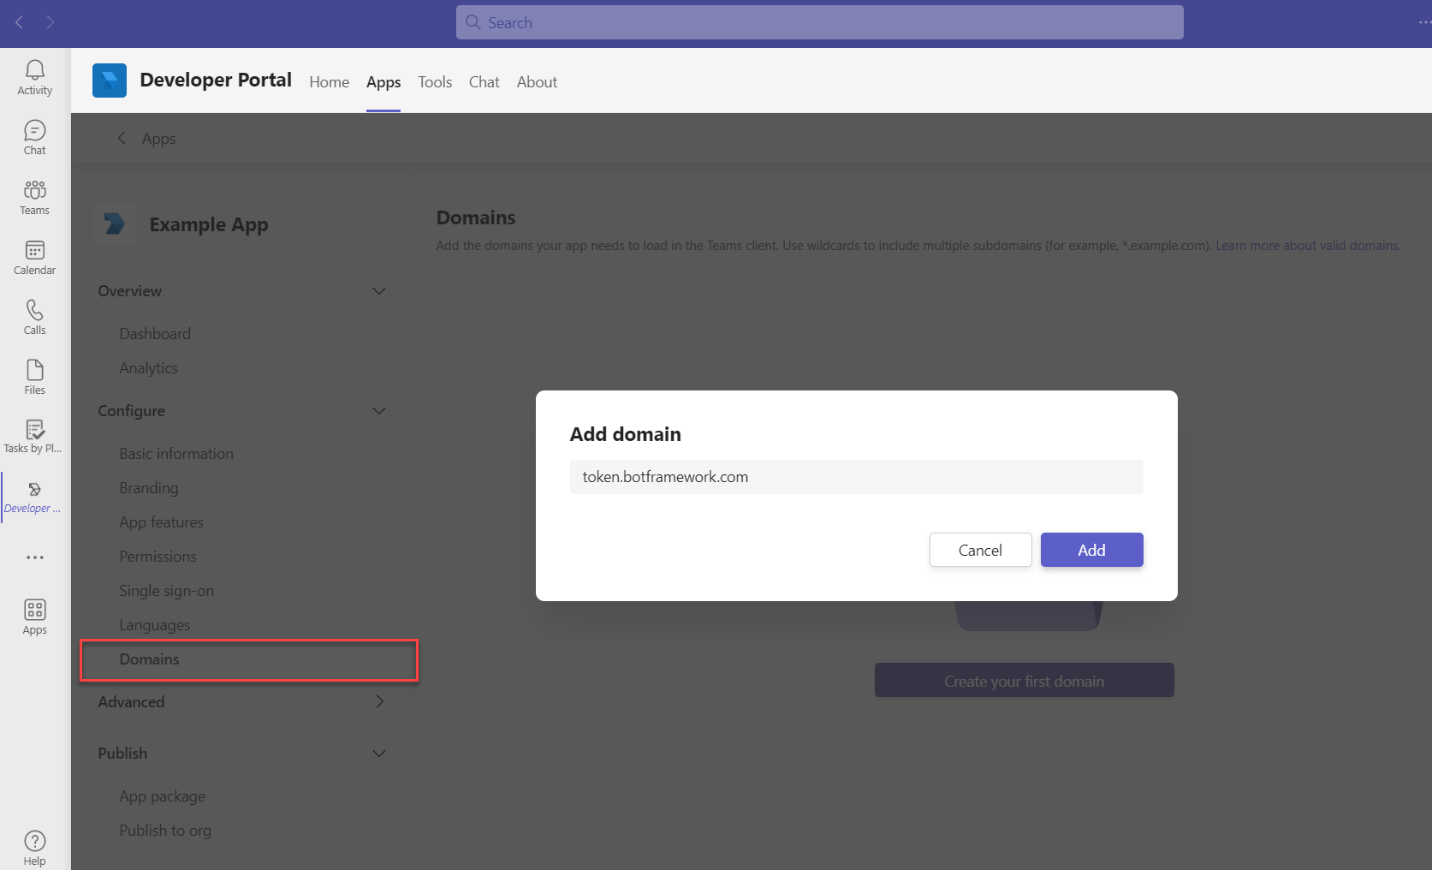
Obraz zawierający tekst, oprogramowanie, zrzut ekranu, numer Opis wygenerowany automatycznie

Add a new domain.

Navigate to Configure > Domains. Add the new domain token.botframework.com.
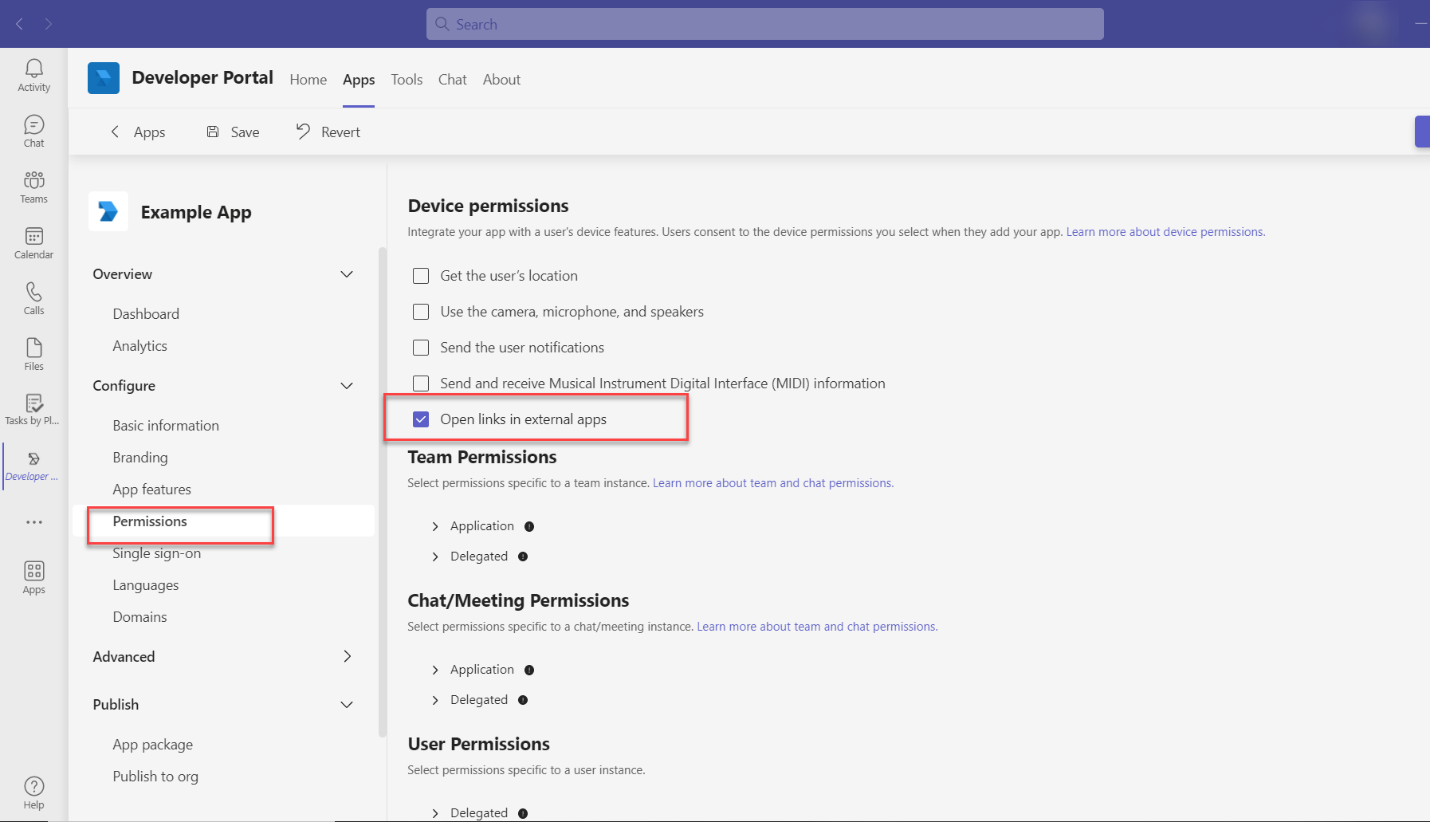
Obraz zawierający tekst, zrzut ekranu, oprogramowanie, Oprogramowanie multimedialne Opis wygenerowany automatycznie

Edit permissions.

Navigate to Configure > Permissions. In the Device Permissions section tick Open links in external apps.

Obraz zawierający tekst, oprogramowanie, Ikona komputerowa, Strona internetowa Opis wygenerowany automatycznie

Step 10. Publish your app

Finally navigate to the Publish section. You can access the app manifest and add the app icons in the App package section.

There are options to publish either to a store or to an organization.

Select the preferable mode and click on the Publish button in the top right-hand corner to finish the process.

Was this helpful?

Yes  No
Related Articles
  • Copy the Existing Channel
  • Destination Assignment
  • Skills Activation
  • Log Insight Action
  • Edge Browser Access Issue
  • Troubleshooting
Copyright 2022 Skybuffer.com. All Rights Reserved.