Introduction
After successful installation of Skybuffer AI Platform, the next step is to complete the post-installation activities, which include importing initial configuration values into the database tables, setting up connections to the Generative AI Model and Document Grounding, and testing these connections. These activities are essential to ensure that the platform is fully operational and ready for use.
Skybuffer AI is a no-code platform built on SAP HANA, designed for enterprise security. It integrates Conversational AI, Generative AI, and Document Grounding (RAG), offering pre-integrated scenarios for a wide range of business applications. Regardless of the deployment option (on premise or on SAP BTP), the initial configuration steps remain the same.
The post-installation process includes the following key tasks:
- Add Initial Values to Database Tables: The first step is to input the necessary initial configuration into the database tables.
- Configure Connections to Generative AI Model and Document Grounding: After importing the initial values, the next step is to configure the connections to the Generative AI model and Document Grounding (Retrieval-Augmented Generation). These configurations enable the AI-driven capabilities and integrations of the platform.
- Test the Connections: After configuring the connections to the Generative AI model and Document Grounding, validate them by creating a test AI Agent and verifying communication through the webchat test channel. This confirms that the integration is successful, and that the platform can interact properly with the AI components.
By completing these post-installation steps (importing the initial values, configuring the necessary connections, and testing them) you will ensure that Skybuffer AI is fully operational and ready to deliver its AI-powered enterprise functionalities.
Prerequisites
- The solution components are successfully installed, and the applications are running without errors. For more information, consult our documentation on Skybuffer AI installation on BTP and/or On Premise
- The SAP Web IDE is activated and set up. For more information on getting SAP Web IDE access, please refer to the SAP standard documentation: SAP Web IDE Documentation
- You have the Tenant ID provided by your solution supplier based on the Client’s registration number in the solution provider’s registry system.
- You have the necessary files for initial webchat configuration to be uploaded, these files are to be provided by your Skybuffer AI solution supplies, examples of file names:
BotChannels.InitialDesignParams.csv
Configuration.ChannelWebchatTheme.csv
- You have user credentials with the following access:
- Access to the installed solution applications in the XSA Organization/Space.
- Access to HDI containers and database tables in the SAP Web IDE environment.
Add HDI Containers with Solution Database Tables in SAP Web IDE
Step 1. Log in to the SAP Web IDE environment using the credentials provided by your Administration team.
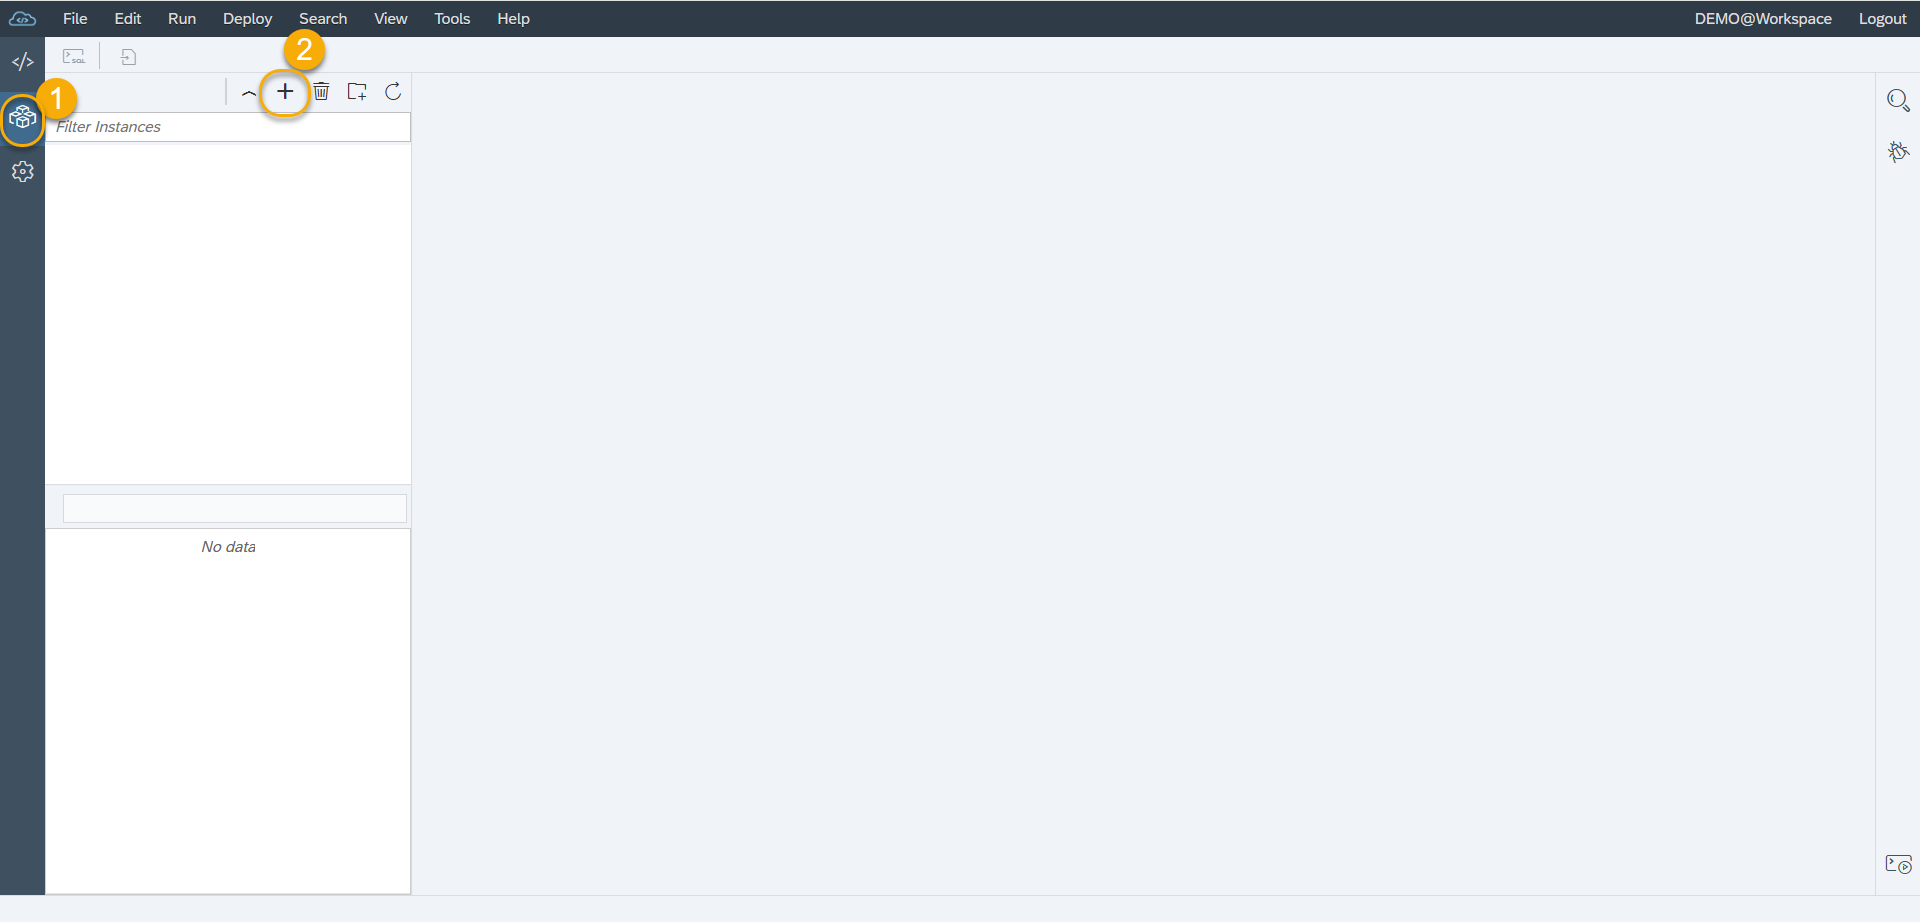
Step 2. Within the Database explorer area (1), add the solution database schemas using ‘+’ button (2).
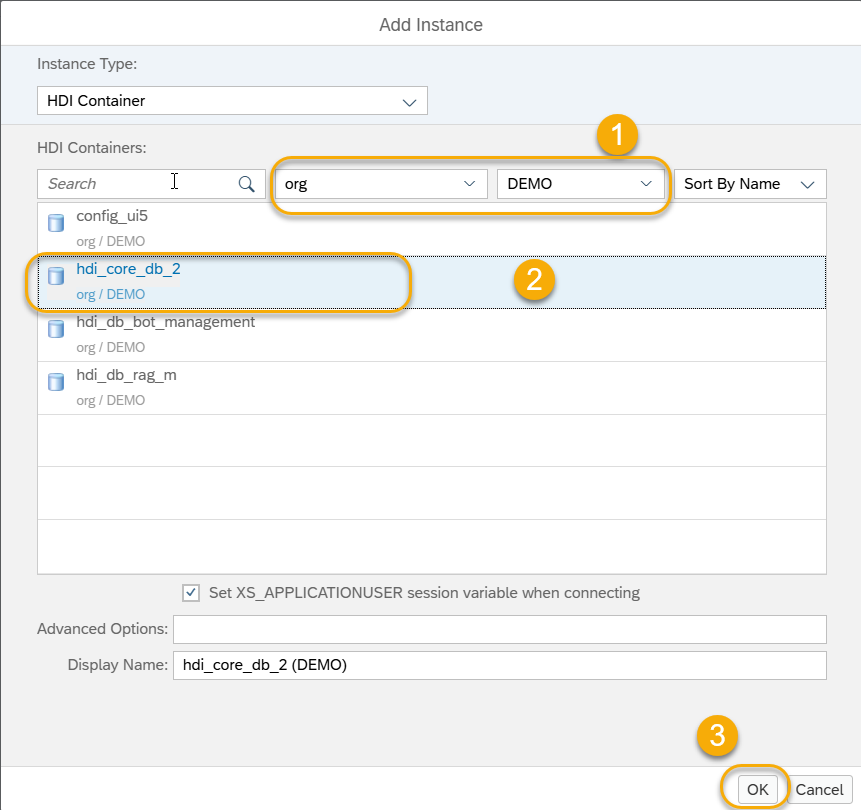
Step 3. Select the Organization and Space where Skybuffer AI solution is installed (1) and select the database schemas hdi_core_db_2 (2) and press OK (3).
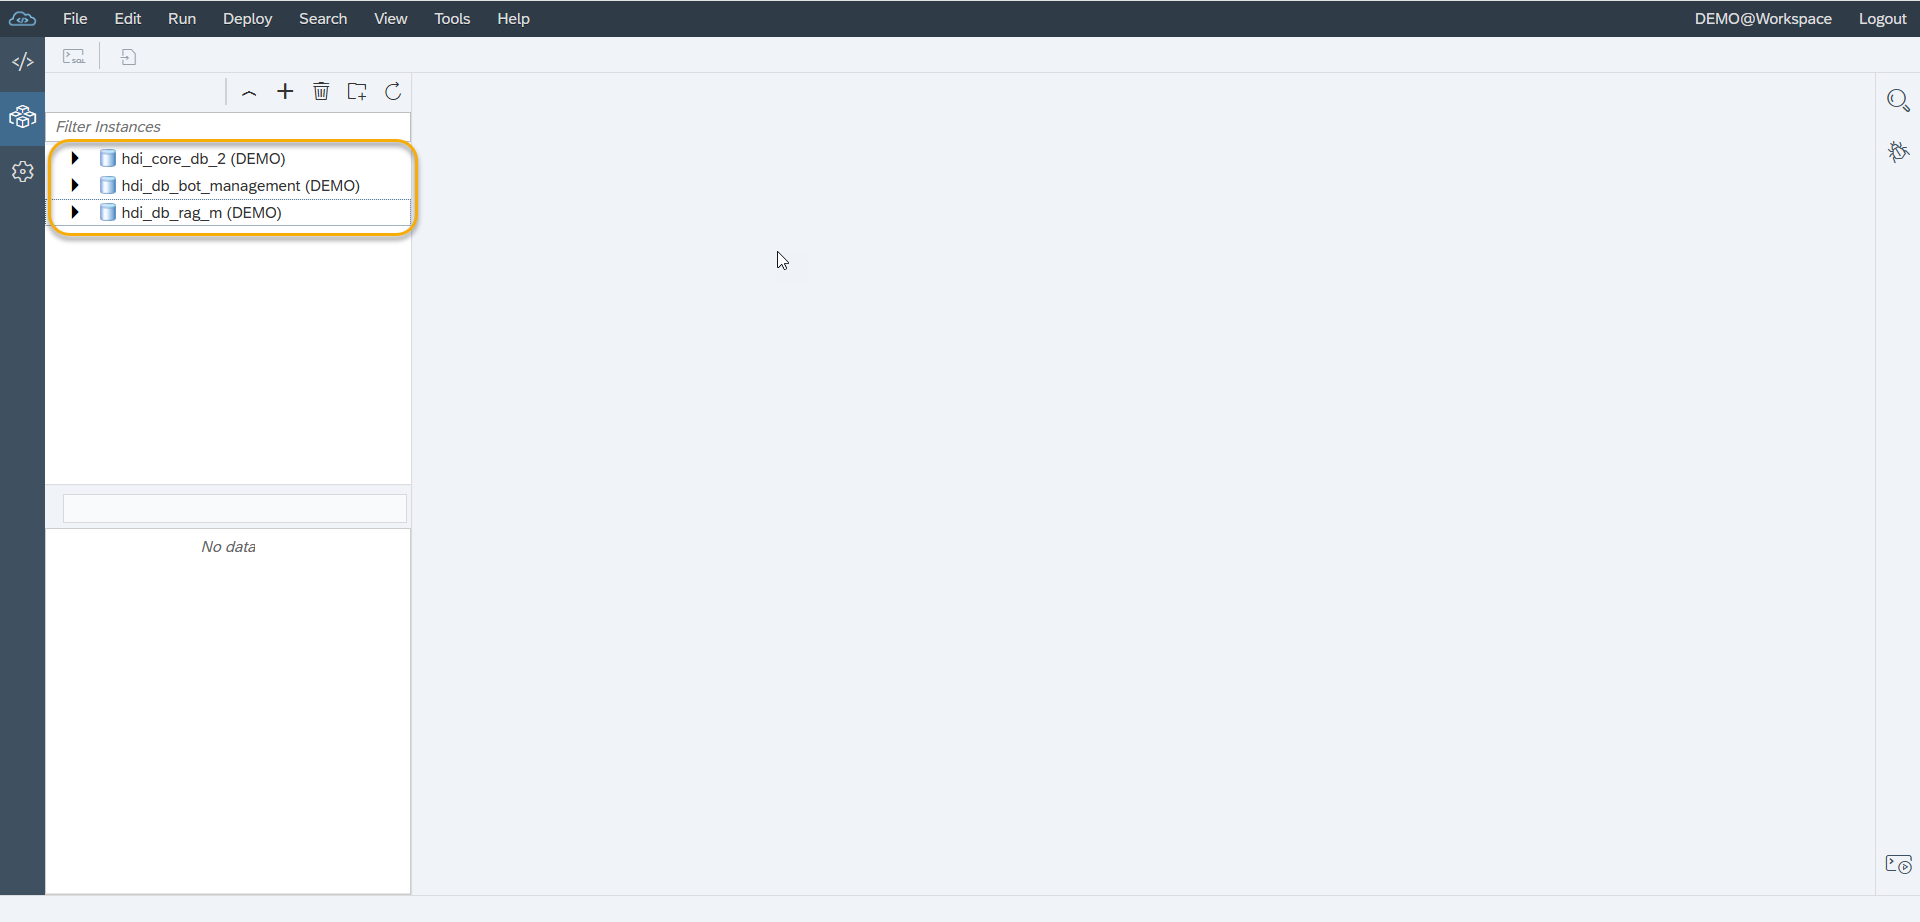
Step 4. Repeat the same procedure for HDI containers hdi_db_bot_management, hdi_db_rag_m.
Step 5. As a result, you should have 3 HDI containers added:
Add Tenant Record
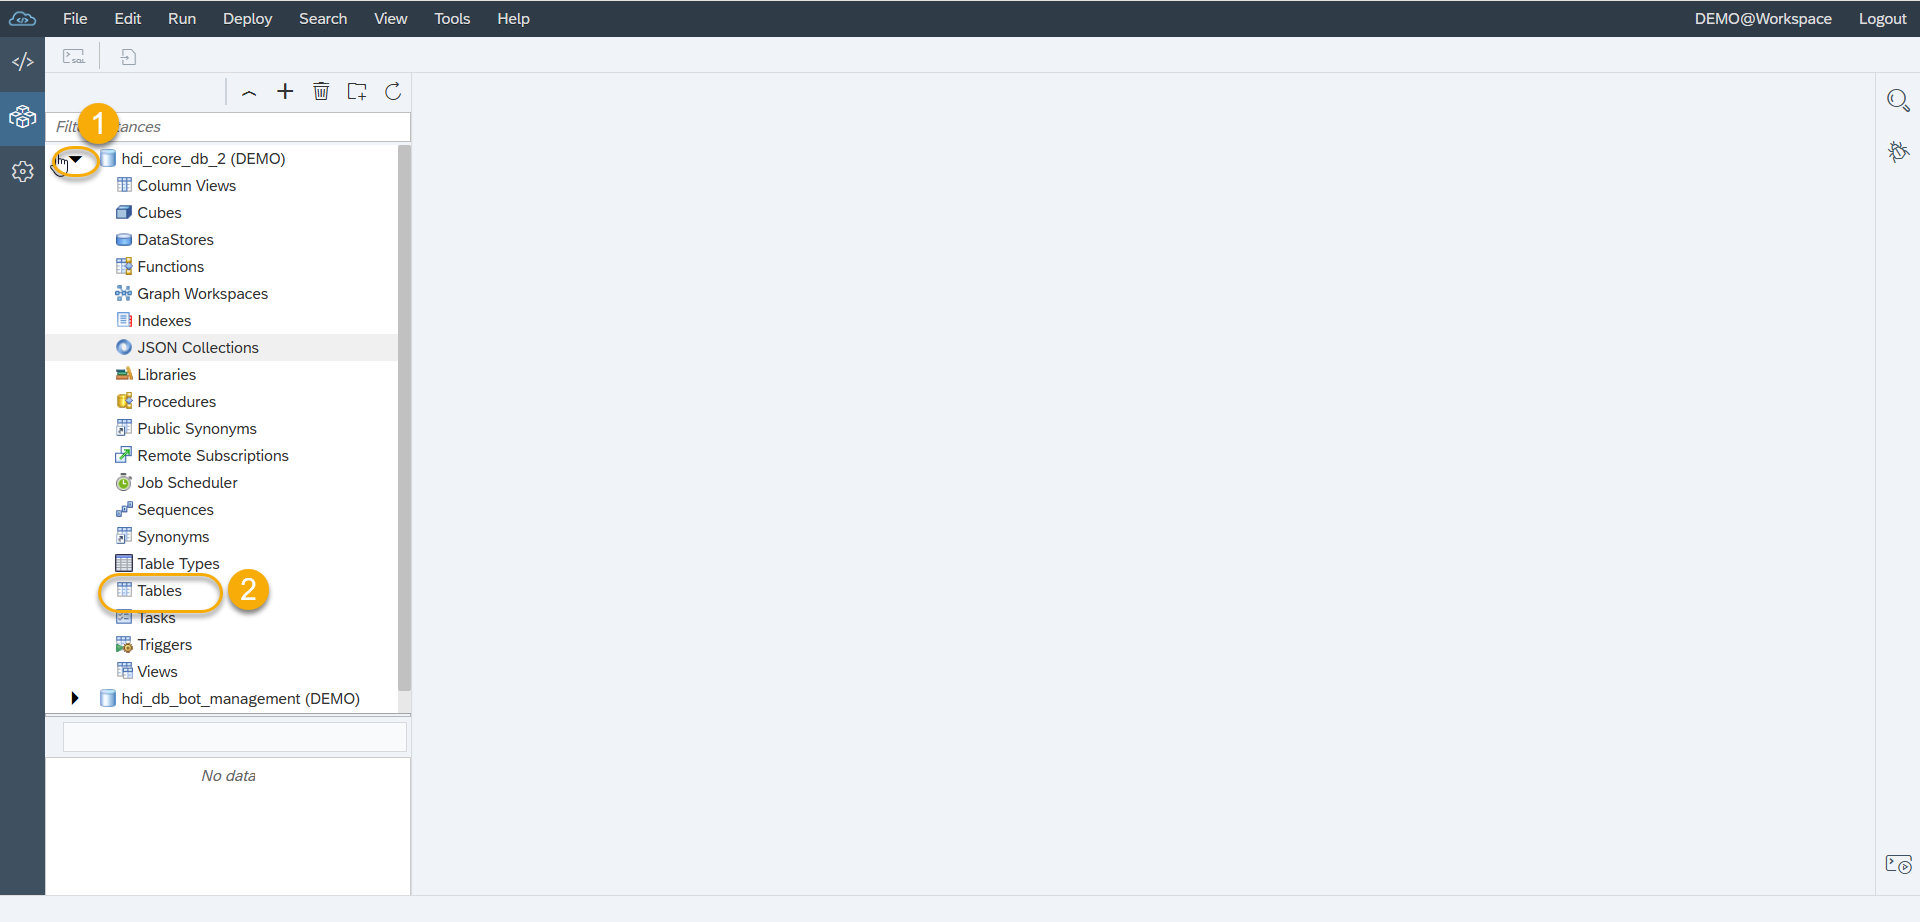
Step 1. From the Instances overview area expand the hdi_core_db_2 container (1) and double click the Tables item (2)
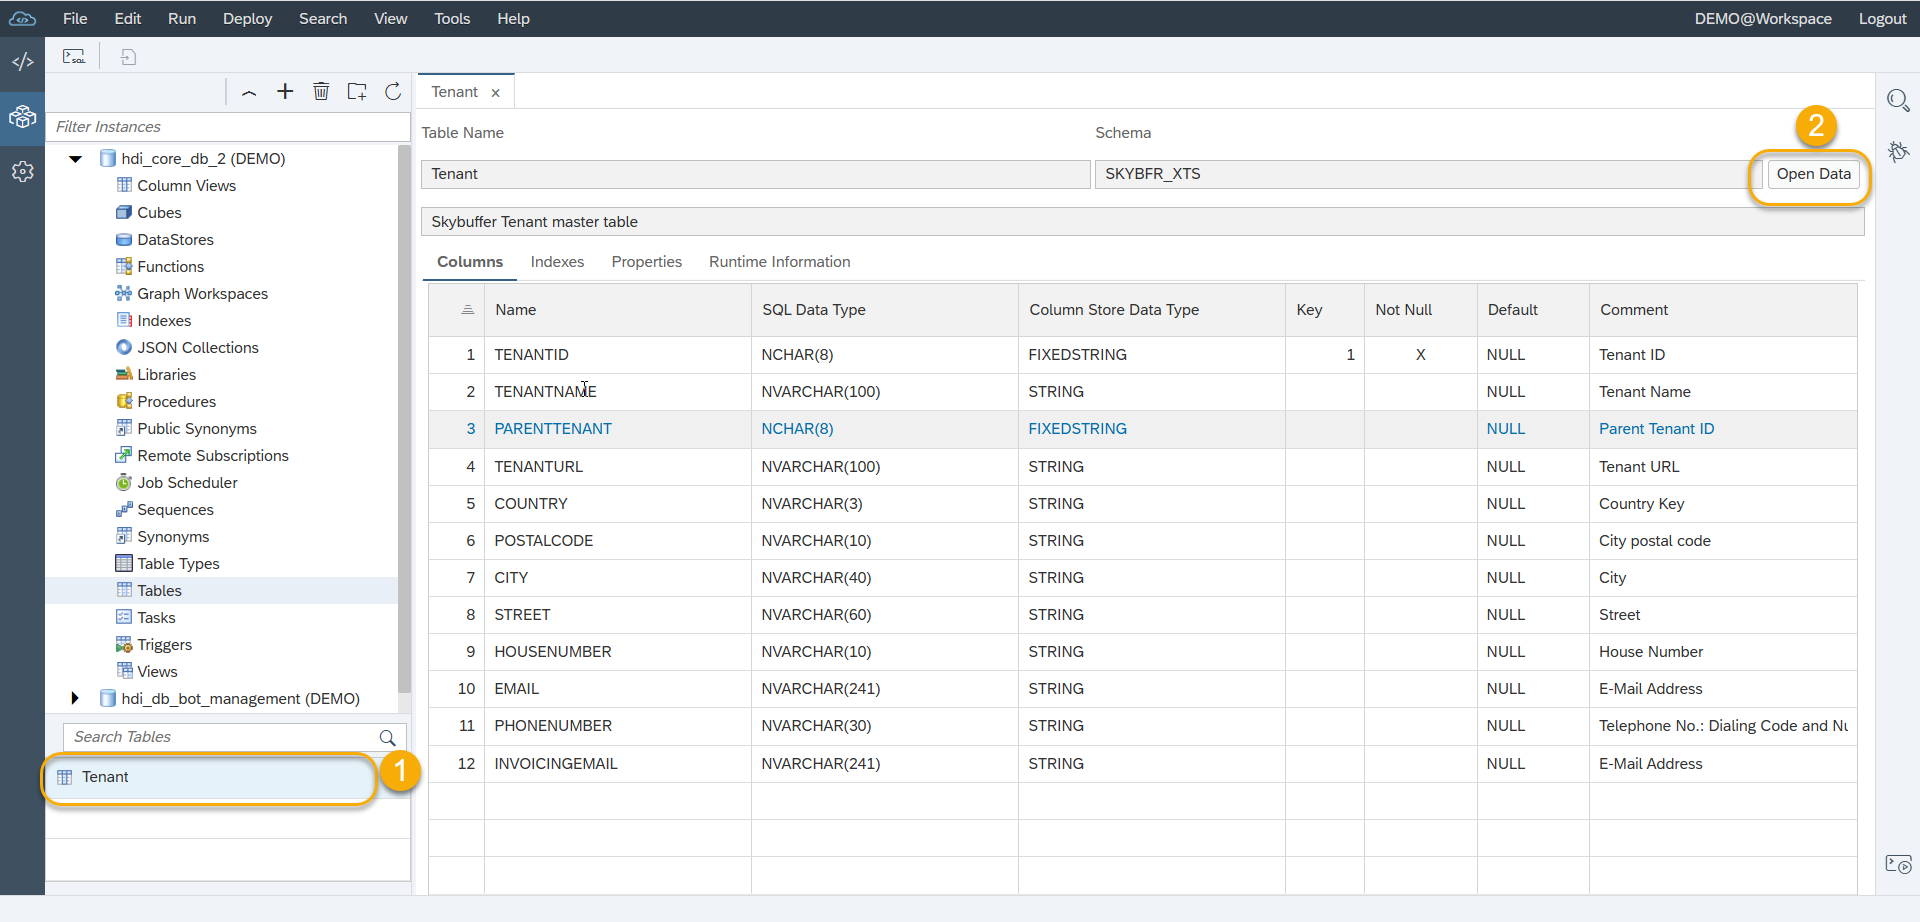
Step 2. Click on the Tenant table (1) and press the Open Data button (2)
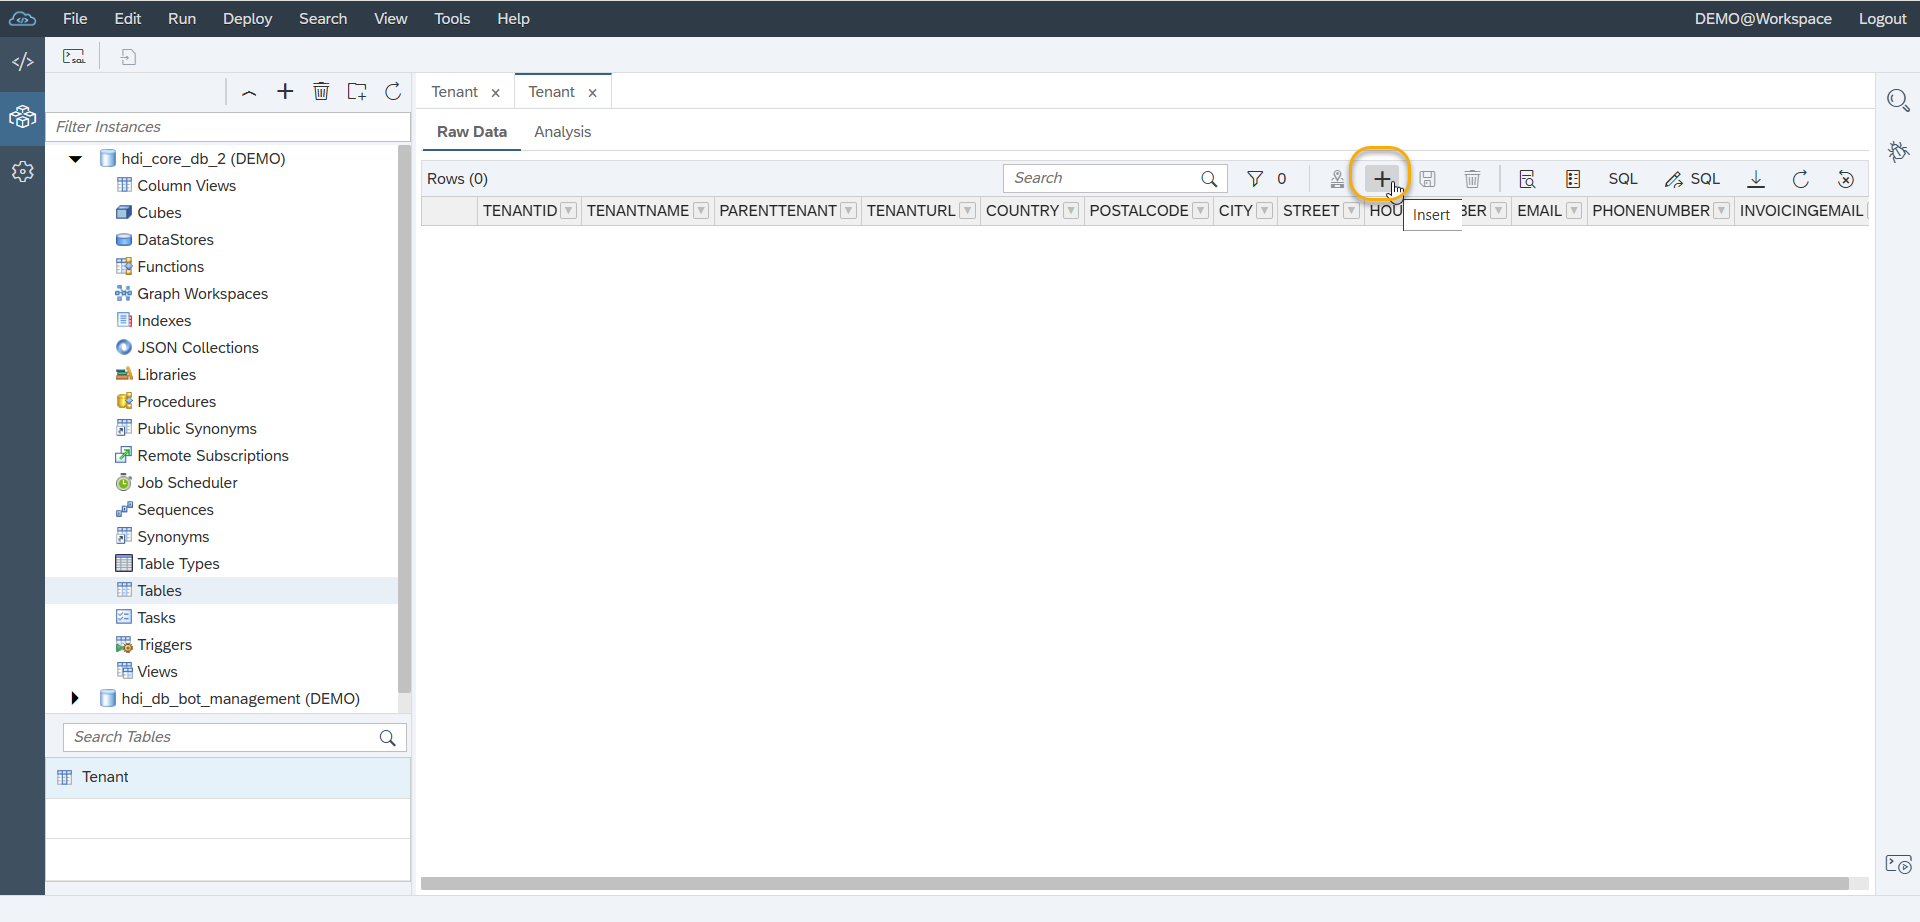
Step 3. Press ‘+’ button to add a new record.
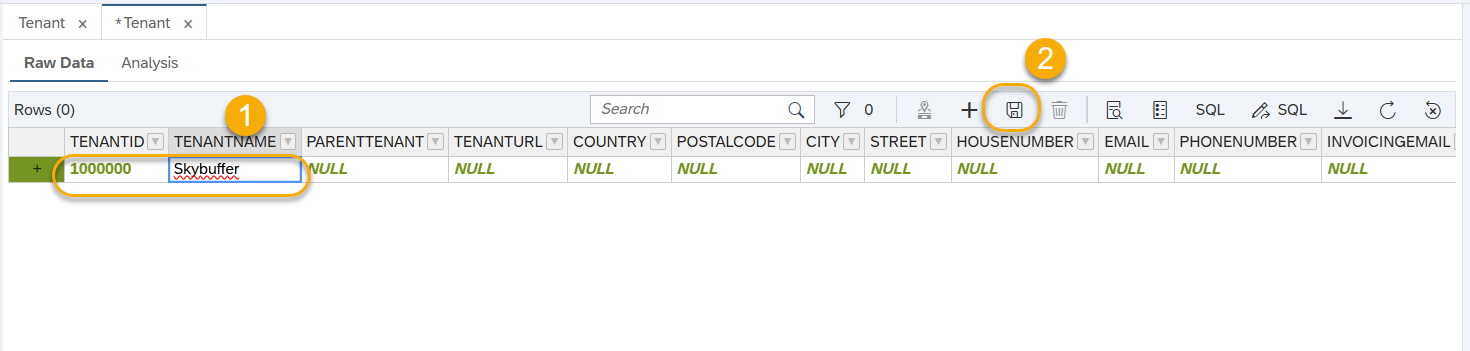
Step 4. Input the Tenant data. TENANTID is a mandatory field, a new numeric value that represents the ID of the licensed solution instance. To edit the value, press Enter on a respective cell (1). Press Save once editing is completed (2).
 NOTE: Tenant ID should be provided by the solution supplier and is connected to the license. If your installation includes integration with Hybrid Chats (contact center solution by Skybuffer), Tenant ID should be synchronized with the Hybrid Chats tenant. I.e. the Tenant ID should be taken from Hybrid Chats.
Initial Webchat Parameters Import
Import Initial Design Parameters for Webchat
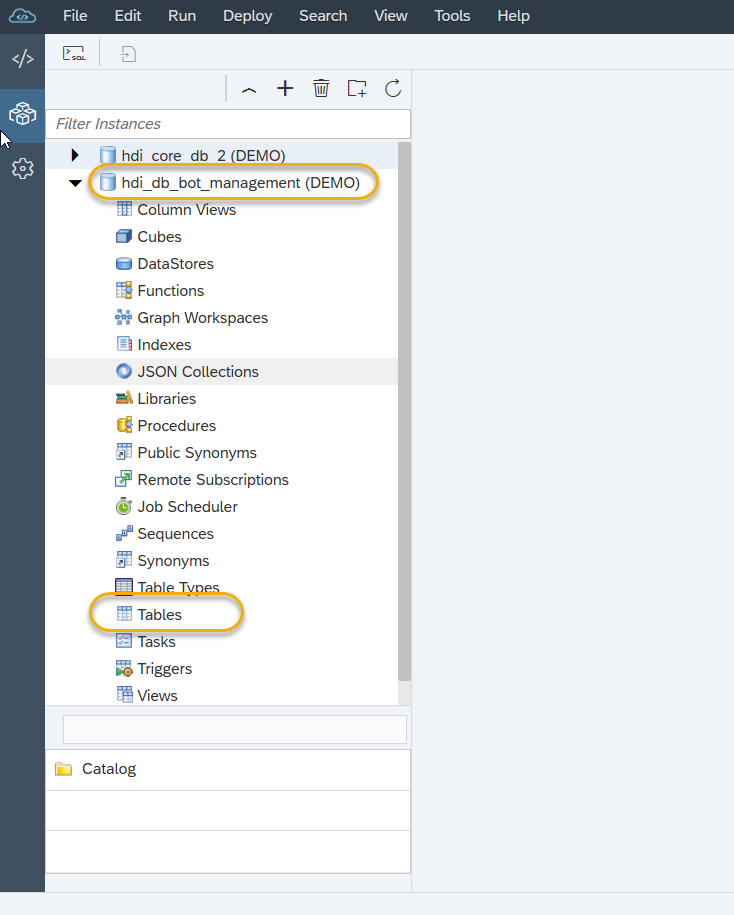
Step 1. From the SAP Web IDE HDI containers list area, expand the hdi_db_bot_management container and navigate to the tables list.
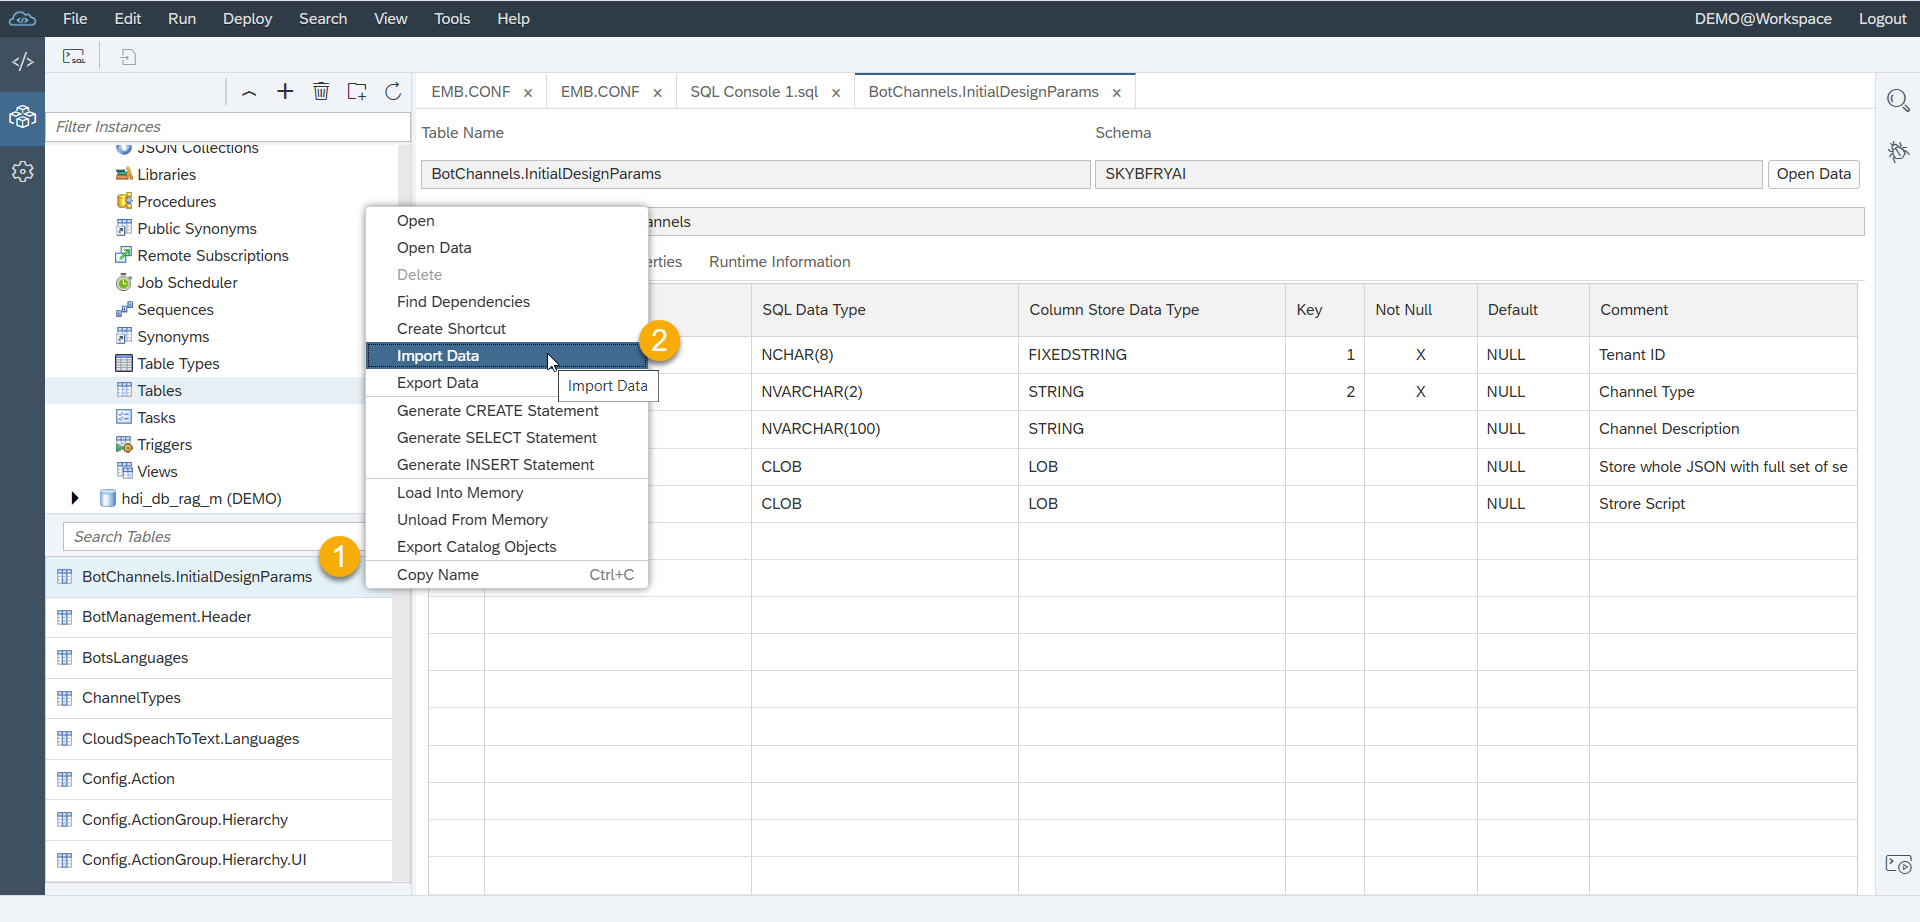
Step 2. Right click on the BotChannels.InitialDesignParams table (1) and select the Import Data function (2).

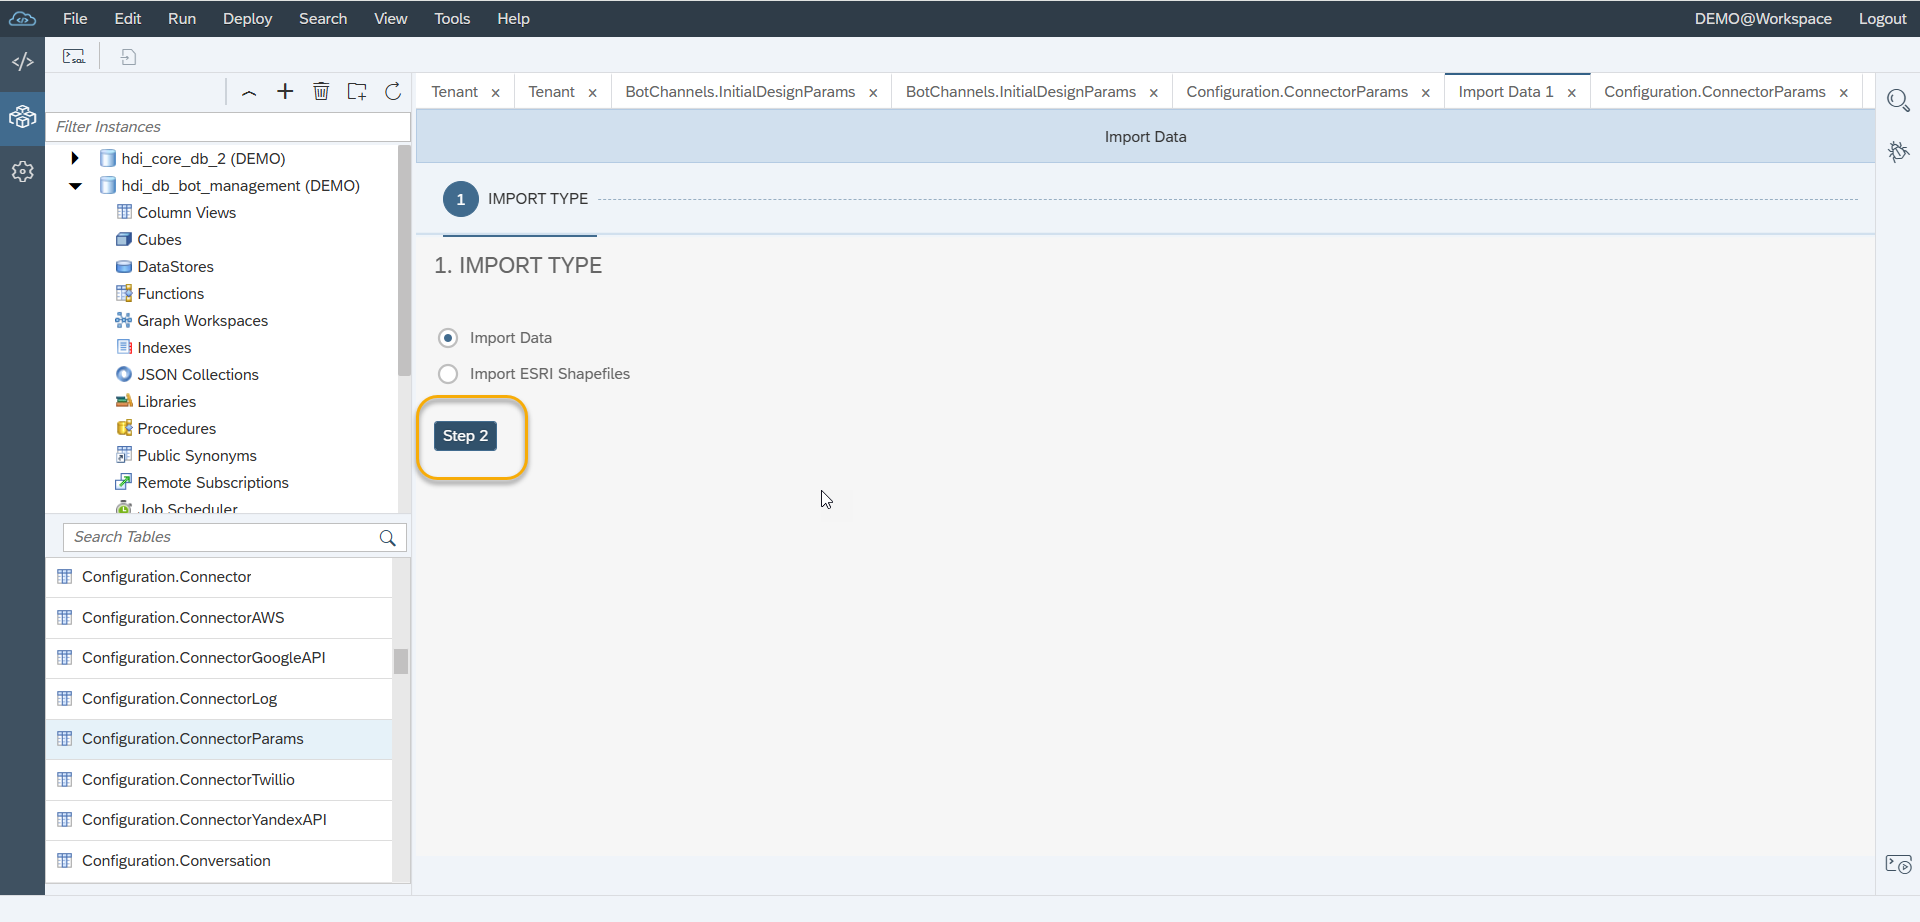
Step 3. Proceed to Step 2 of the import procedure with no change to default setting.
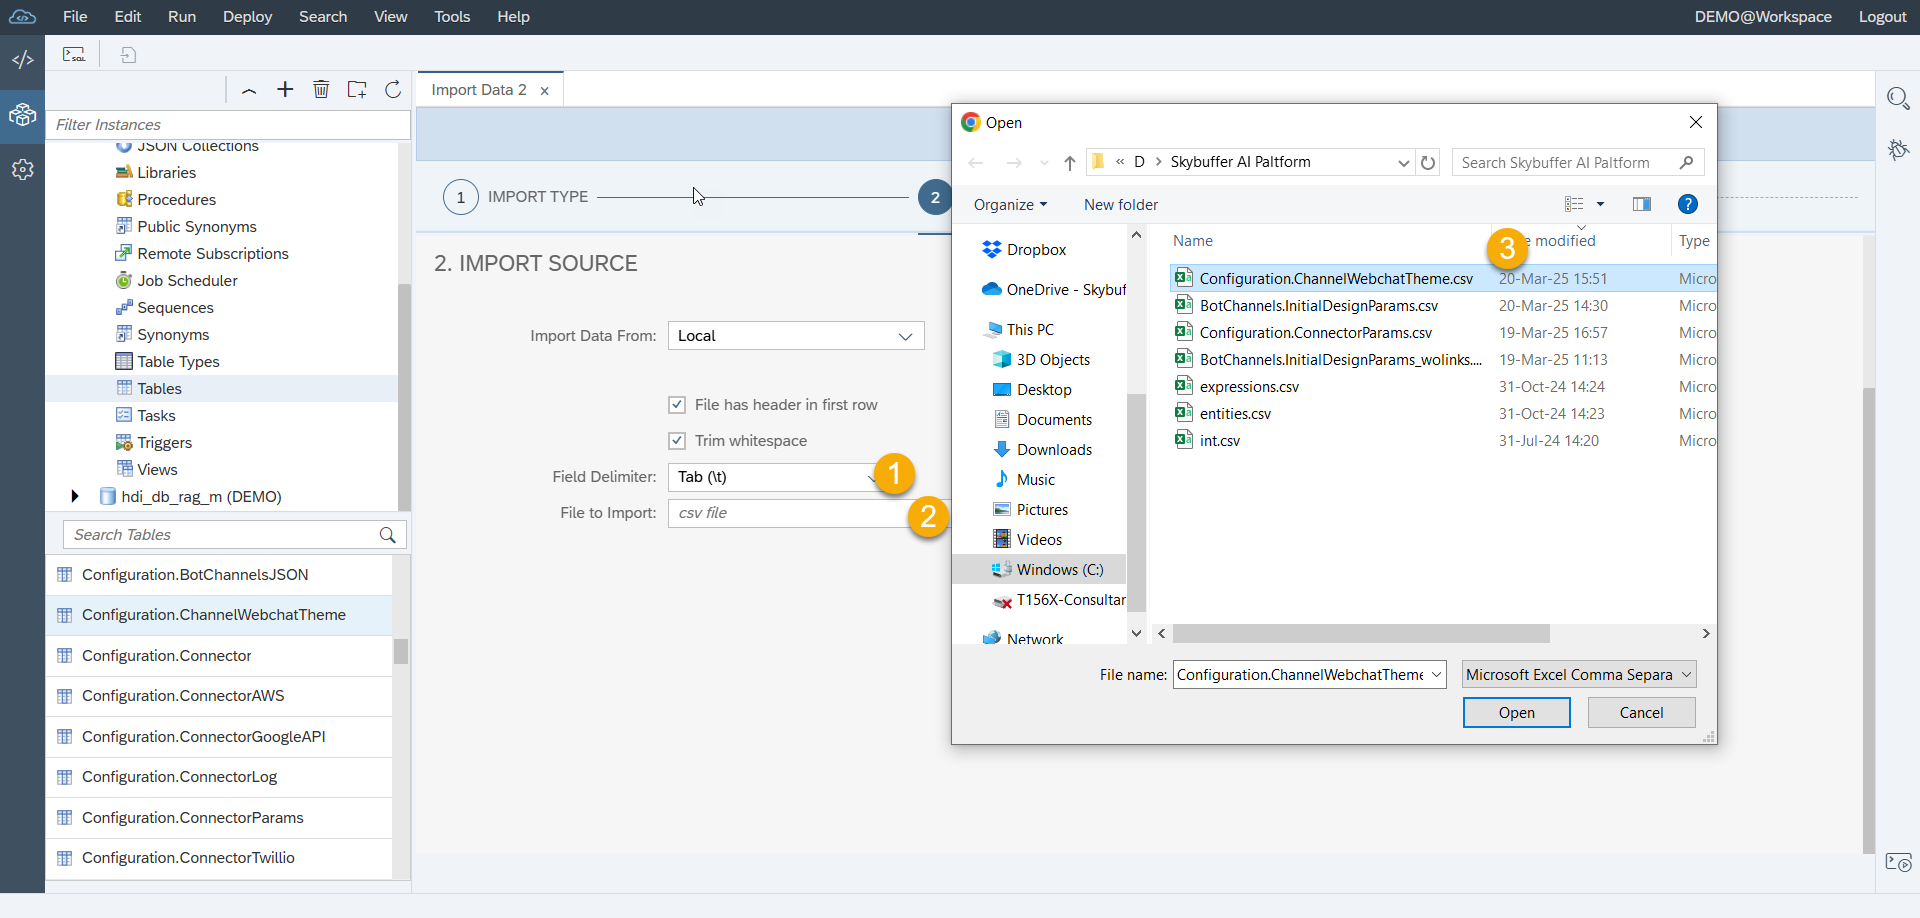
Step 4. Within Step 2 of the import procedure, set the delimiter as Tab (1), press the Browse button to navigate to a source file selection (2). Select the file with the Initial Webchat parameters (by default, the csv file of BotChannels.InitialDesignParams.csv is supplied by the solution supplier) (3).

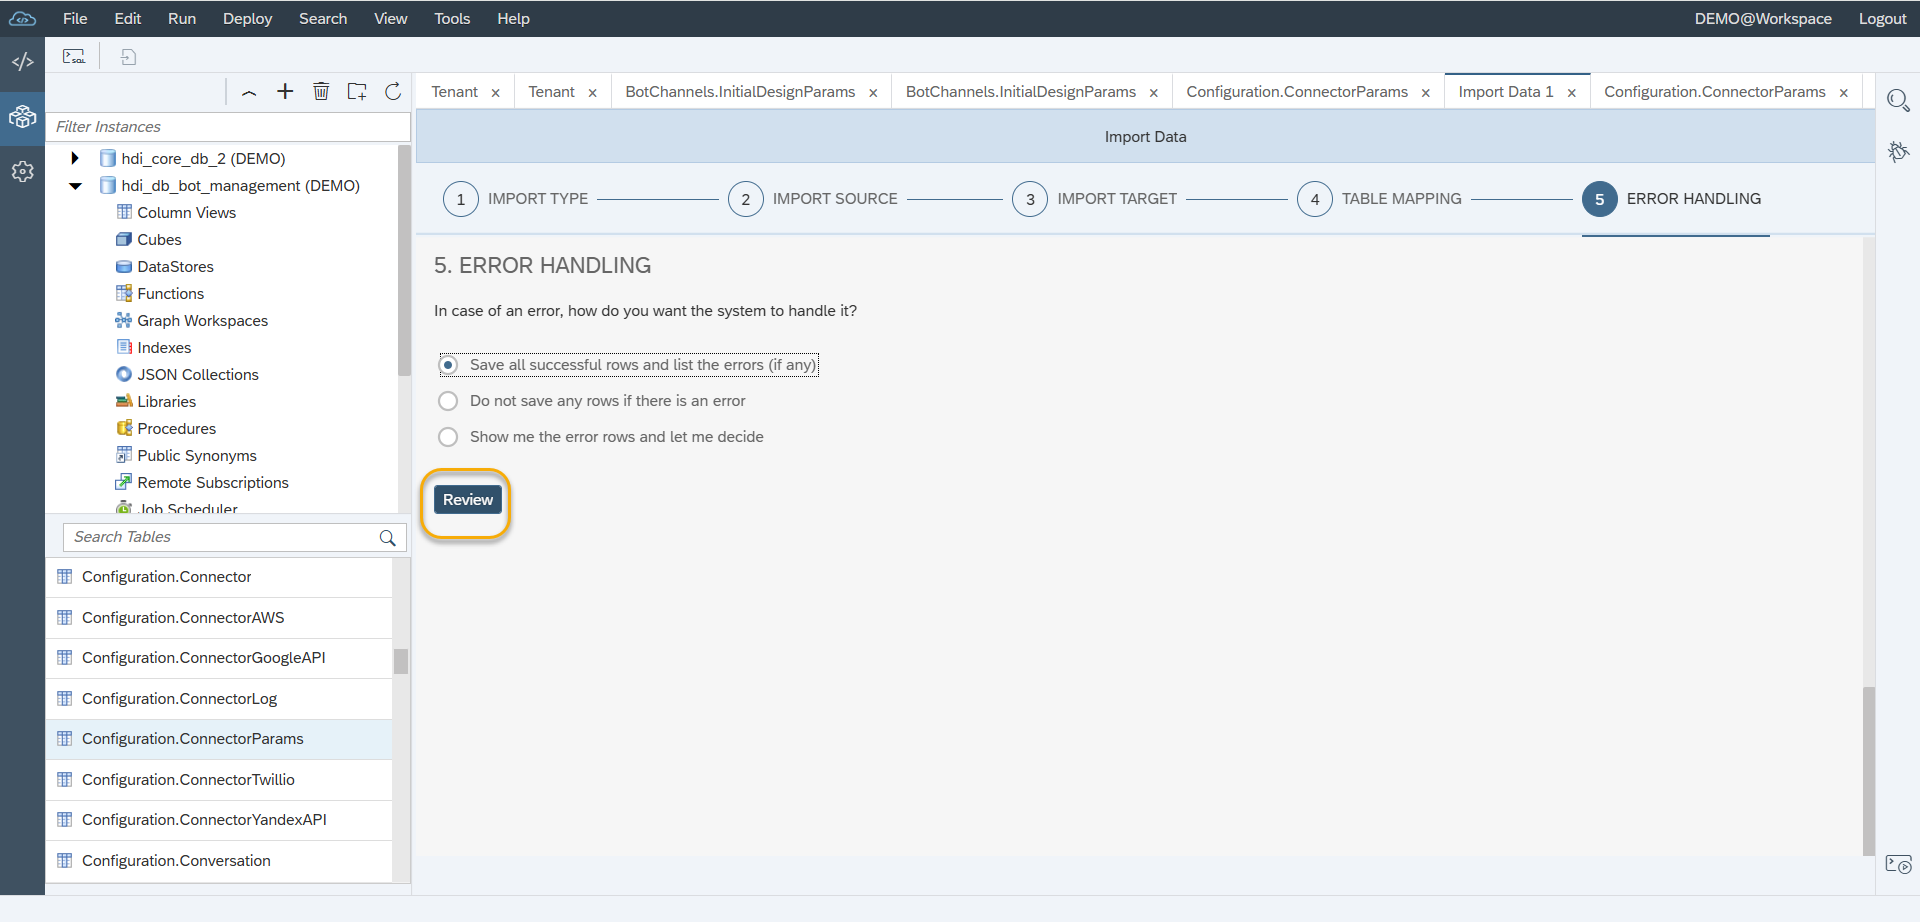
Step 5. Proceed to Step 5 of the import procedure with no changes to the default values. Press Review.
Step 6. During the final step, press the Import Into Database button.
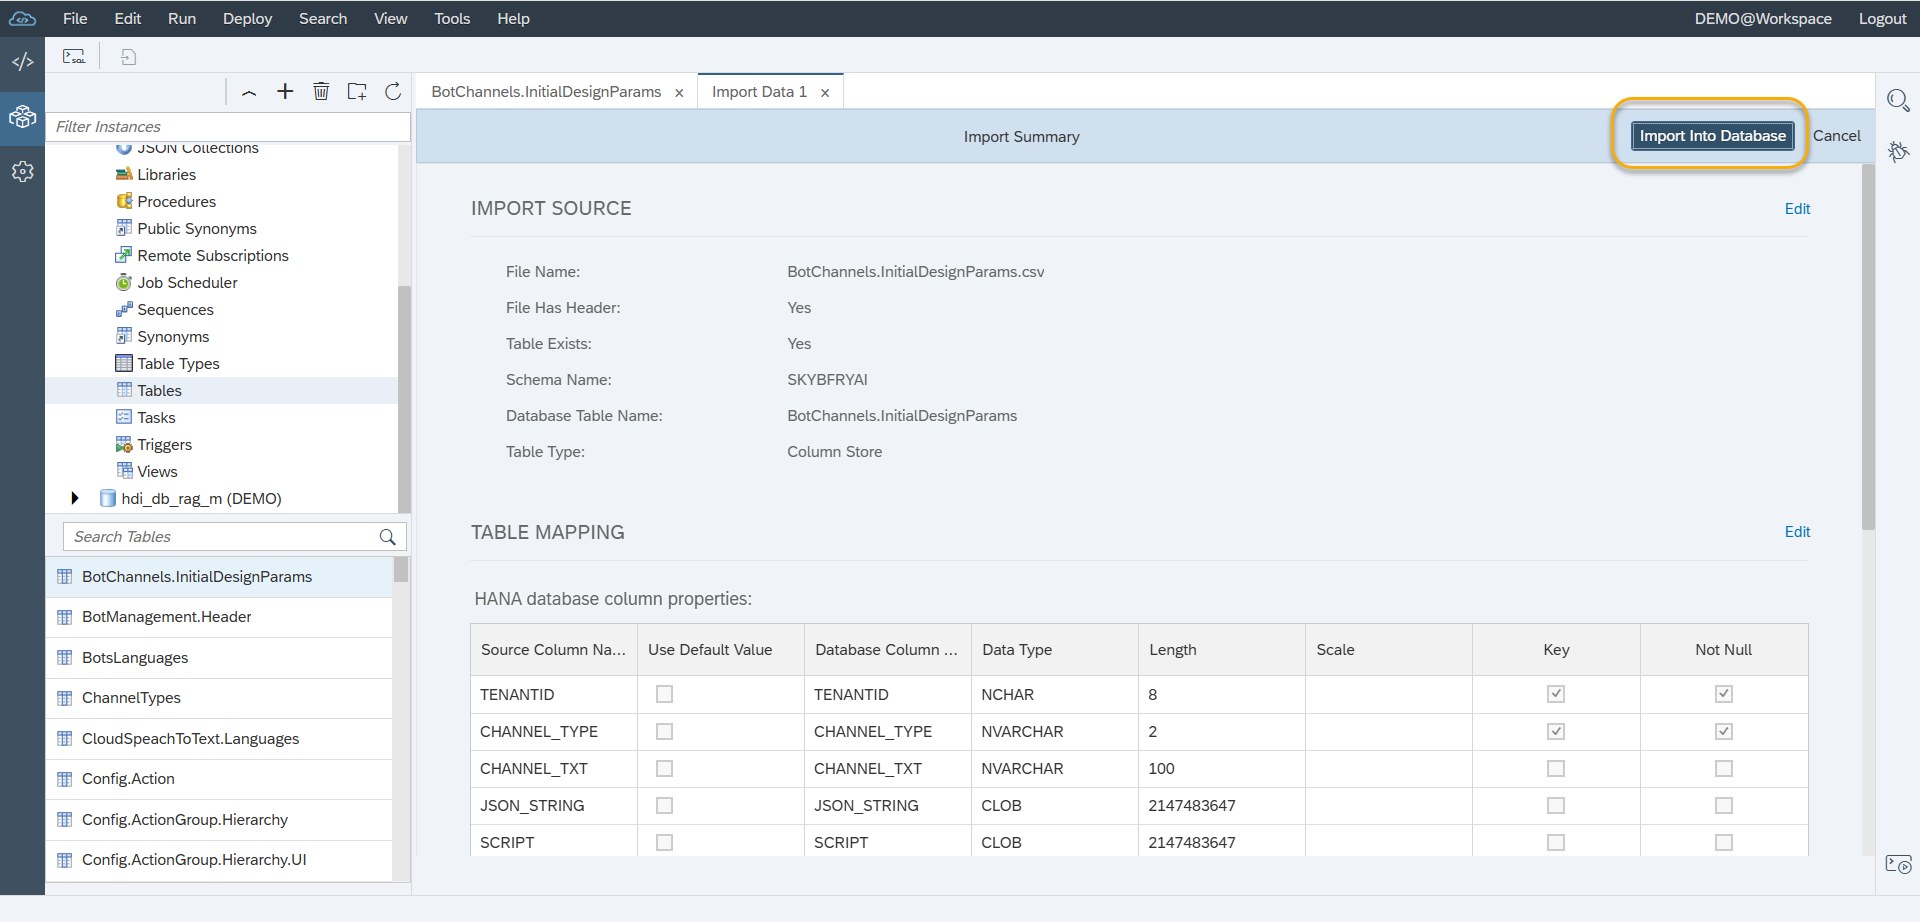
Now the import of the webchat default parameters is completed.
Import Webchat Themes

Step 1. From the SAP Web IDE HDI containers list area, expand the hdi_db_bot_management container and navigate to the Tables list.
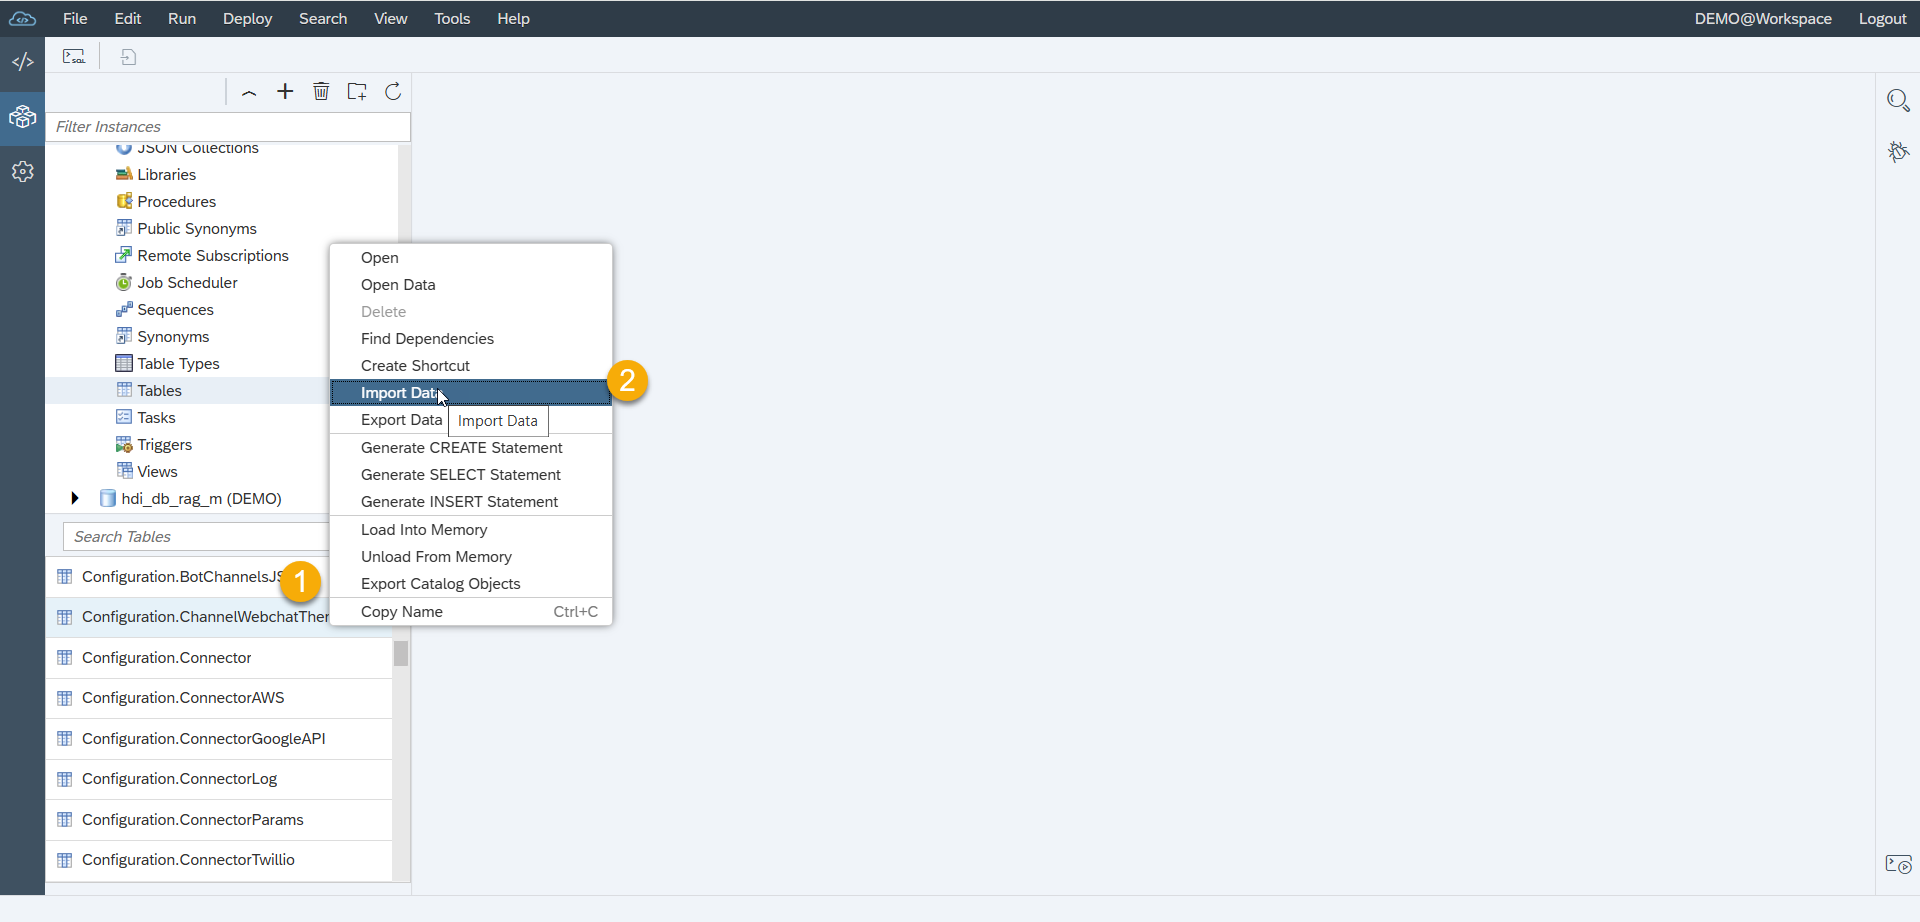
Step 2. Right click on the Configuration.ChannelWebchatTheme table (1) and select the Import (2) function.
Step 3. Proceed to Step 2 of the import procedure with no change to default setting.
Step 4. Within the Step 2 of the import procedure set the delimiter as Tab (1), press the Browse button to navigate to a source file selection (2). Select the file with Webchat Theme record (by default, the csv file of Configuration.ChannelWebchatTheme.csv is supplied by the solution supplier) (3).

Step 5. Proceed to Step 5 of the import procedure with no changes to the default values. Press Review.

Step 6. During the final step, press the Import Into Database button.
Step 7. Import of the webchat default parameters is completed.
Create Generative AI Connection in Models Hub
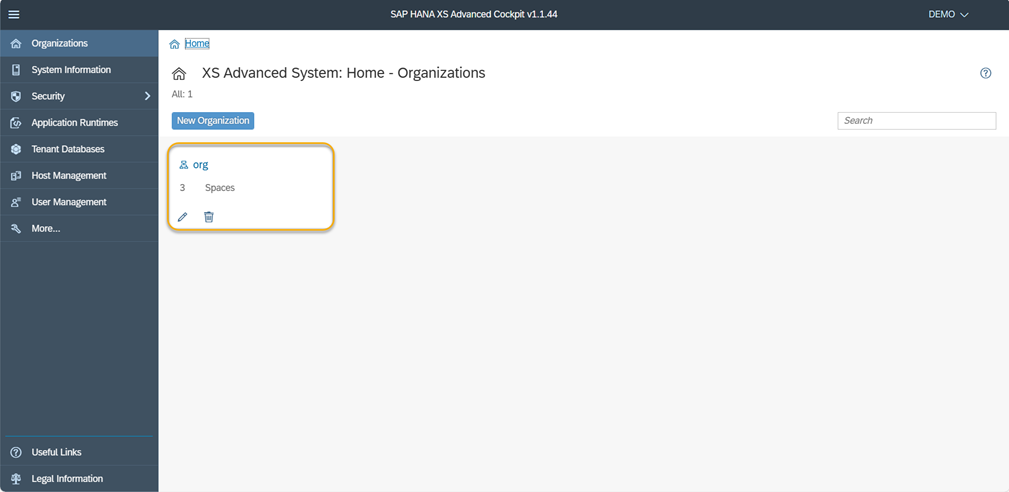
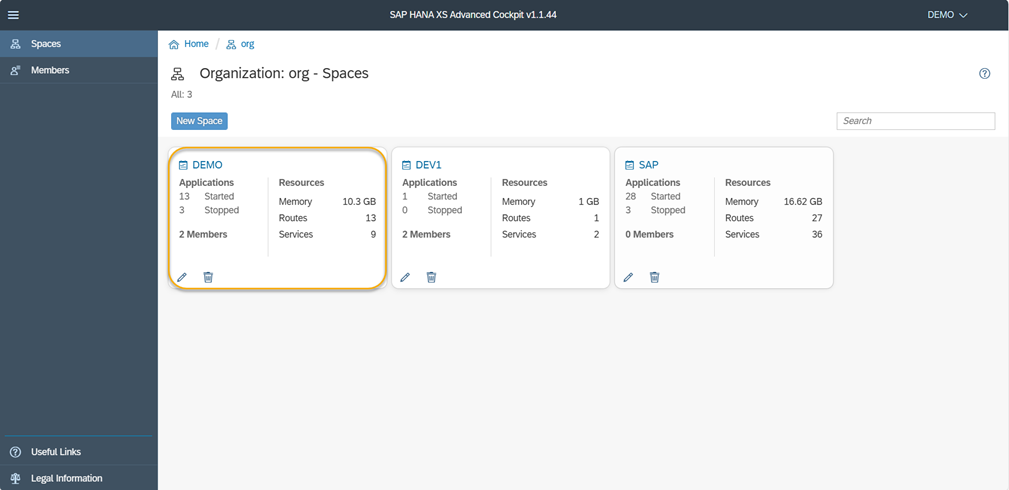
Step 1. Log in to the installed solution applications in the XSA Organization/Space and select the space where Skybuffer AI applications are installed.
Step 2. You will see a list of applications. Select the application of platform.
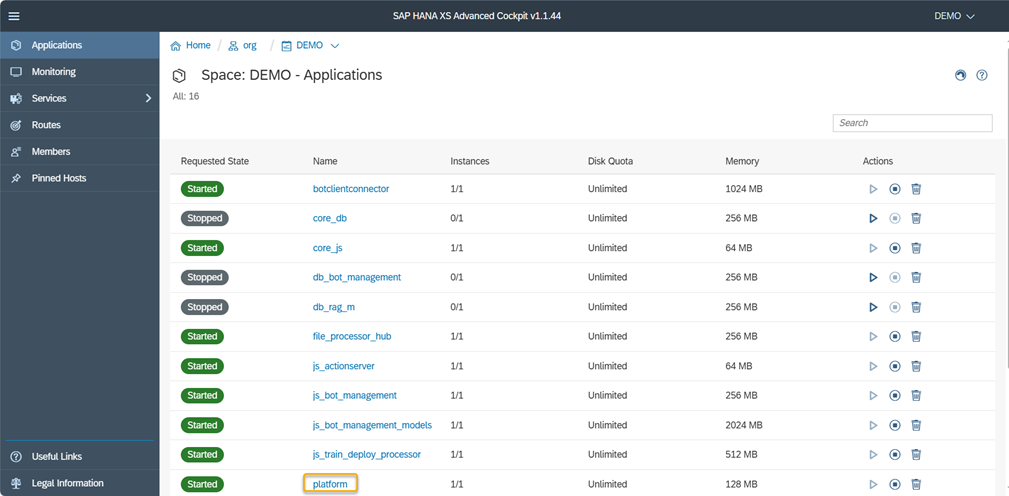
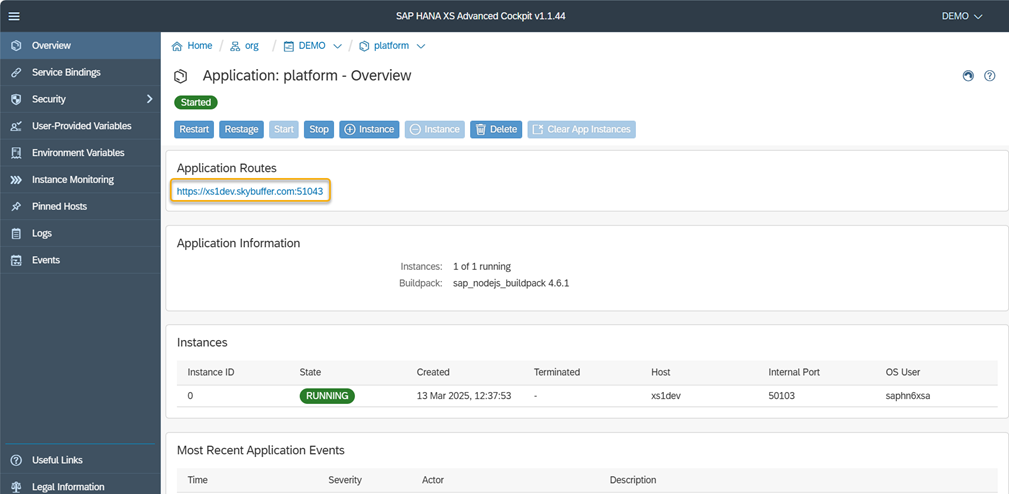
Step 3. Click on the link provided below the Application Routes in order to access the selected application.
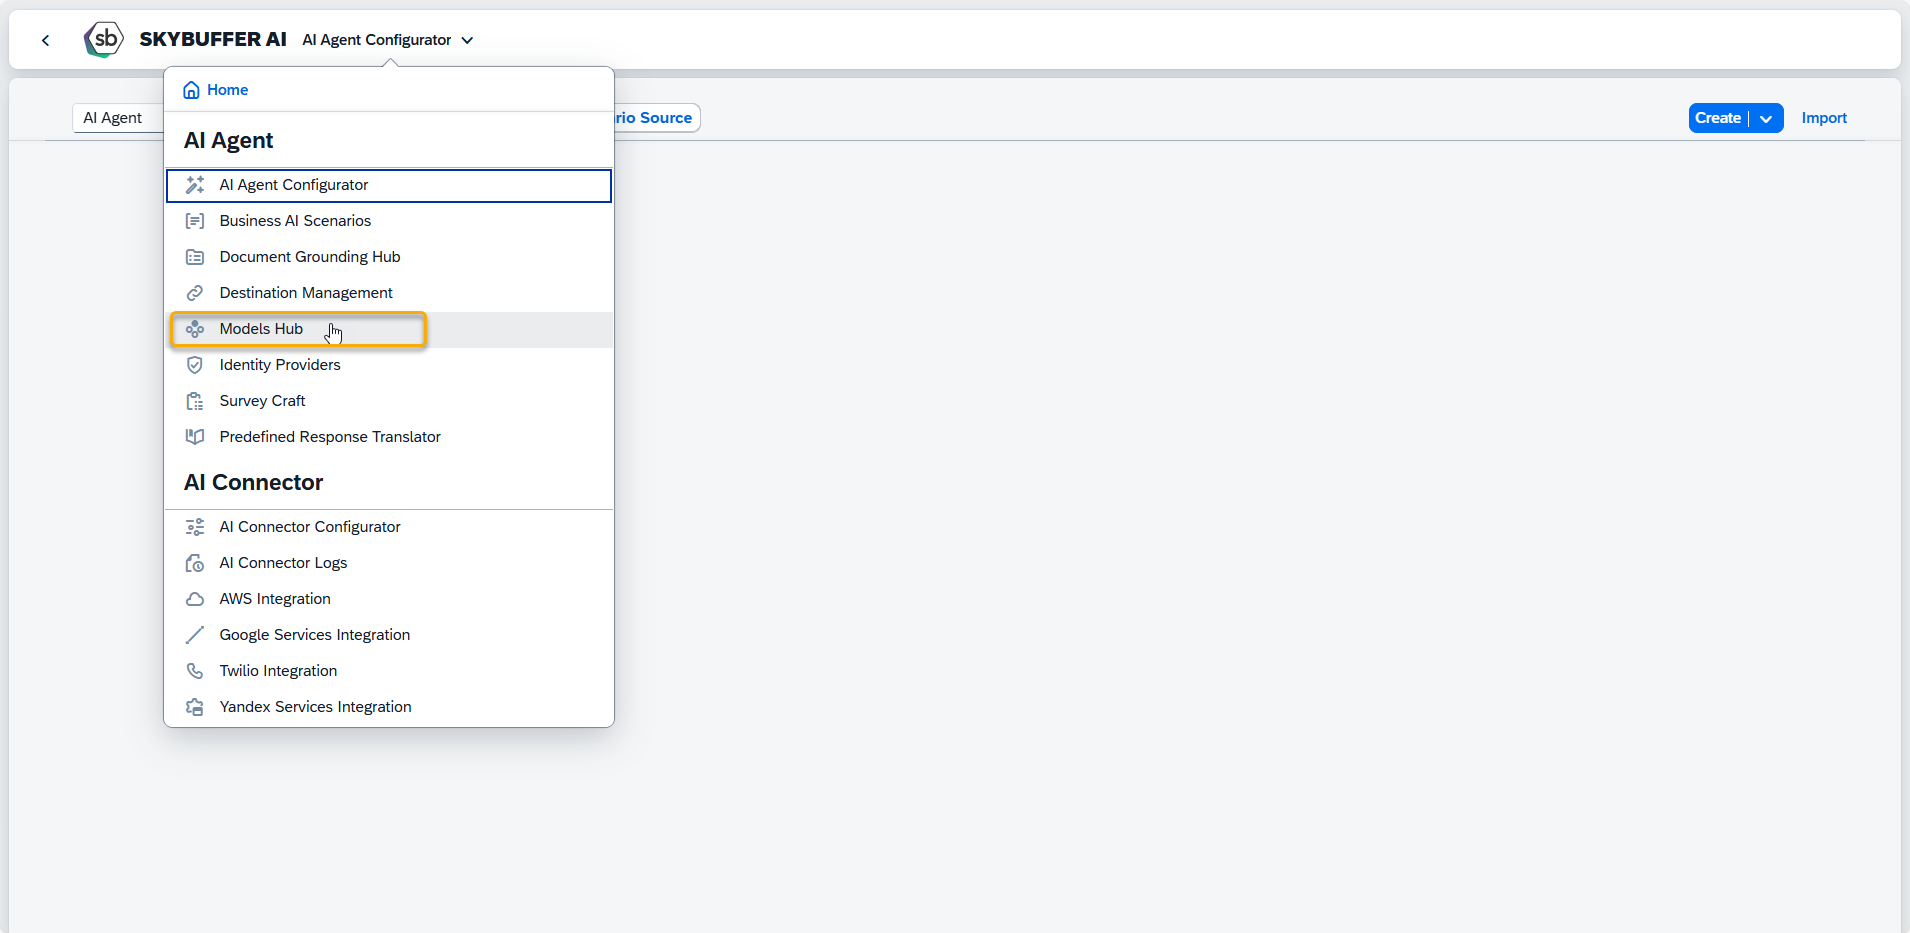
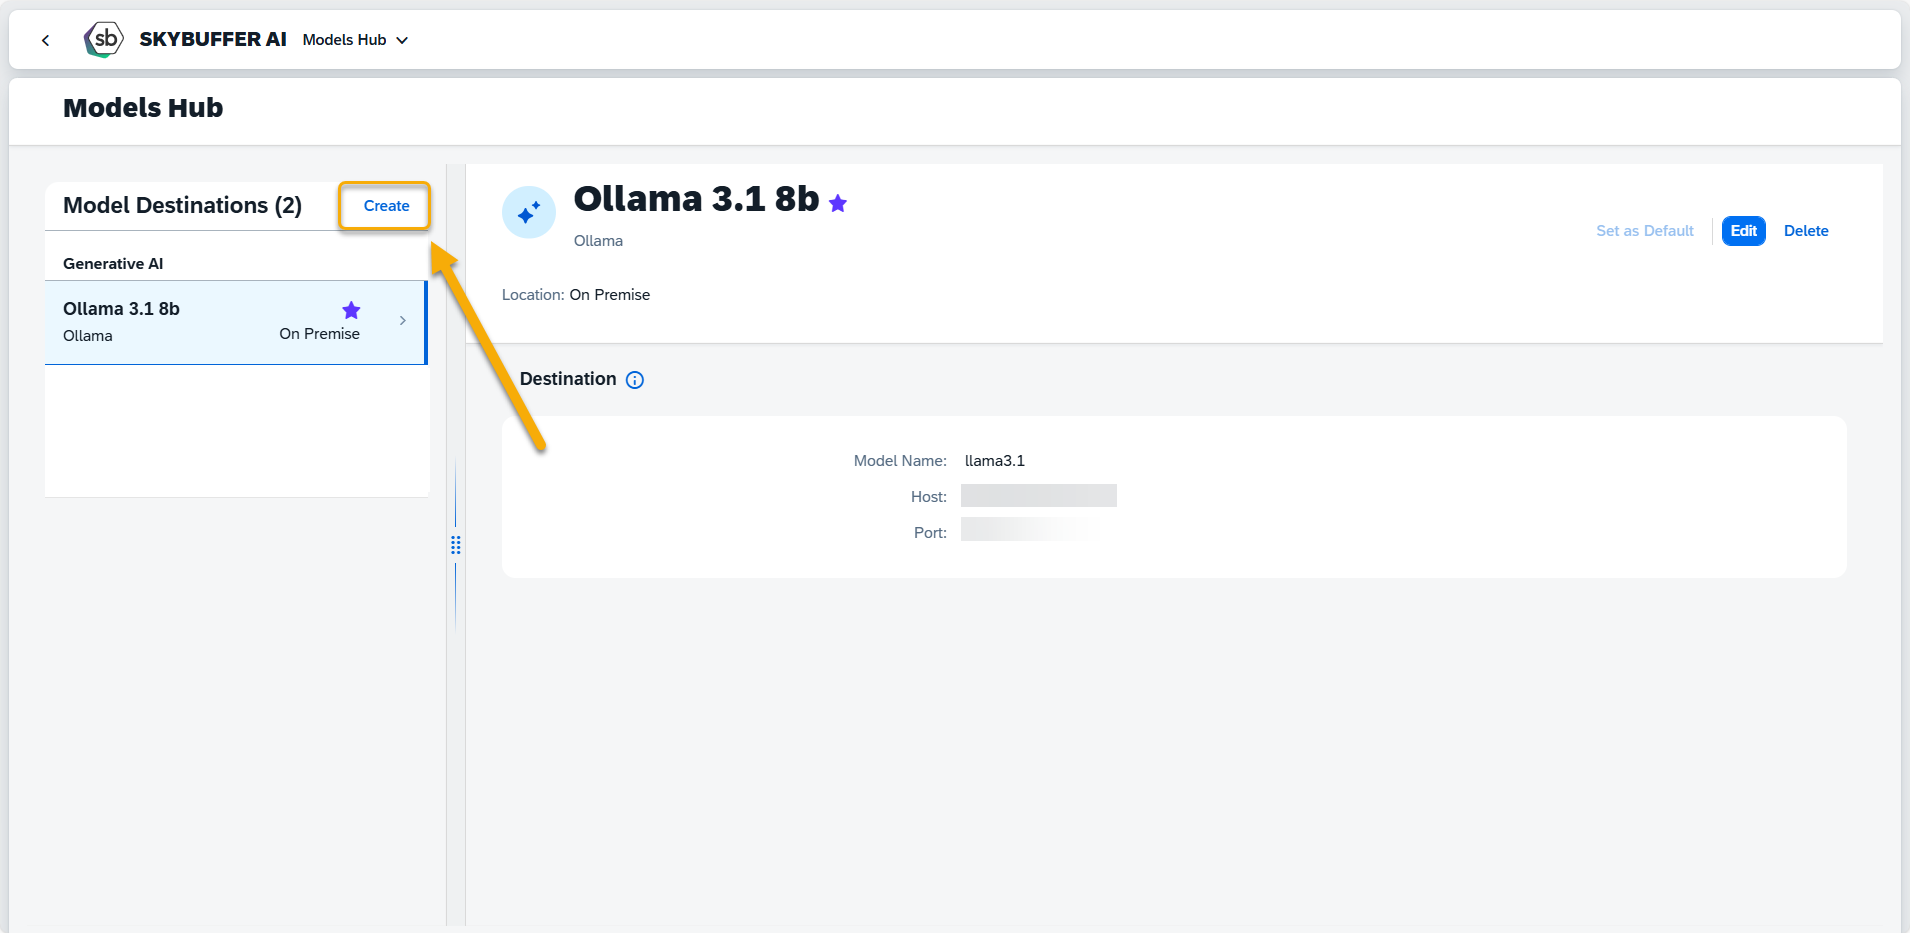
Step 4. The first page you will see is the AI Agent Configurator application. To create a Generative AI connection, navigate to the Models Hub application. Open the navigation list and select Models Hub.
Step 5. Click the Create button to add a new connection.
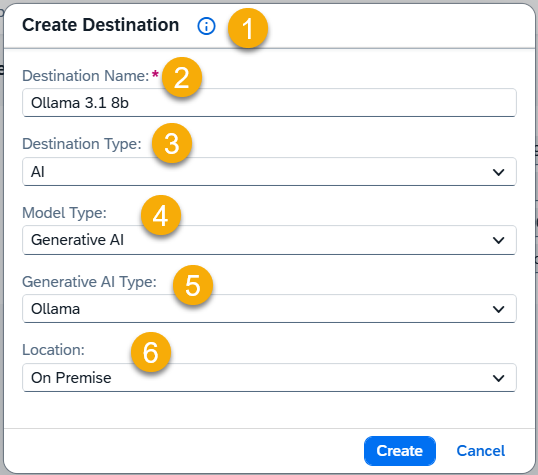
Step 6. Fill in the basic data for the Generative AI Model connection:
For guidance and hints, click the Information icon (1).
Destination Name (2)
Enter a unique name to easily identify this model destination.
Destination Type (3)
Select one of the following destination types:
- AI – For AI destinations such as Generative AI model destinations or Document Grounding space destinations.
- Shared Location – For document storage locations, primarily used for conversion in the Document Grounding Hub (e.g., Microsoft SharePoint or other shared repositories).
AI Type (4)
Choose the relevant AI type:
- Generative AI – For content generation models
- Document Grounding – For vectorized document storage.
Additional Fields for Generative AI (5)
If you select Generative AI, two additional fields will appear:
- Generative AI Type: Choose either Ollama or OpenAI.
- Location:
- For Ollama: Select from On-Premise, SAP AI Core, or SAP Generative AI Hub.
- For OpenAI: Choose either SAP Generative AI Hub or API Endpoint (if you plan to use your OpenAI key).
Example for Creating a Generative AI Connection with Ollama On-Premise:
- Destination Name: Ollama 3.1 8b
- Destination Type: AI
- Model Type: Generative AI
- Generative AI Type: Ollama
- Location: On-Premise
Step 7. Press the Create button.
Step 8. Within the Destination details screen, fill in all necessary information and press the Save button.
Model Name: Enter the name of the AI Model you are planning to use for Generative AI actions.
For example, Ollama models list: Ollama Models
Host and Port: Enter the address of the server where the model is located (residing)
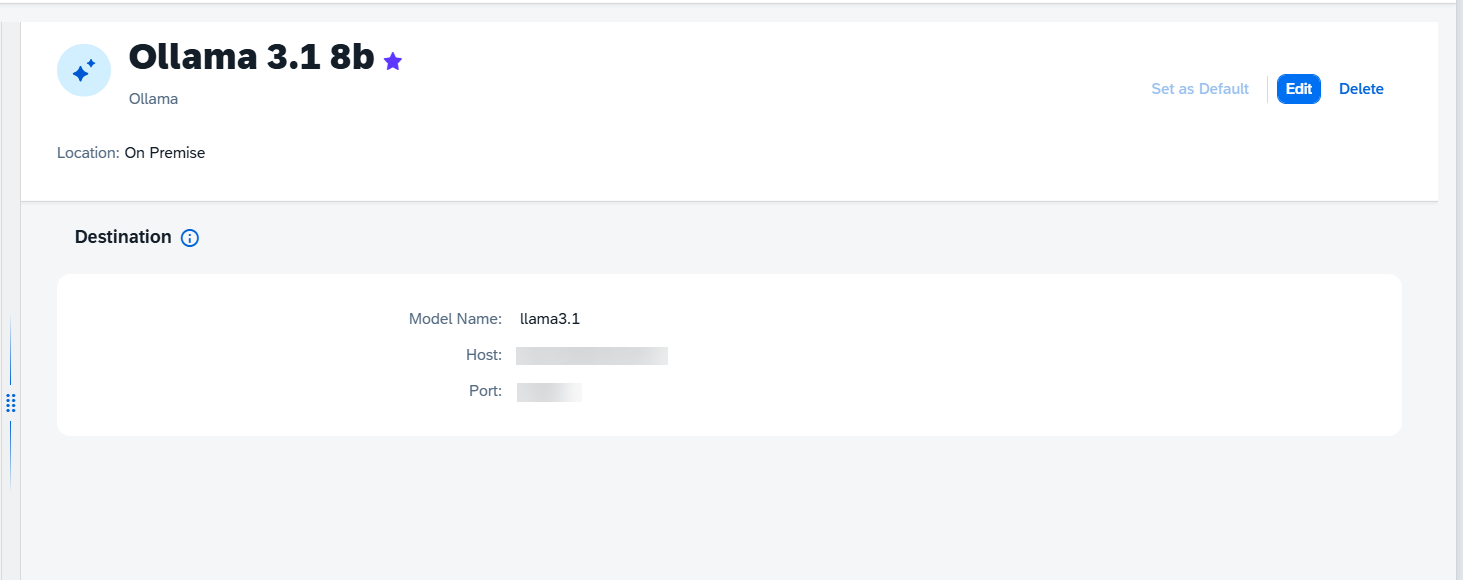
Step 9. Once you have finished setting up this configuration, click the Set as default button. This will automatically add your connection to the Generative AI Destination field when creating a Generative AI action in the new AI Agent.
Create Document Grounding Connection in Models Hub
Step 1. Navigate to the Models Hub application. A detailed instruction on how to navigate to Models Hub can be found in the previous chapter Create Generative AI Connection in Models Hub, Steps 1-5.
Step 2. Go to the Models Hub application and click the Create button to add new connections.
Step 3. Fill in the basic data to Create Destination:
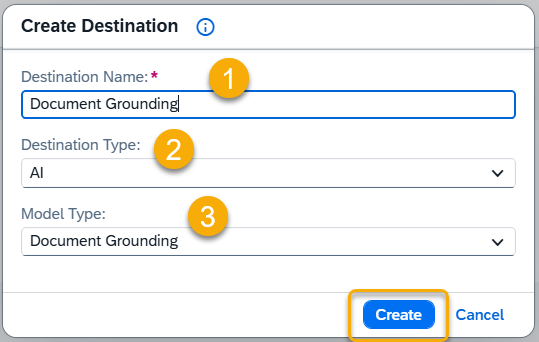
Destination Name: Provide a unique name for easy identification e.g. Document Grounding (1)
Destination Type: AI (2)
Model Type: Document Grounding (3)
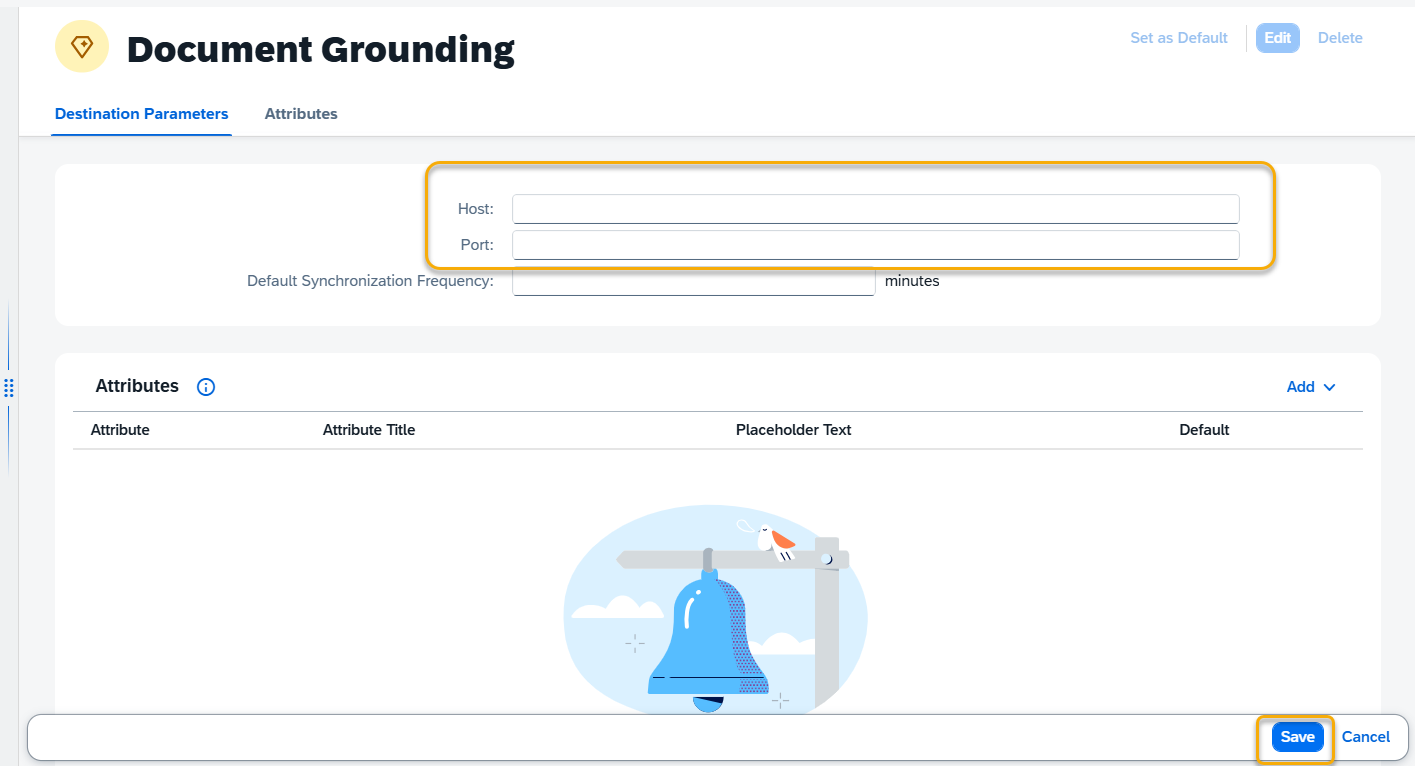
Step 4. Within the connection details screen, fill in all necessary information and press the Save button.
Step 5. Get Host and Port of the py_rag_m application.
To navigate to the list of applications, follow the steps from the previous chapter Create Generative AI Connection in Models Hub, Steps 1-2.
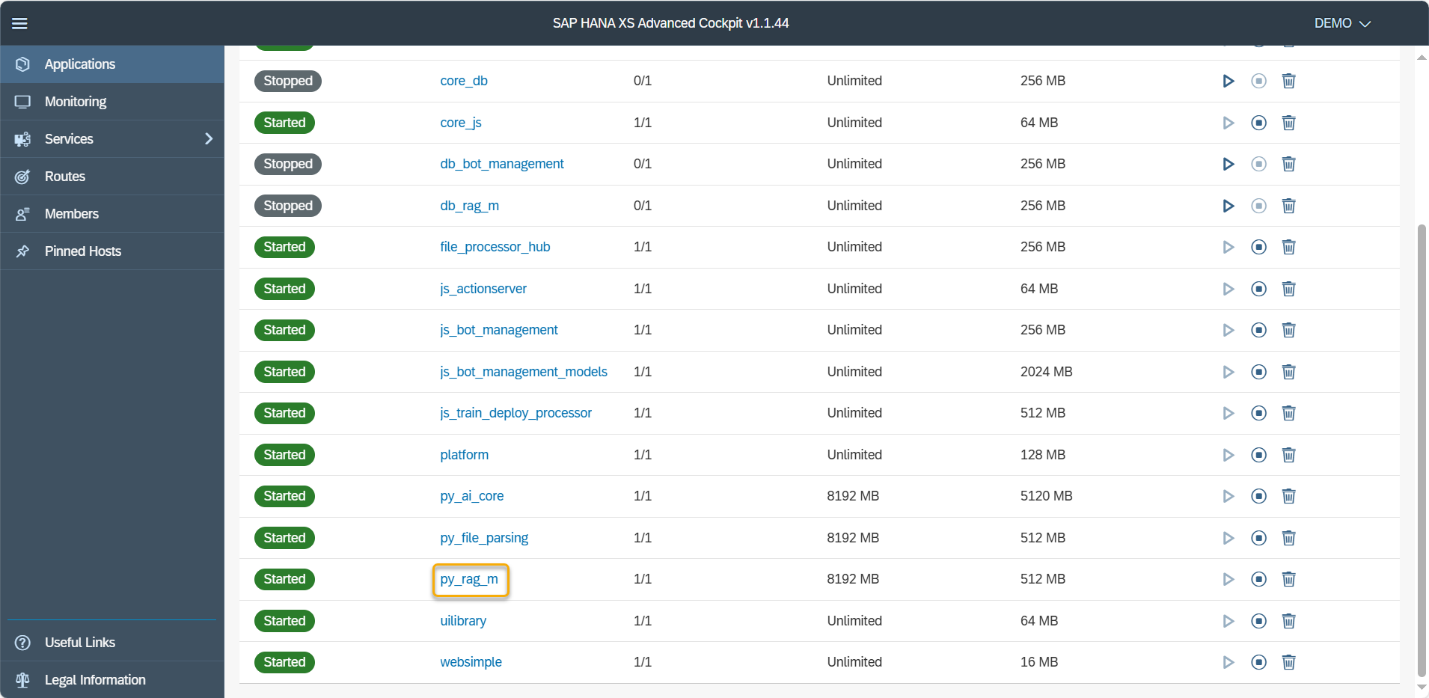
Enter the py_rag_m application:
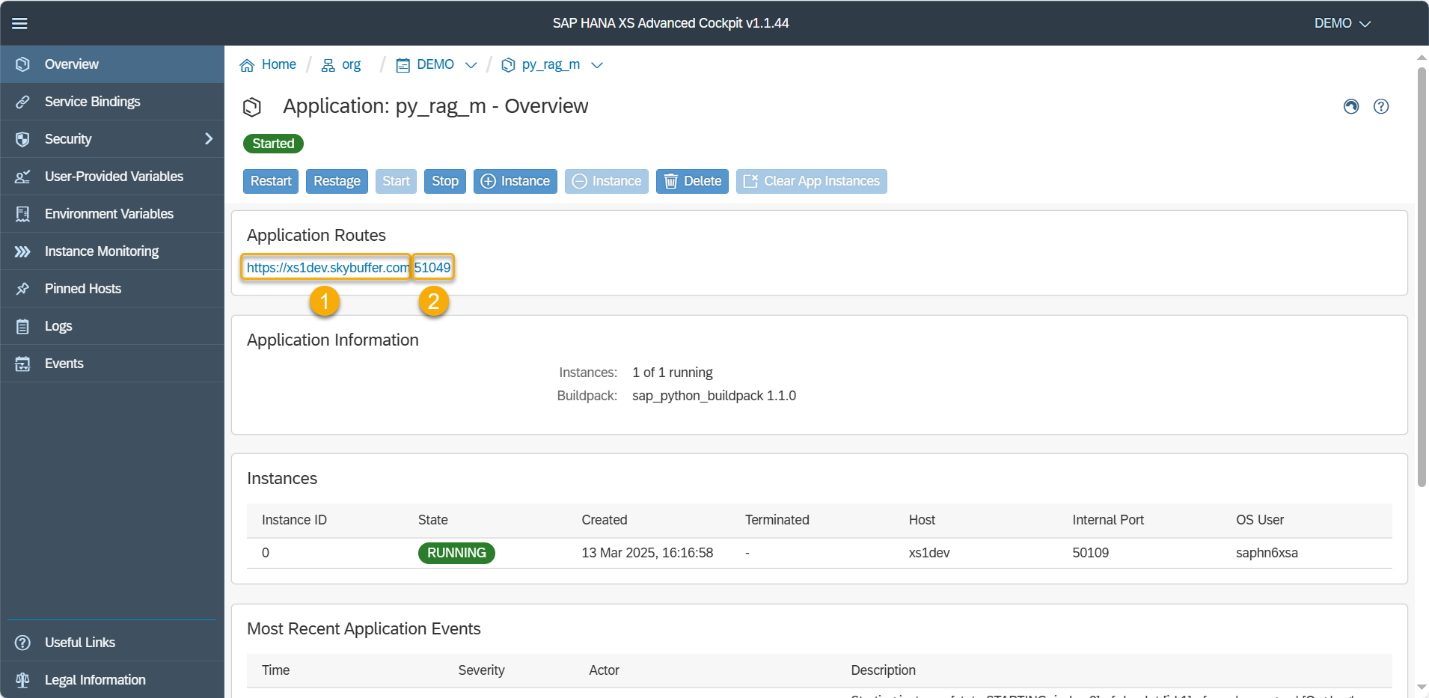
Copy the information about Host (1) and Port (2) into Document Grounding Connections Parameters in Models Hub and save your entries.
Step 6. (OPTIONAL) After adding basic Document Grounding Connections Parameters, you can also enter Attributes and Default Synchronization Frequency.
For more information please refer to the Models Hub Section in the Skybuffer AI solution documentation.
Step 7. Save your entries.
Step 8. Once you have finished setting up this configuration, click the Set as default button. This will automatically add your connection to the Document Grounding Destination field when creating a Document Grounding action in the new AI Agent..
Assign Embeddings Model in RAG Table
The py_rag_m application can operate in different modes for generating embeddings. These settings are not automatically configured after the initial installation and should be set manually according to the customer’s preferences.
Configuration is done in the database, either in the hdi_db_rag_m schema or in the hdi_db_rag_vector schema (supported only in SAP BTP environment). The EMB.CONF table is used for this purpose.
NOTE: After modifying or creating the configuration, you must restart the py_rag_m application.
Step 1. Enter the database and open hdi_db_rag_m schema. Go to EMB.CONF table:
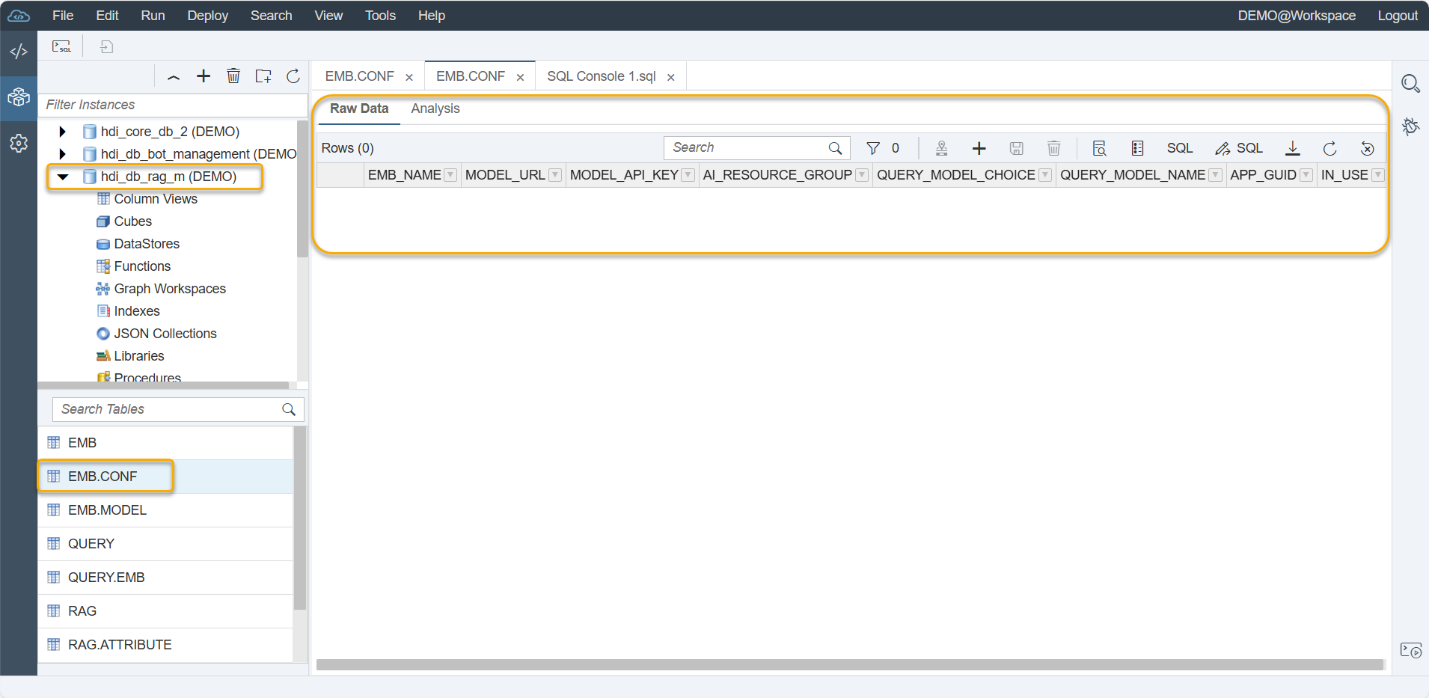
Step 2. Enter the configuration parameters in the Embedding Model Configuration (EMB.CONF) table:
When setting up the EMB.CONF table, you will need to provide specific values for each field. Below are the acceptable options and notes:
EMB_NAME – Embeddings Model Name
- mxbai-embed-large: Supports English only
- paraphrase-multilingual: Supports around 50 languages, including English, Russian, and Norwegian
- Other values: Can be found in the EMB table, but avoid using them in production without prior consultation
MODEL_URL
MODEL_API_KEY
- Leave as empty string “” when using Ollama on Hetzner
- Use your API key if connecting to OpenAI or Gemini models
AI_RESOURCE_GROUP
- Empty string “” for Hetzner
- Default for SAP AI Core deployment
QUERY_MODEL_CHOICE
- ollama, google, openai, or none
QUERY_MODEL_NAME
- llama3.1 or another available model name
APP_GUID
- Optional value; leave as empty string “” if not used
- Used for synchronization with bot_management
IN_USE
- Set to True to activate the configuration
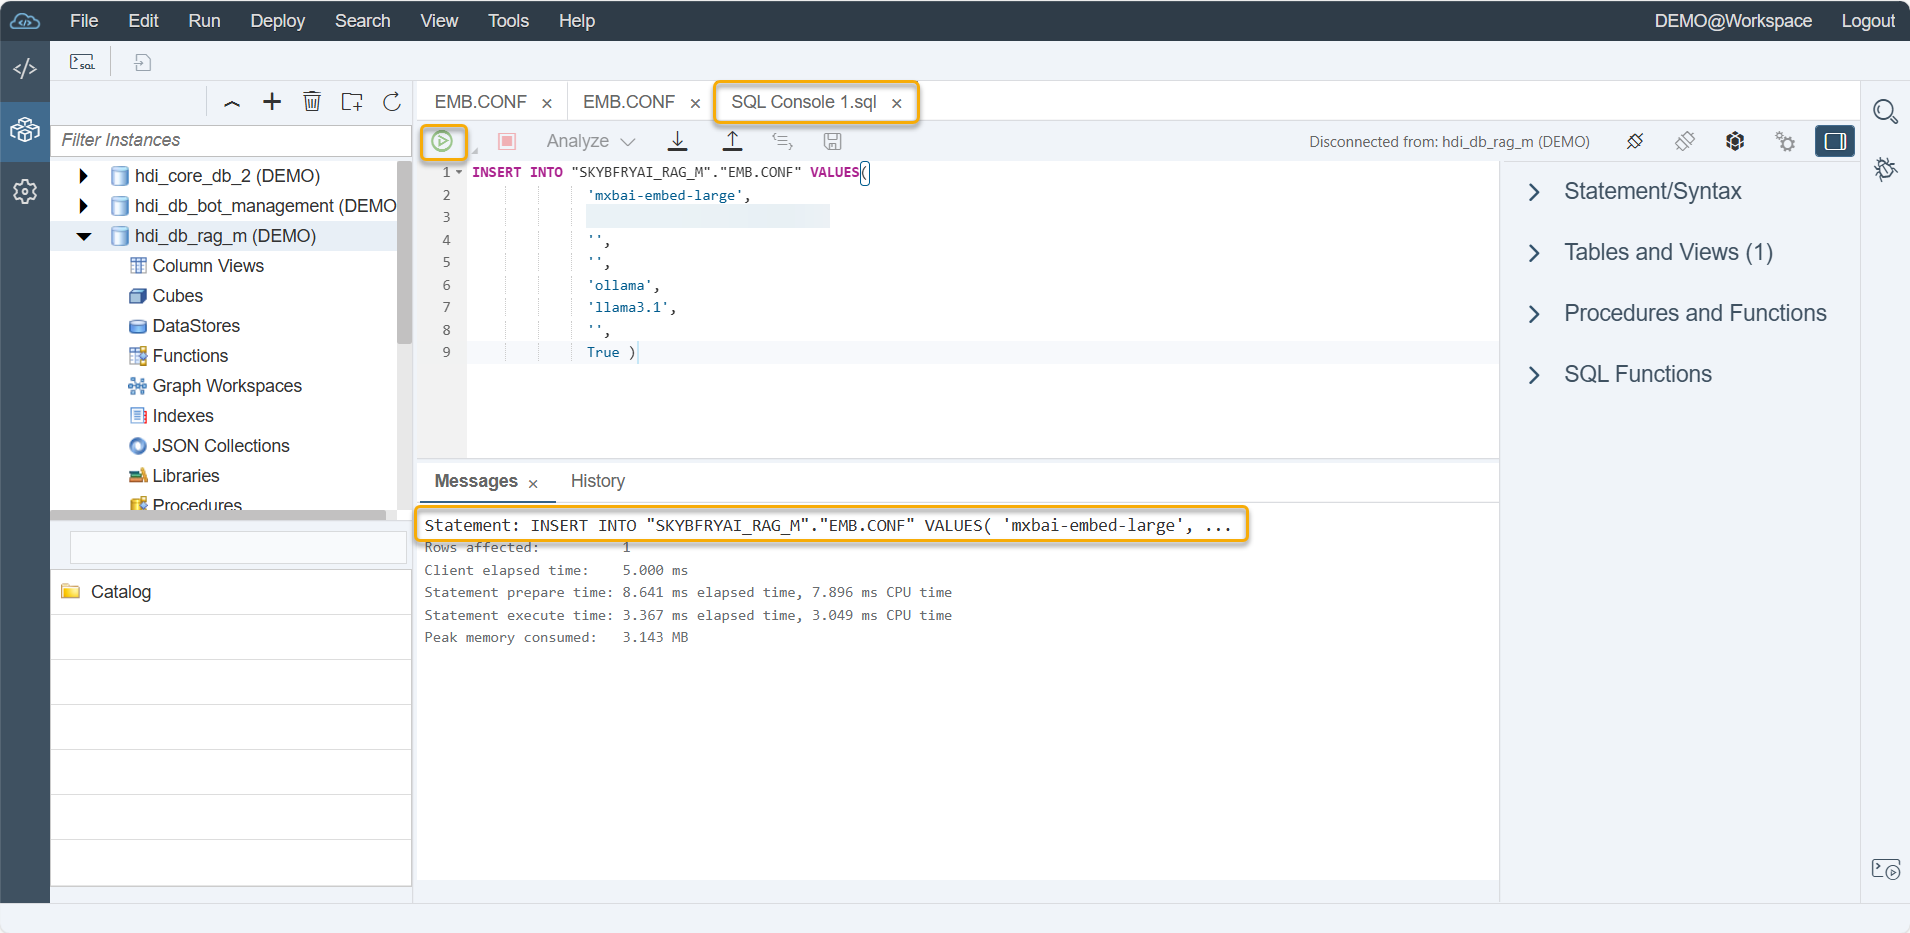
Quick SQL Insert Example
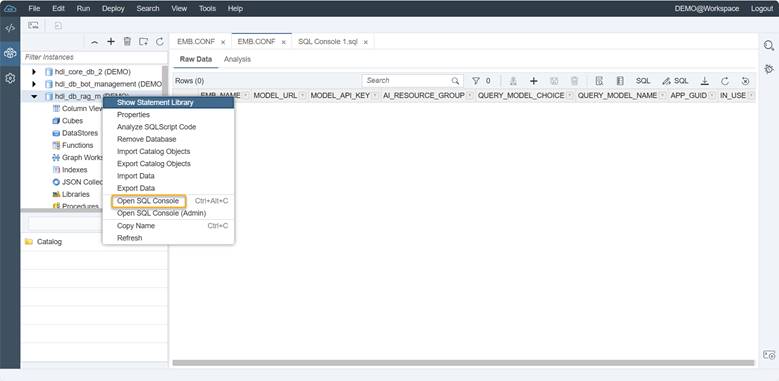
Open SQL console:
Use the script snippet below for quick insertion:
INSERT INTO "SKYBFRYAI_RAG_M"."EMB.CONF" VALUES(
    'mxbai-embed-large',
    '[REPLACE THIS PLACEHOLDER WITH THE FULL LINK OF YOUR MODEL LOCATION, for example http://135.352.11.22:12345]',
    '',
    '',
    'ollama',
    'llama3.1',
    '',
    true
);
This will quickly insert a valid configuration into the EMB.CONF table.
Make sure to replace the placeholder with your relevant model link.

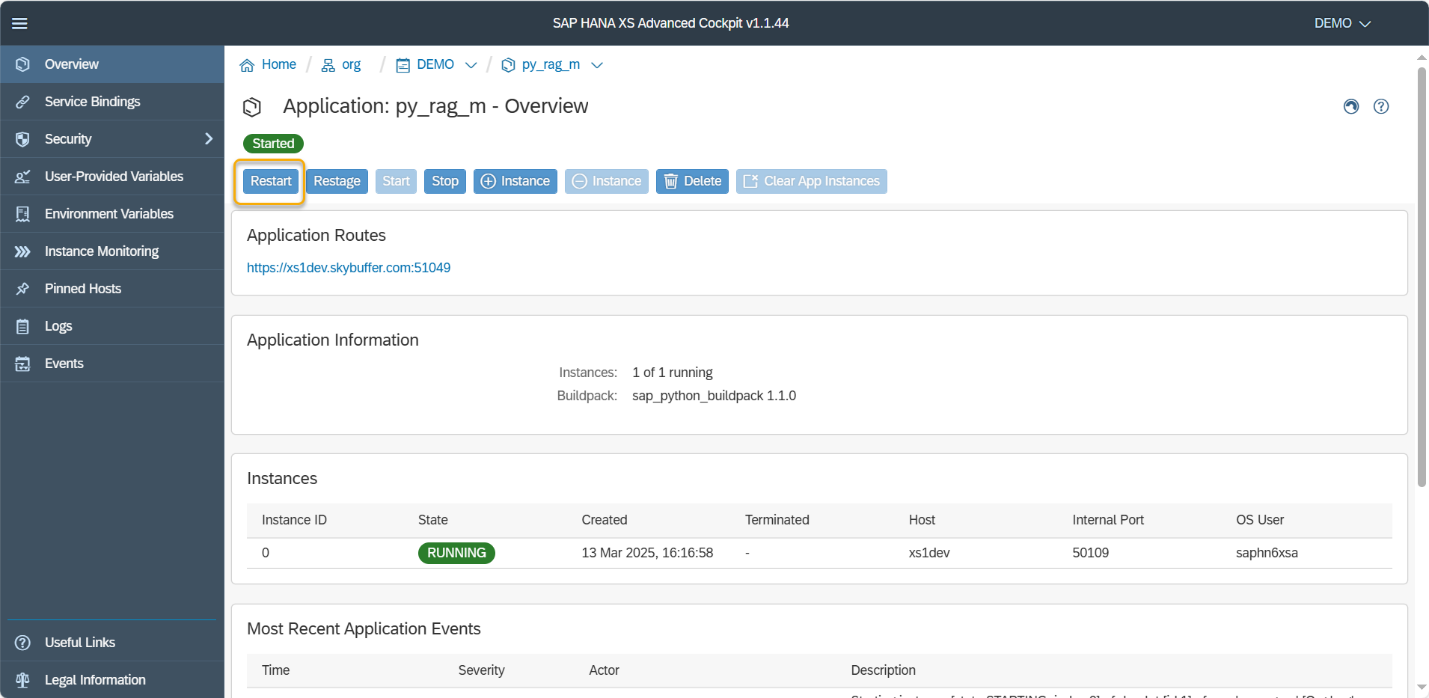
Step 3. Restart the py_rag_m application:
Set Up AI Agent for Solution Testing
Create AI Agent in AI Agent Configurator Application
Once basic configuration is done, the tenant record is added to Database schemas and Generative AI and Document Grounding connections are created, it is time to register a new AI Agent and start adding tools and creating actions.
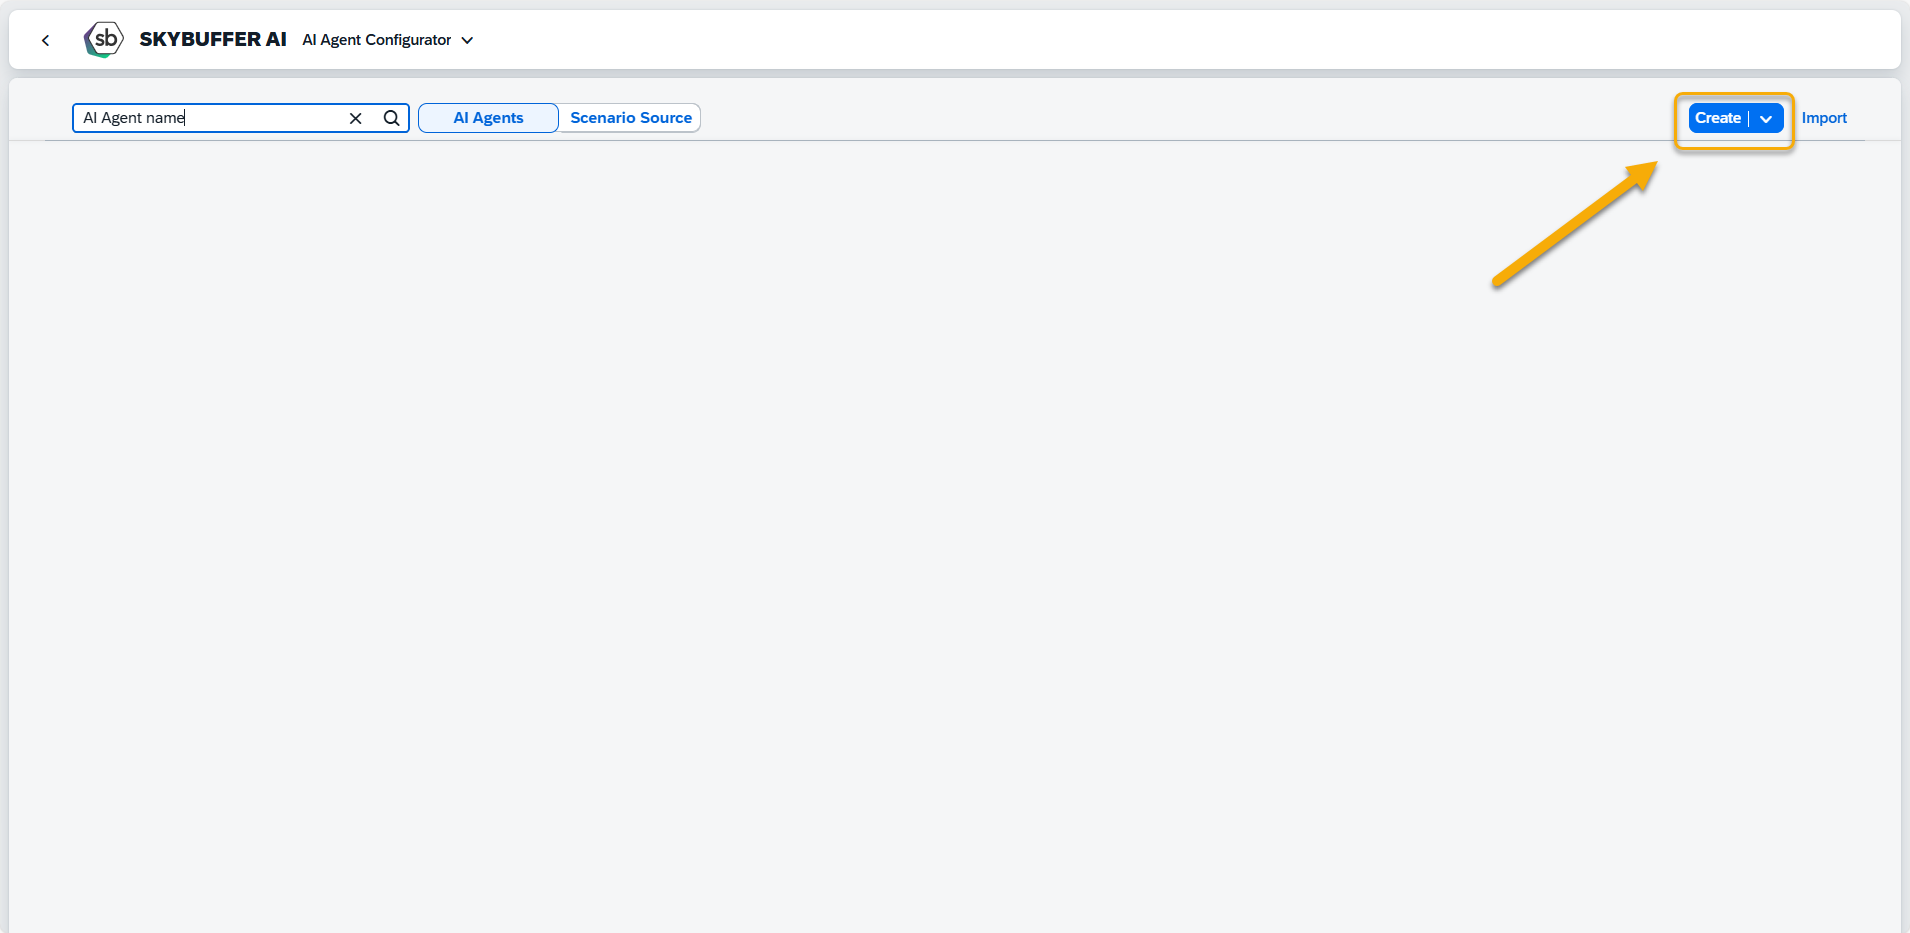
Step 1. First, open the AI Agent Configurator application.
Step 2. To start working on your AI Agent, you need to create it. Click on the Create button at the top right-hand corner.
Step 3. Fill in general information: name, description and label and click on the Create button.
Name: Provide a unique name for your AI Agent e.g. hr-support
Description: You can add a description to specify what is the agent’s main functionality e.g. HR assistant that answers employee questions
Label: for easy identification e.g. TEST
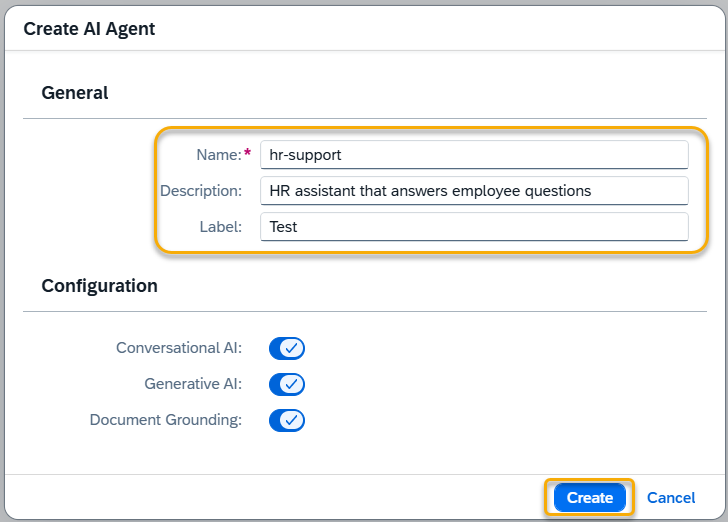
Step 4. Your AI Agent is created.
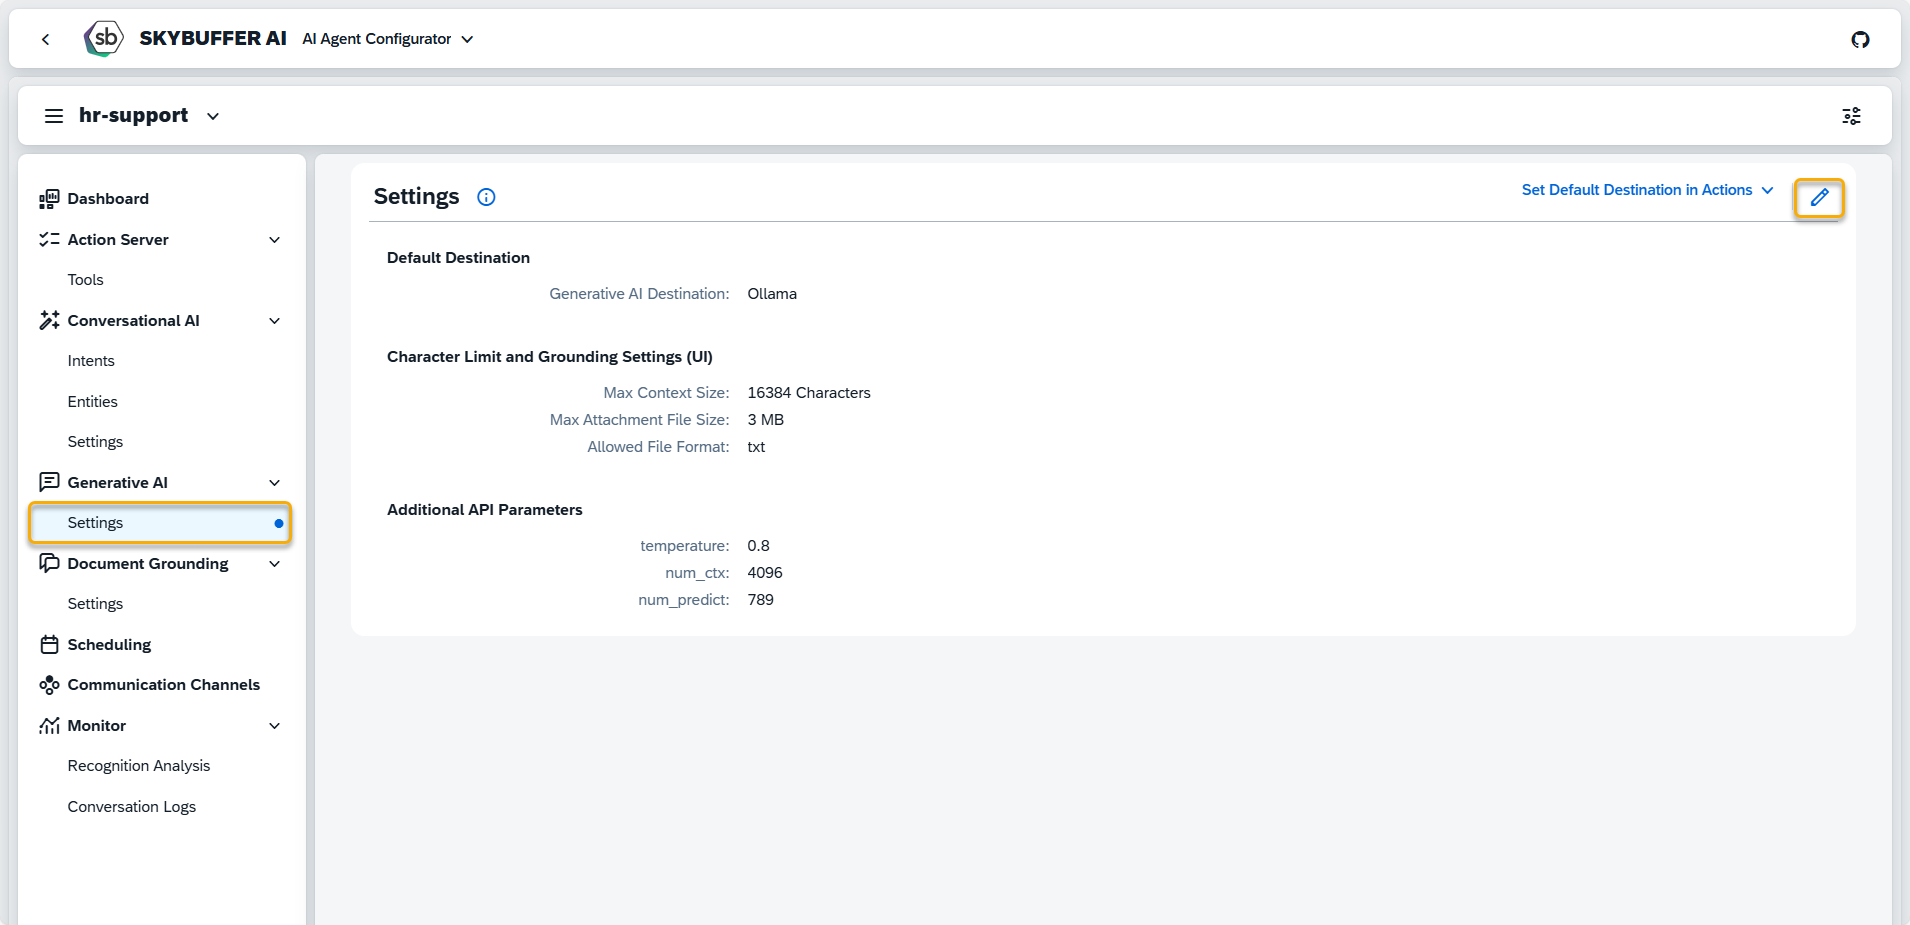
Step 5. Activate the required files formats for use as source documents in Generative AI action. Navigate to Generative AI settings and enter the edit mode:
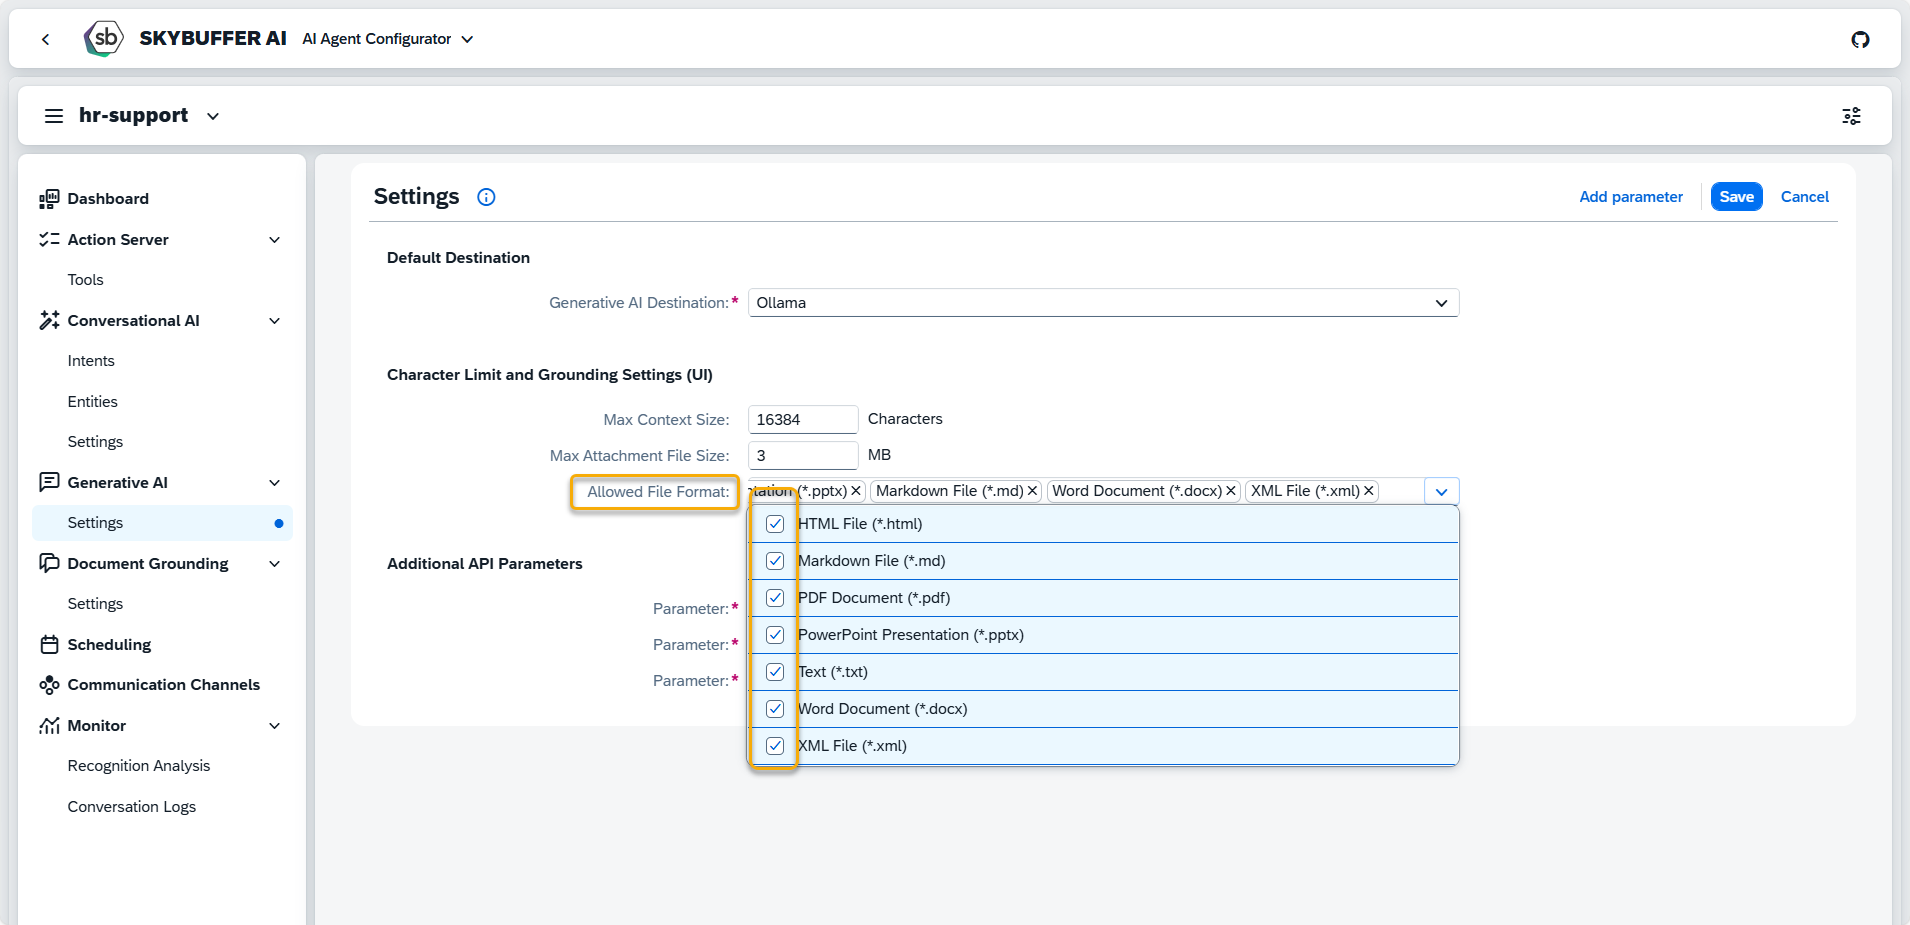
Step 6. In the Allowed File Format section, expand the list of available file types and select the ones you want to enable for upload. Save your entries.
Create Tool and Add Generative AI Action
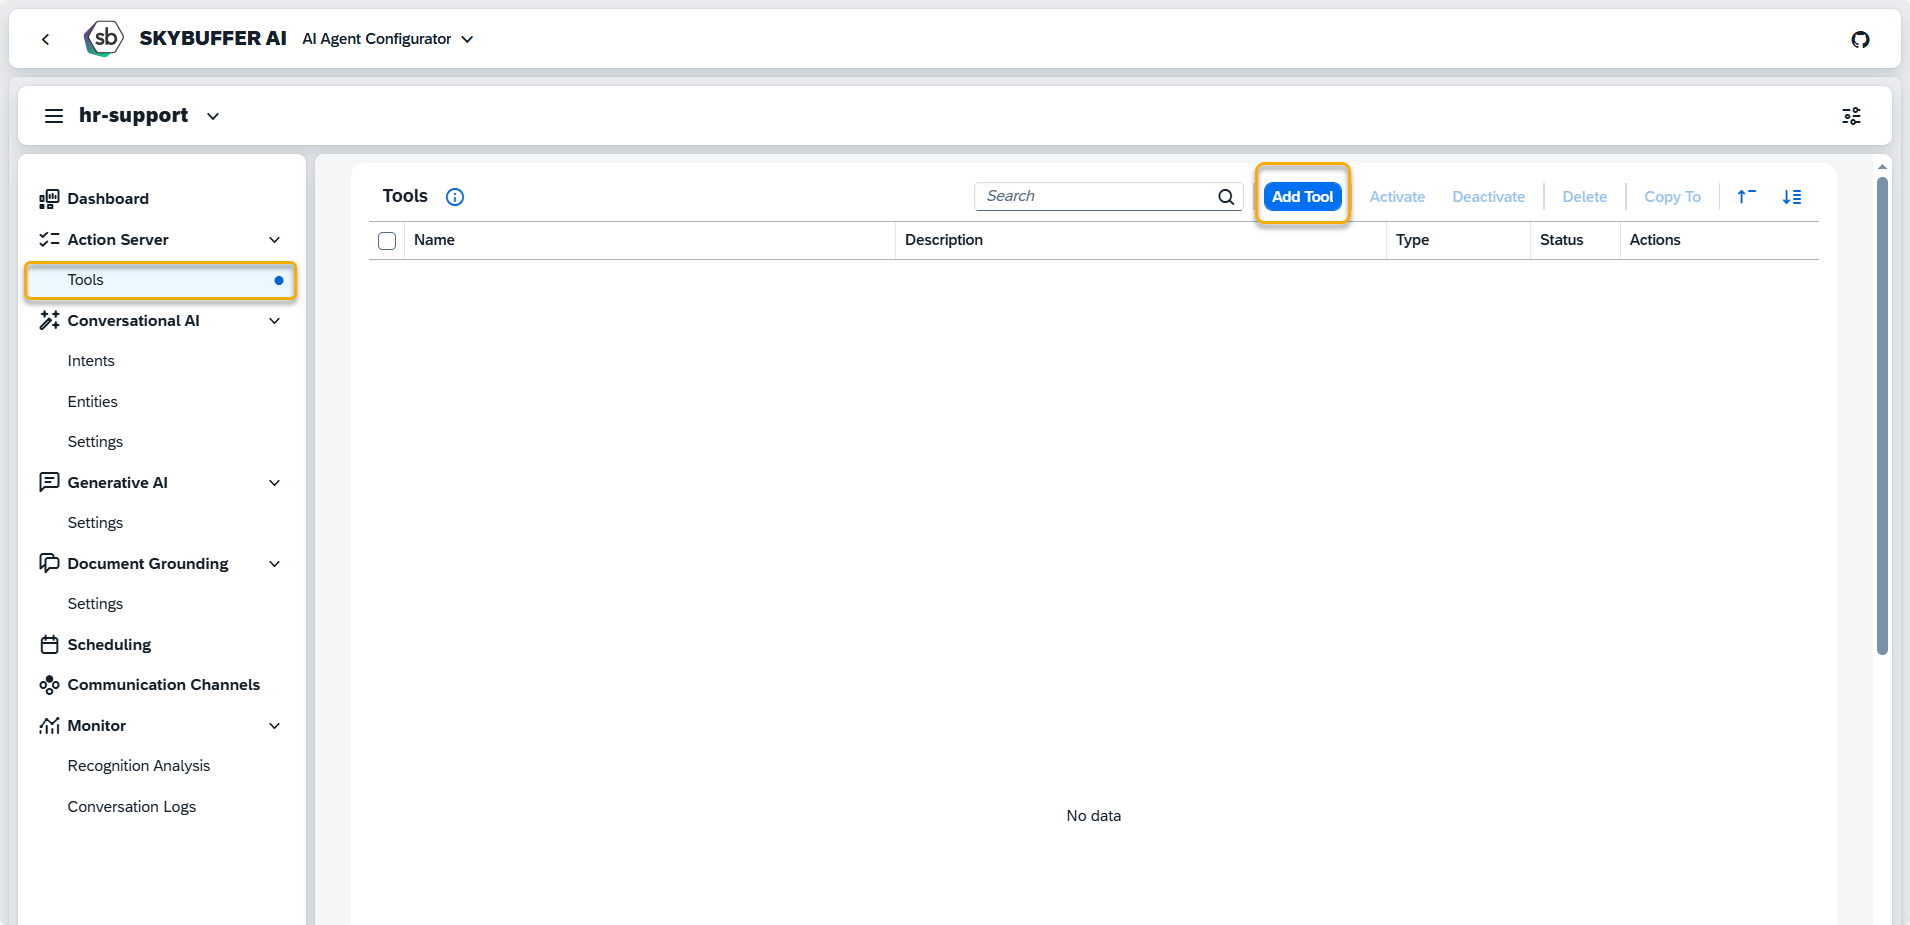
Step 1. Go to the Action Server section and click on the Add Tool button:
Step 2. Add the tool name, description (optional) and select the tool type:
Name: zxas-fallback
Description: Simple fallback tool
Type: select fallback from the list

Step 3. Your tool is now created. Open it and continue to zxas-fallback-trigger:

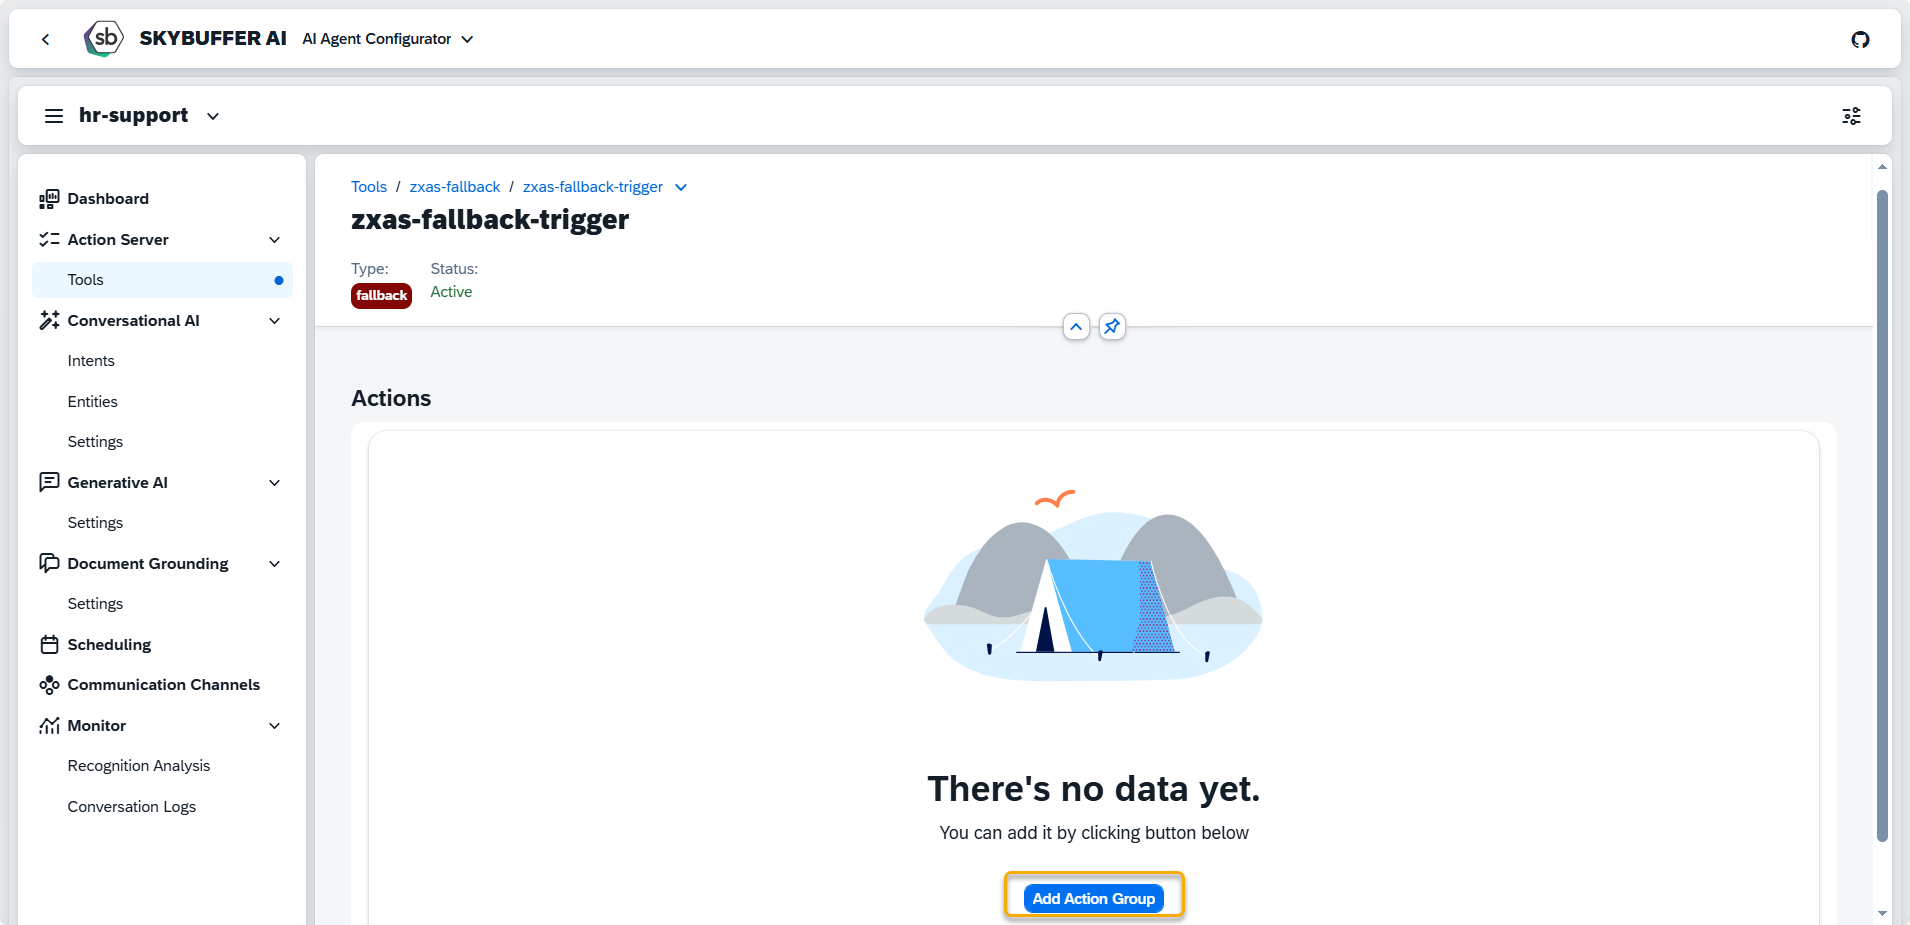
Step 4. For now, the tool is empty, click on the Add Action Group button:
Step 5. Select the type of Action you would like to add, click on Add AI Action and select Generative AI 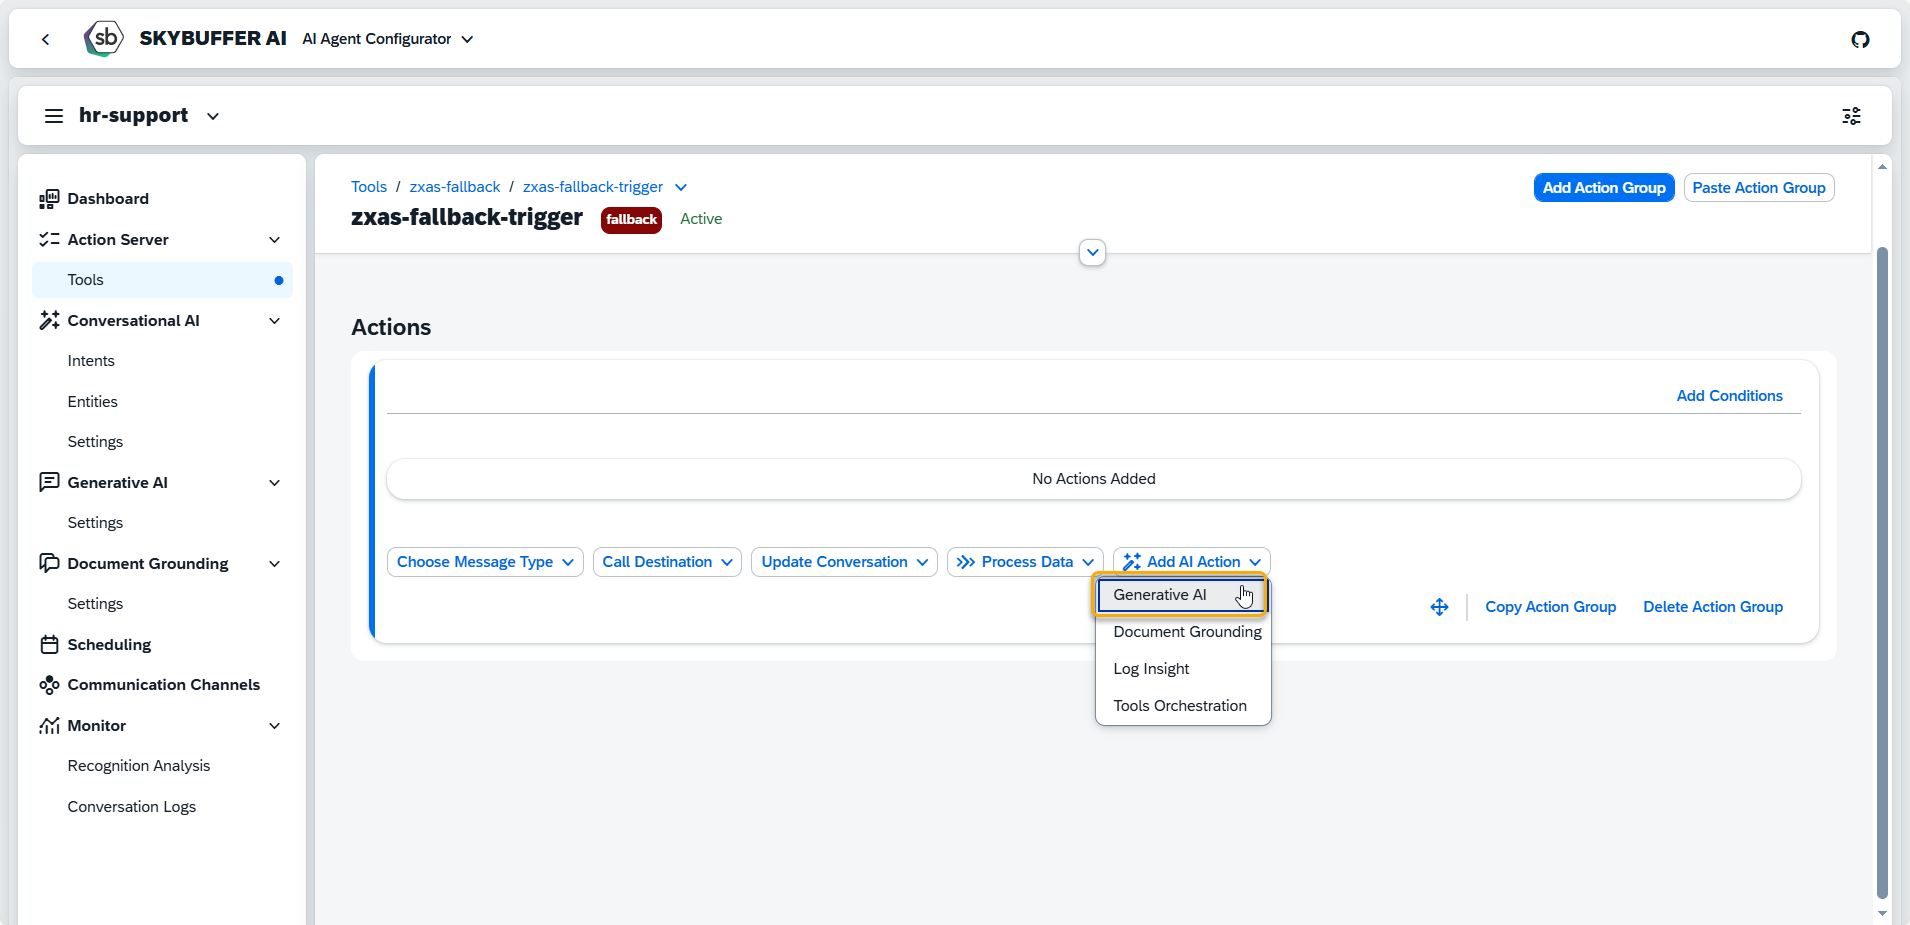
Step 6. You can see the action template and edit it according to your needs:
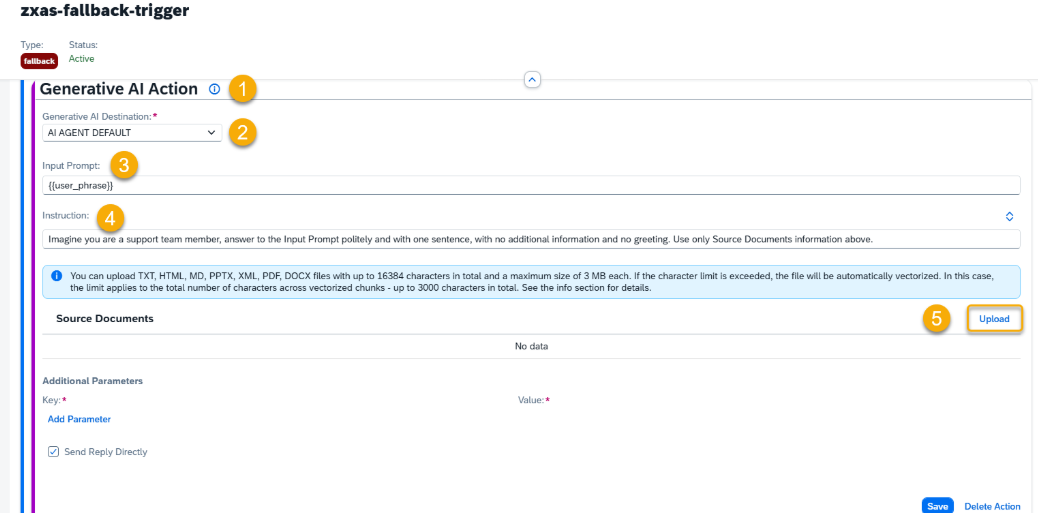
For guidance and hints, click the Information icon (1).
Generative AI Destination:
This field defines the AI model used to generate responses. By default, when you create an Action, it is set to use a hardcoded mask called “AI AGENT DEFAULT”. This is not the name of a specific model and does not exist in the model hub.
Instead, “AI AGENT DEFAULT” is a placeholder that always points to the current default generative AI model assigned to the AI Agent.
You can override this by selecting a specific model for your Action (e.g., Ollama). If you do, the Action will always use that model—even if the AI Agent’s default changes later. (2)
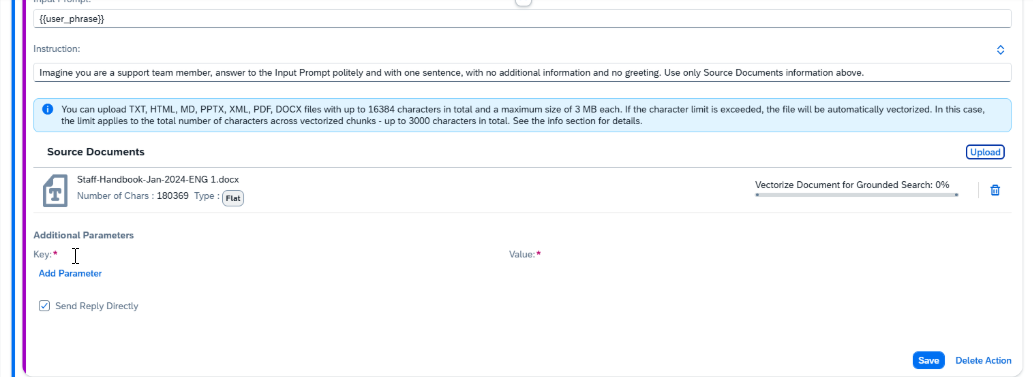
Input Prompt: The Input Prompt field contains the question asked to the AI. It includes the User Phrase (the exact phrase the user enters), which is combined with instructions and source documents to create the context for Generative AI. You can enhance {{user_phrase}} by adding additional text or memory parameters.
NOTE: For this example, please enter into the Input Prompt field: {{current_message.content}} (3)
Instruction: The text in the Instruction field guides Generative AI in generating its response. Along with the Input Prompt and Source Documents, it helps create the context for Generative AI. (4)
Example: Imagine you are a support team member, answer to the Input Prompt politely and with one sentence, with no additional information and no greeting. Use only Source Documents information above.
To upload documents, click the Edit button and then Upload (5). You should see all the document formats available for upload. This configuration was completed in Step 5, Section: Create AI Agent in AI Agent Configurator Application.
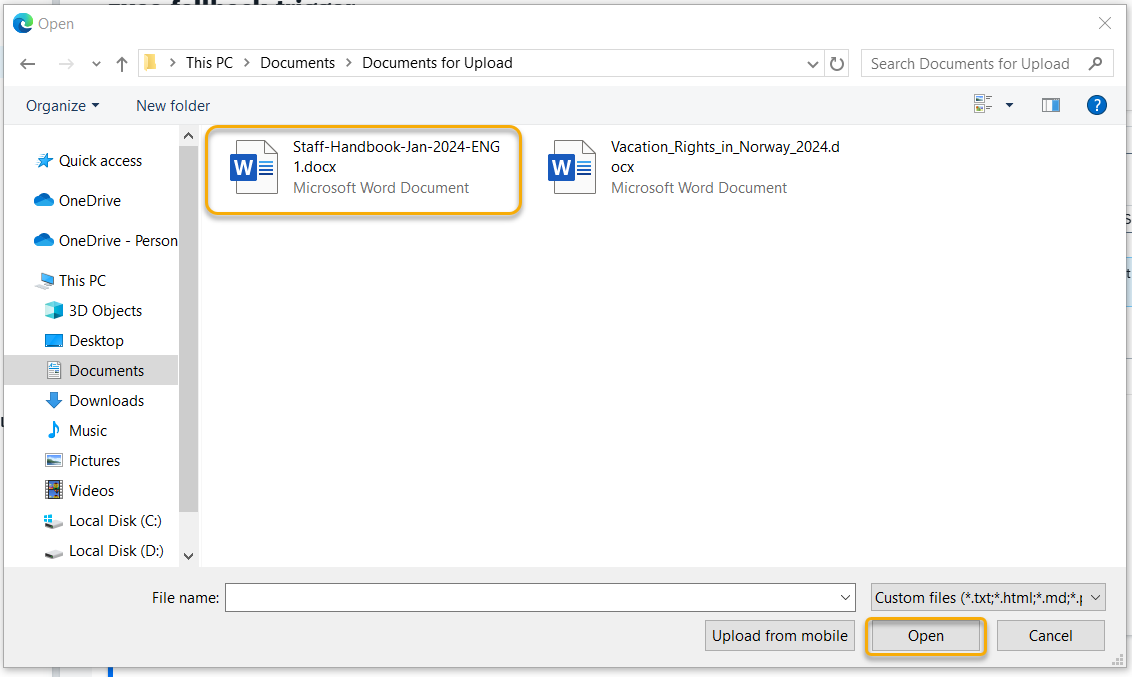
Step 7. Select the files you would like to upload:
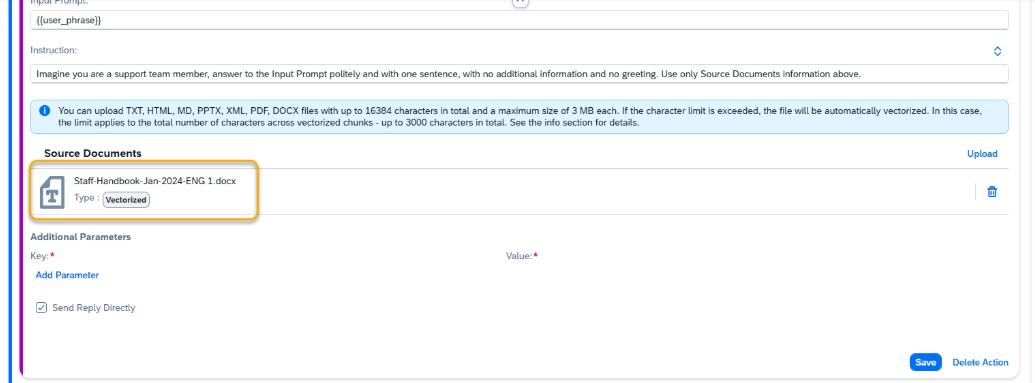
Step 8. If your file exceeds the word limit, wait until it is being vectorized.
Step 9. Repeat this step for uploading more than one document:
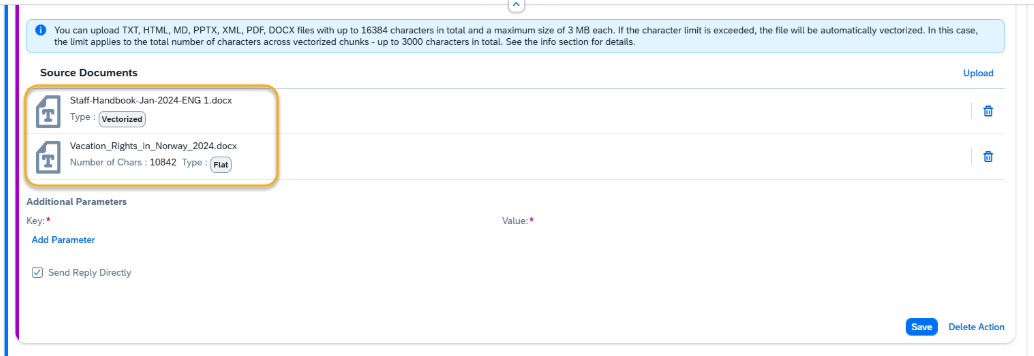
Step 10. Save your entries.
NOTE: Only one of our files was vectorized. The other did not require conversion as it did not exceed the allowed by Generative AI model tokens limit.
Test Your AI Agent on the Webchat Test Channel
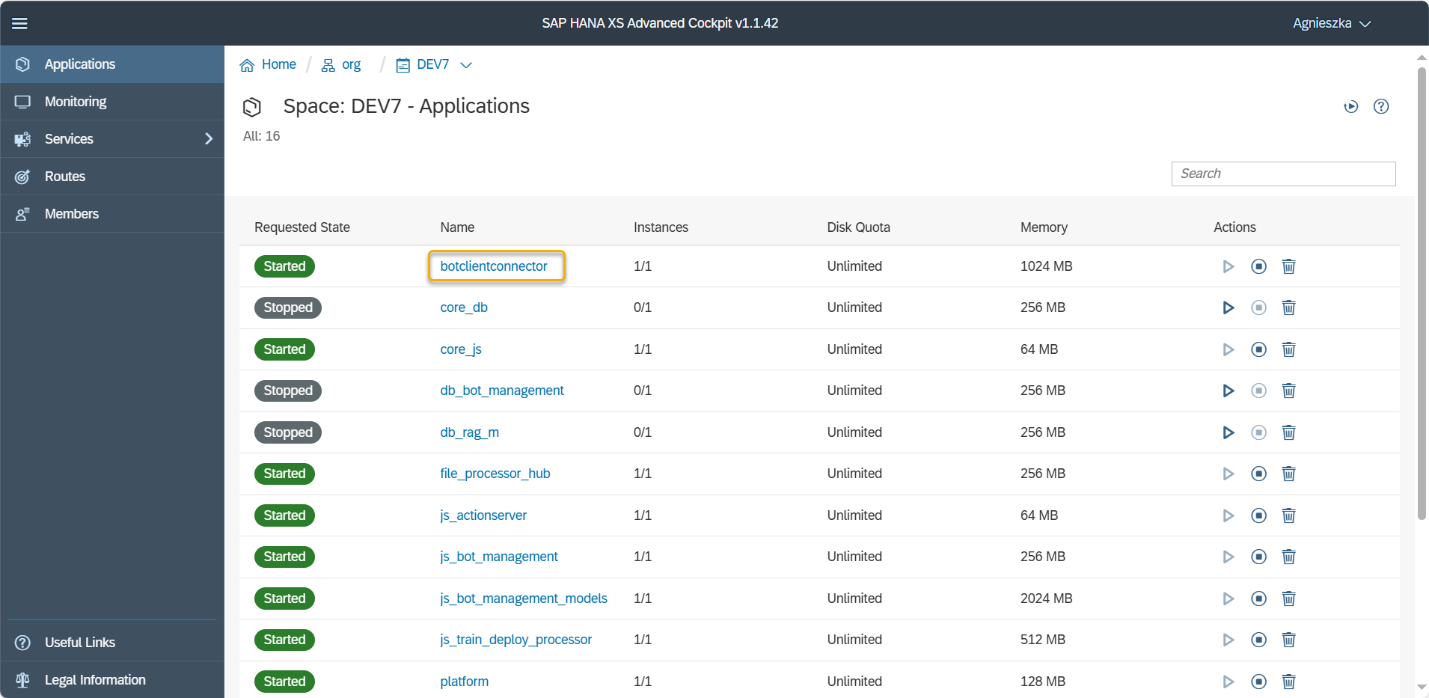
Step 1. Before the first webchat conversation, you need to restart the botclientconnector application. Go to the list of applications and click on botclientconnector:
Step 2. Click the Restart button:
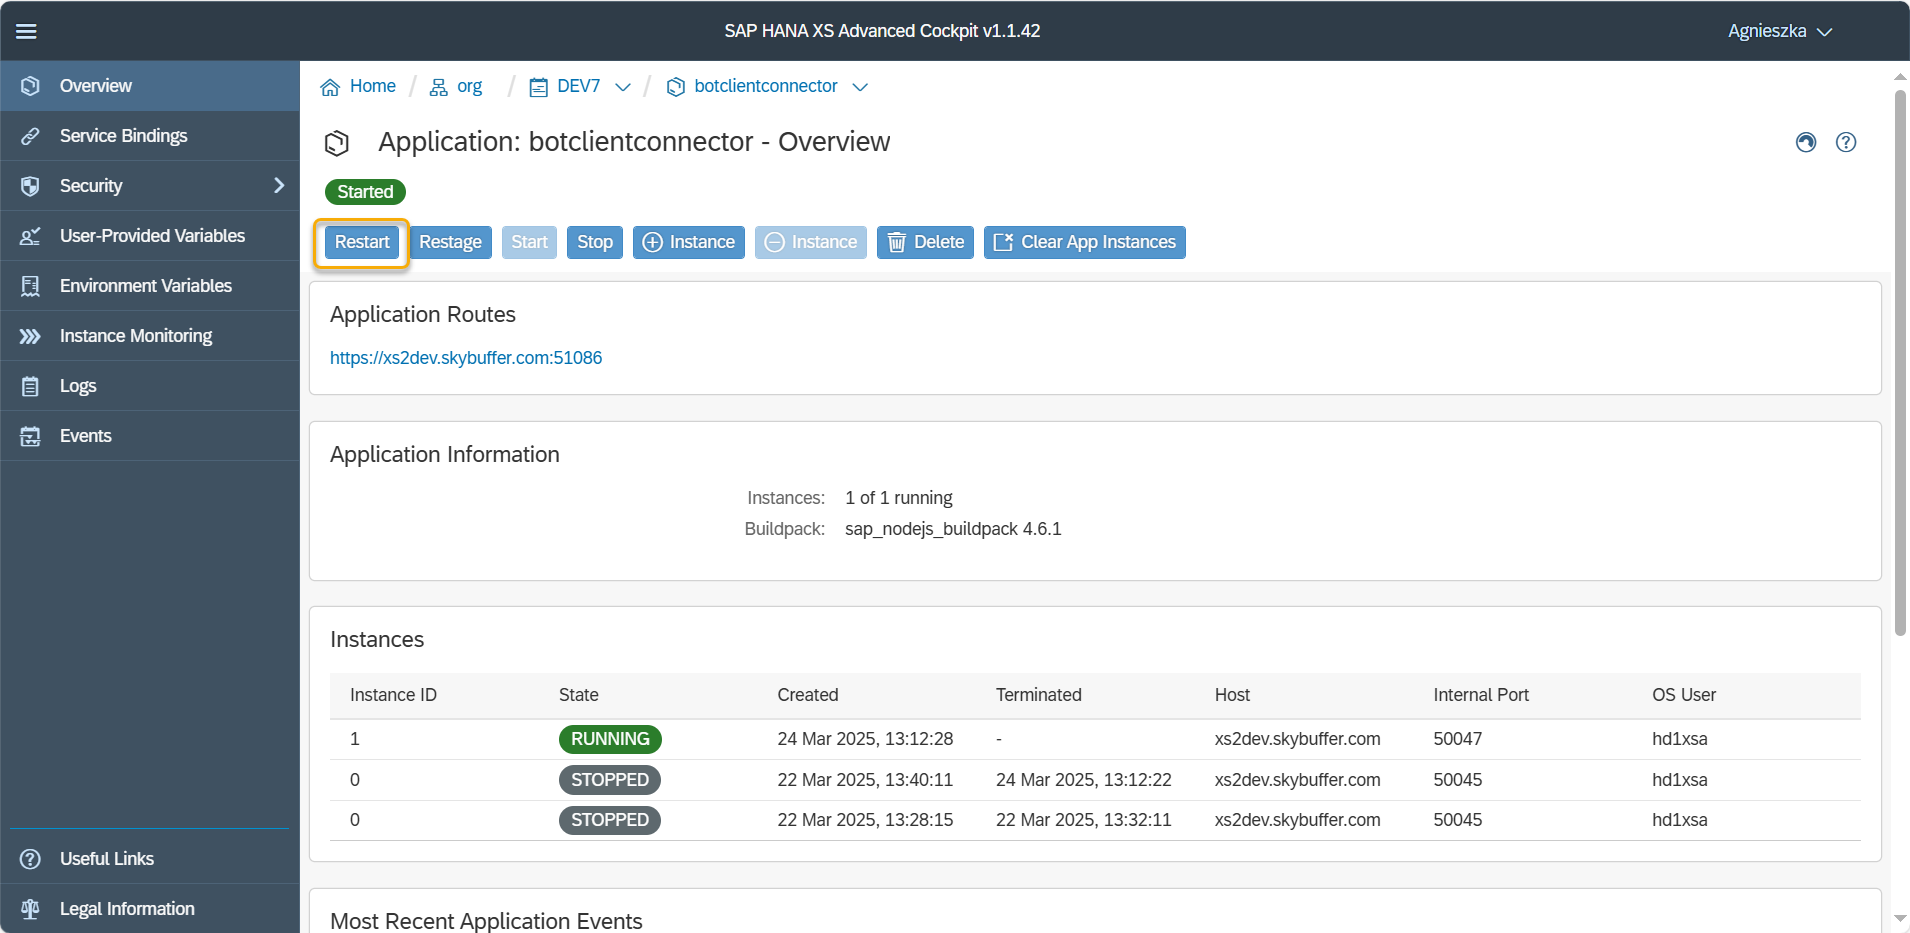
After the restart, you should see the status Running.
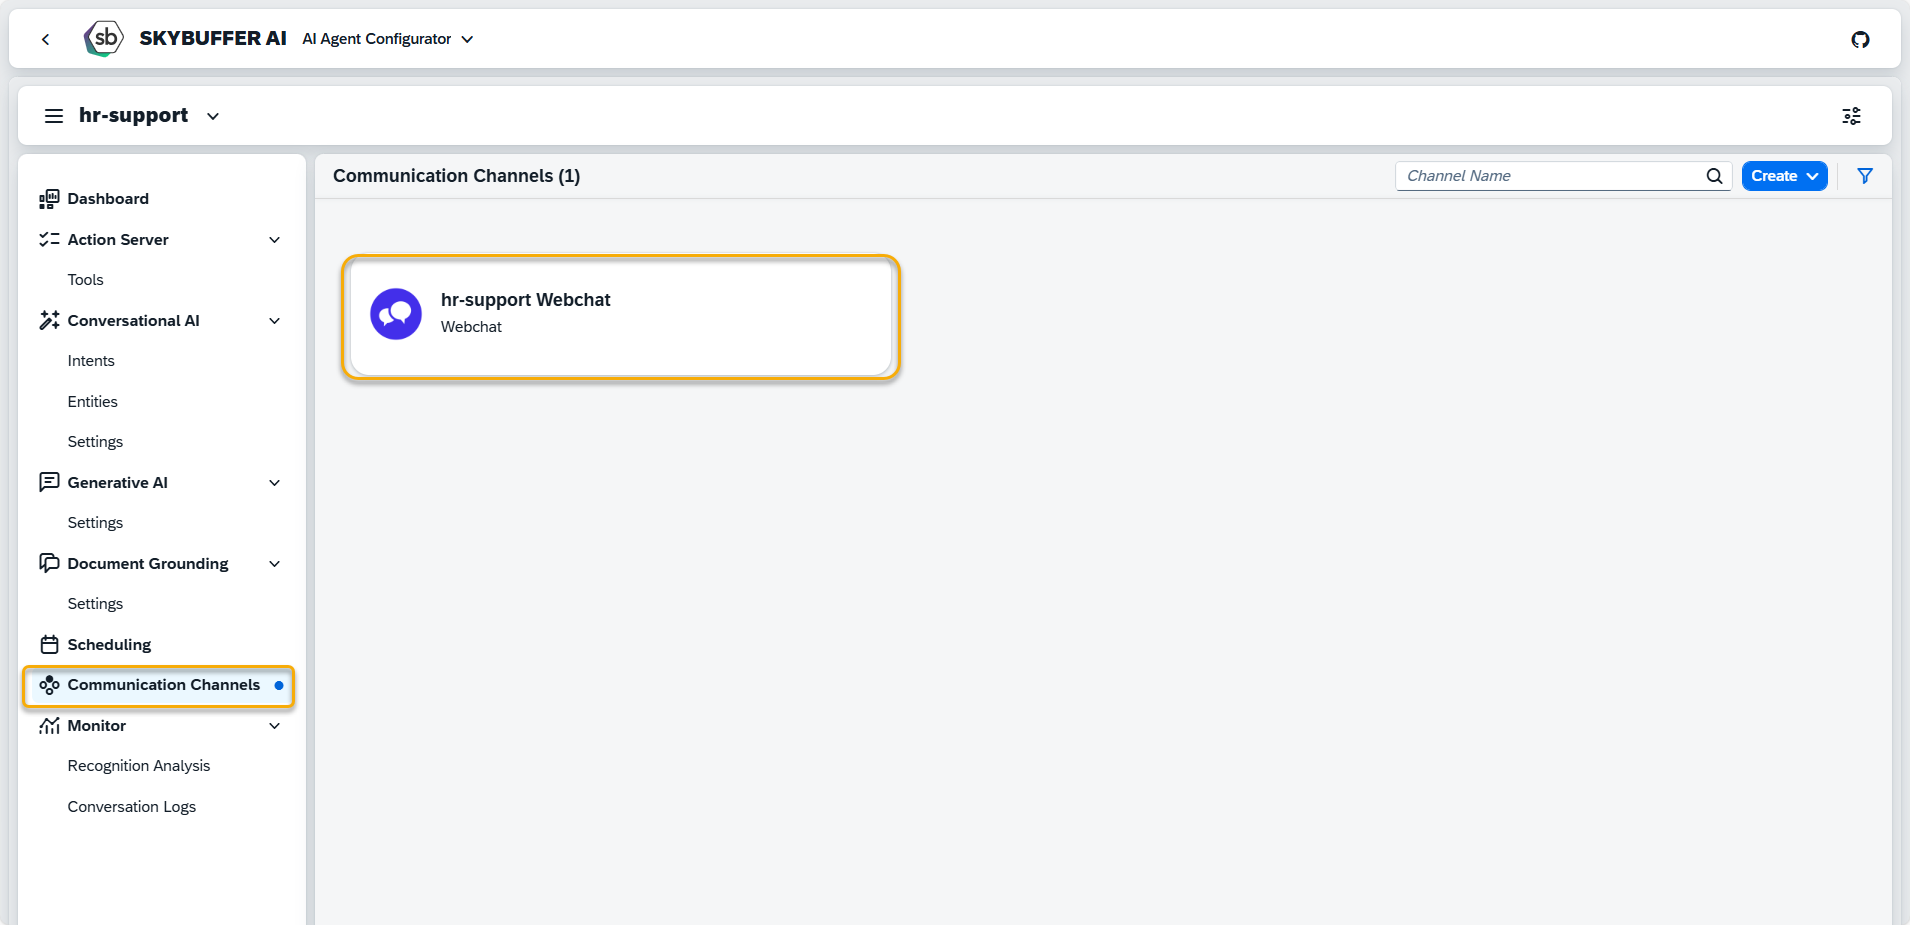
Step 3. Navigate to Communication Channels and select automatically created webchat channel with your AI Agent name:
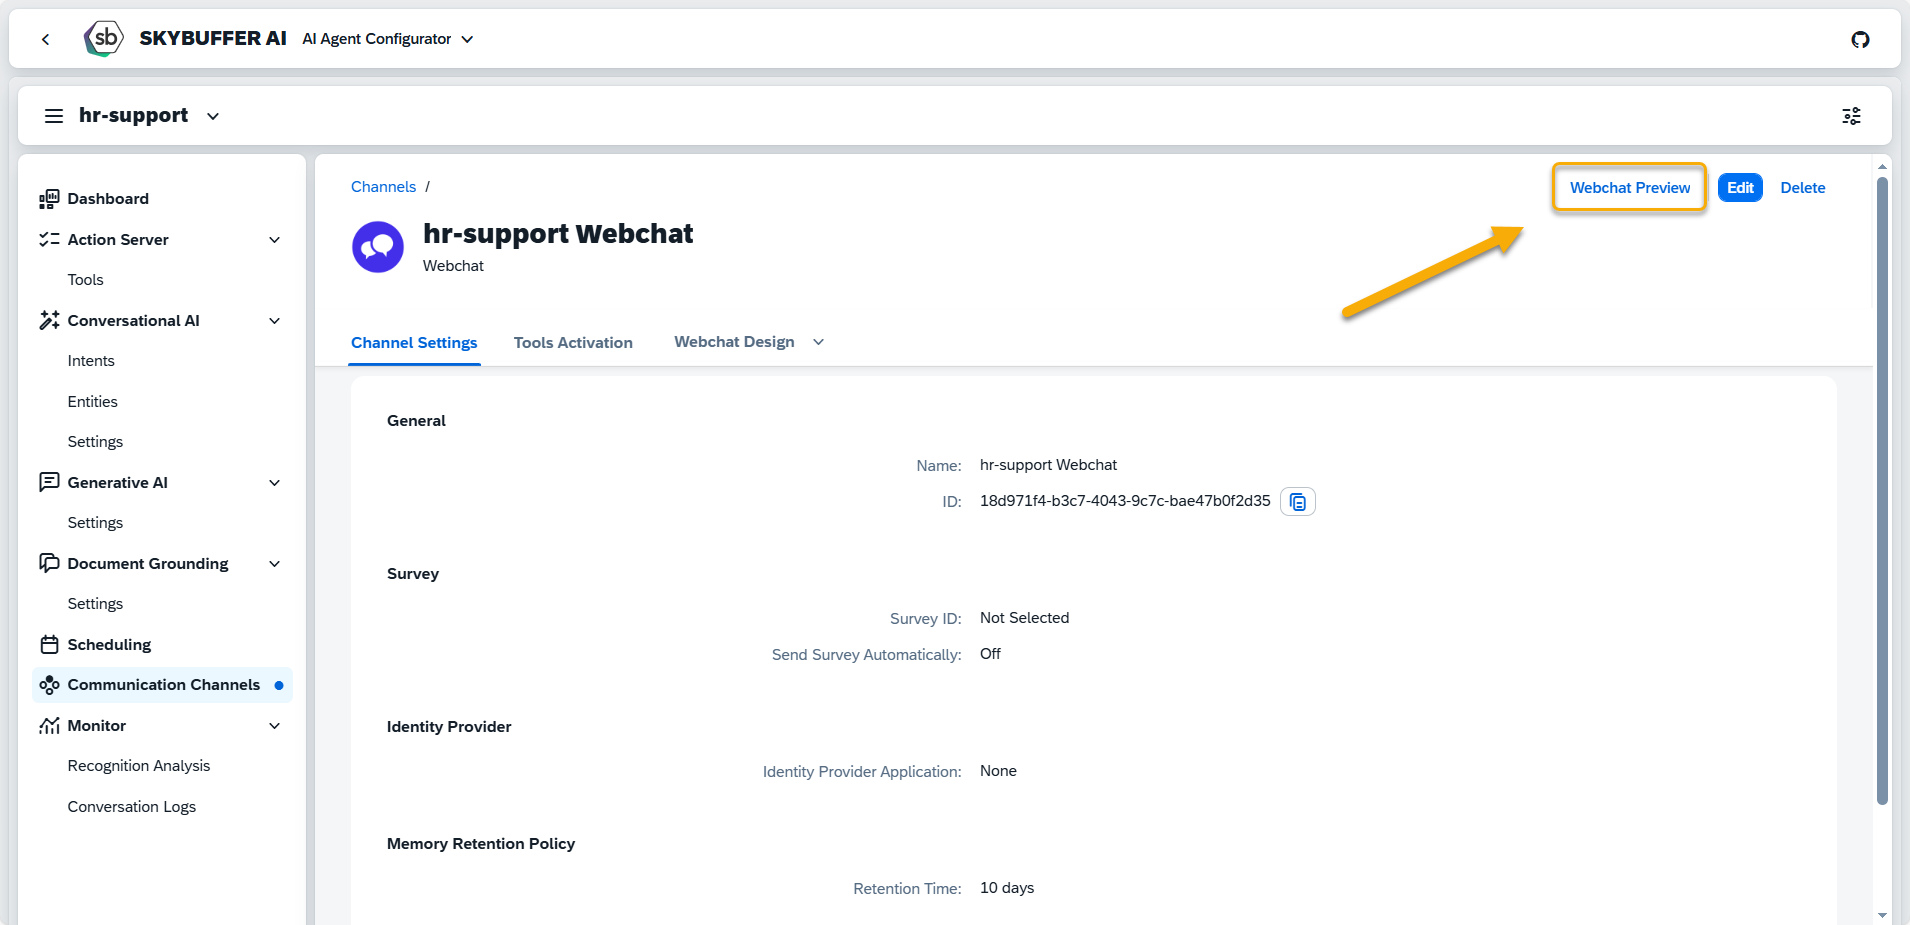
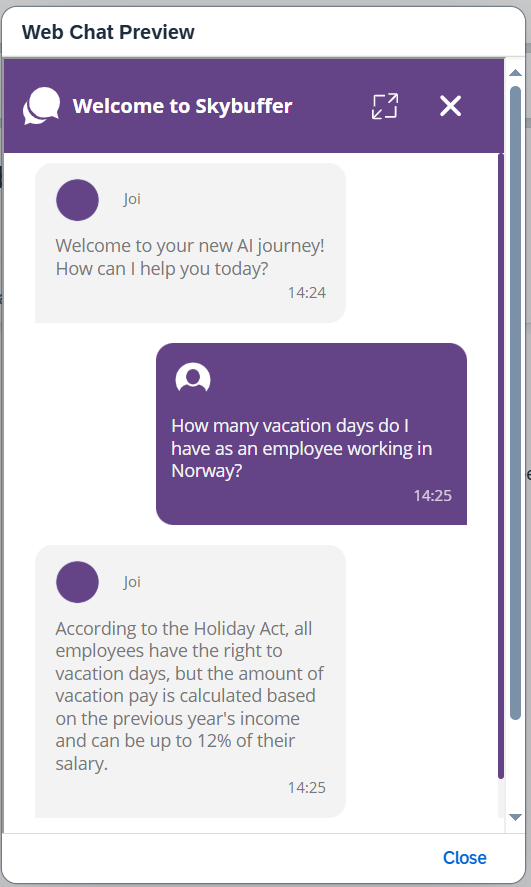
Click the Webchat Preview button at the top right-hand corner of the screen:
Step 4. Start a new conversation by asking questions about one of the documents you uploaded in the previous steps, Section: Create Tool and Add Generative AI Action.
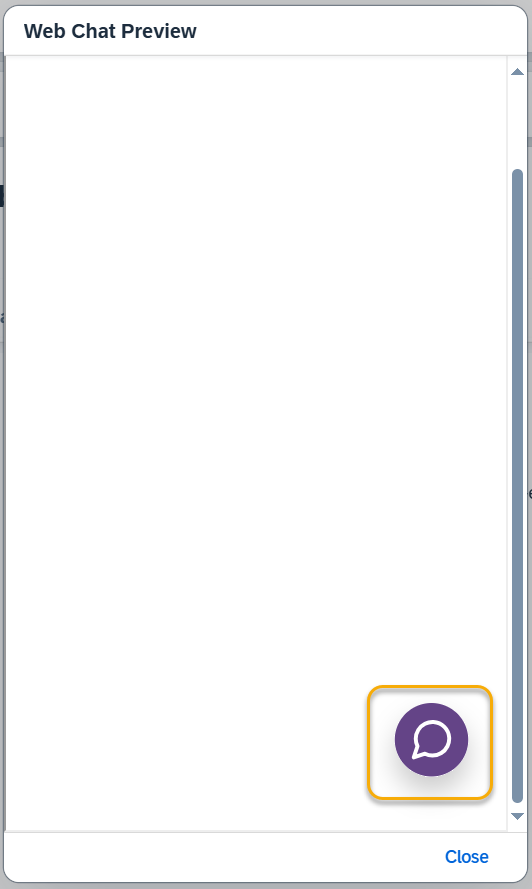
You can ask questions about the content of one of two documents uploaded:
Test Case 1. Questions about: Vacation_Rights_in_Norway_2024
- What are my vacation rights if I am a part-time employee in Norway?
- How many vacation days do I have as an employee working in Norway?
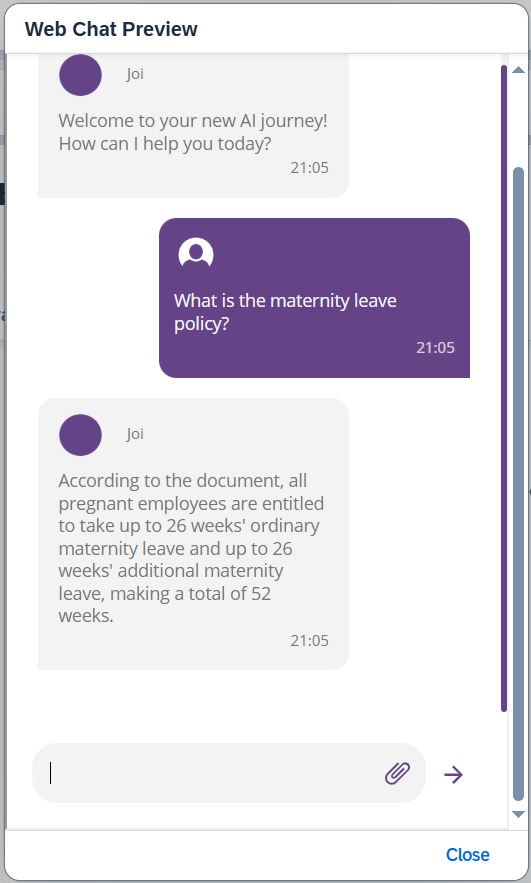
Test Case 2. Questions about: Staff-Handbook-Jan-2024-ENG
- What is the maternity leave policy?
- Can I work flexible hours from home?
Step 5. You have now completed the post-installation configuration and successfully validated the integration of the solution with Generative AI and Document Grounding connections. You can proceed by configuring the SAP connection (if applicable) and continue modeling additional business scenarios using the Skybuffer AI Agent Configurator tool.
Useful Links:
- Skybuffer AI User Guidelines
- SAP Web IDE Administration (SAP Help User Guidelines)