Adaptive Card
This Action Type allows the AI Agent to present information in a structured, interactive card format using the Adaptive Card framework. You can define the card layout in JSON, reuse captions for consistent labels or localization, and reference memory parameters to display dynamic data from integrations
Step 1. Create an Adaptive Card Action by pressing the button at the bottom of an Action Group:
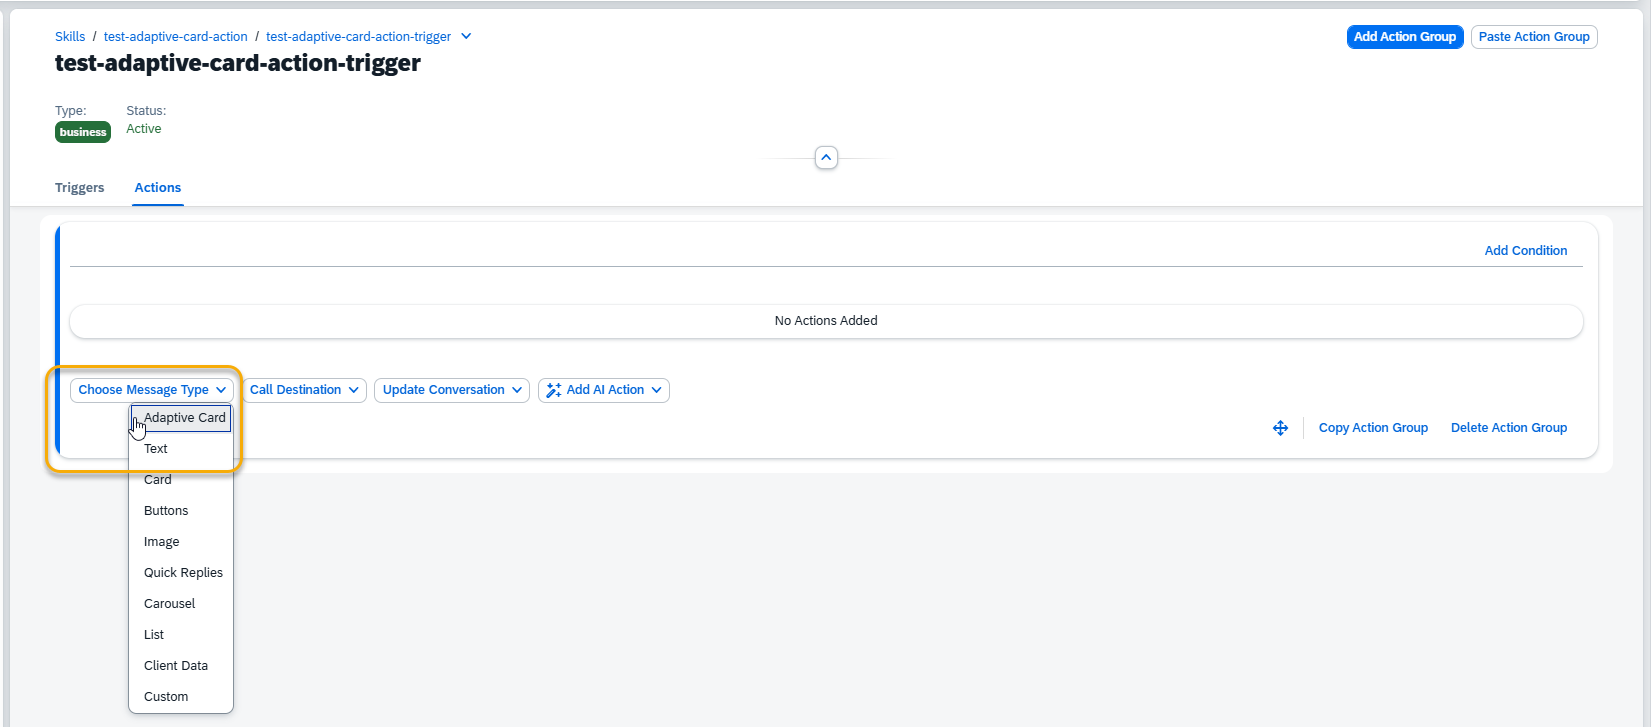
Step 2. A new Adaptive Card Action will appear and be ready to be filled in. Let’s set up this block step by step.
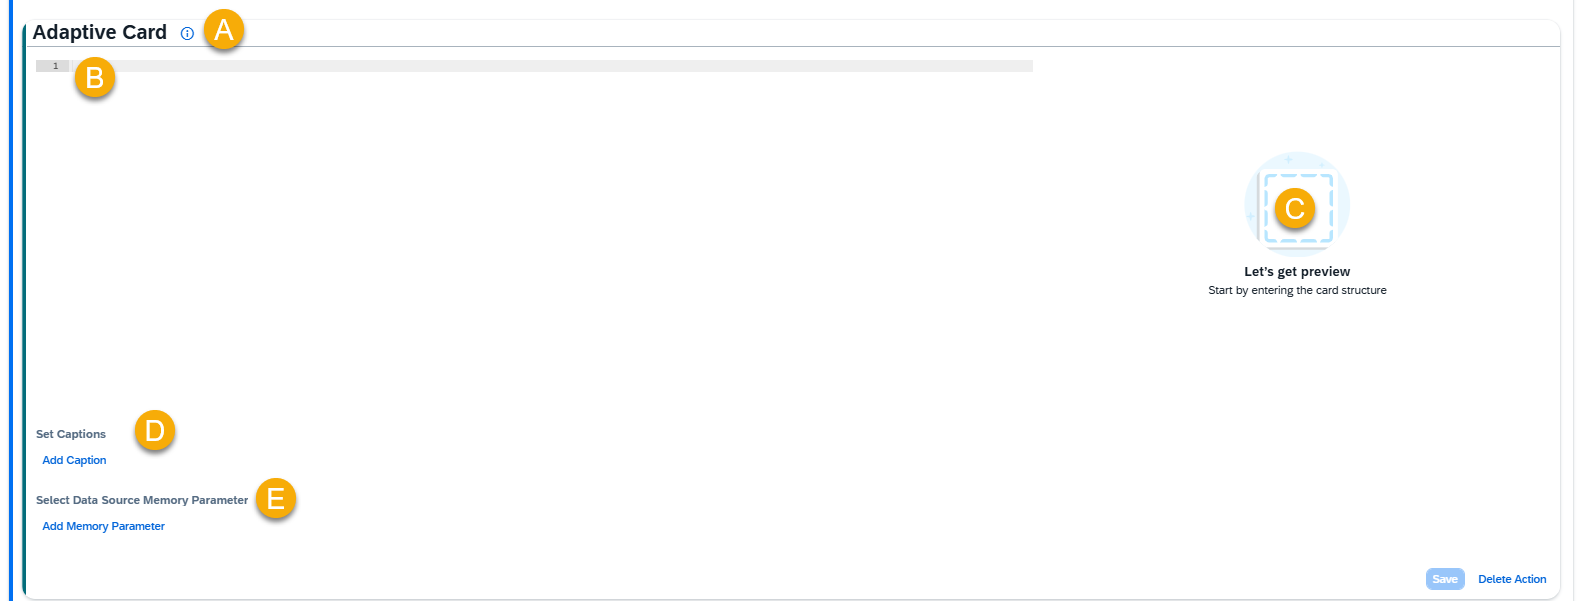
A – Help Dialog
For guidance on the action setup, click the Information Icon. A help dialogue with instructions will appear.
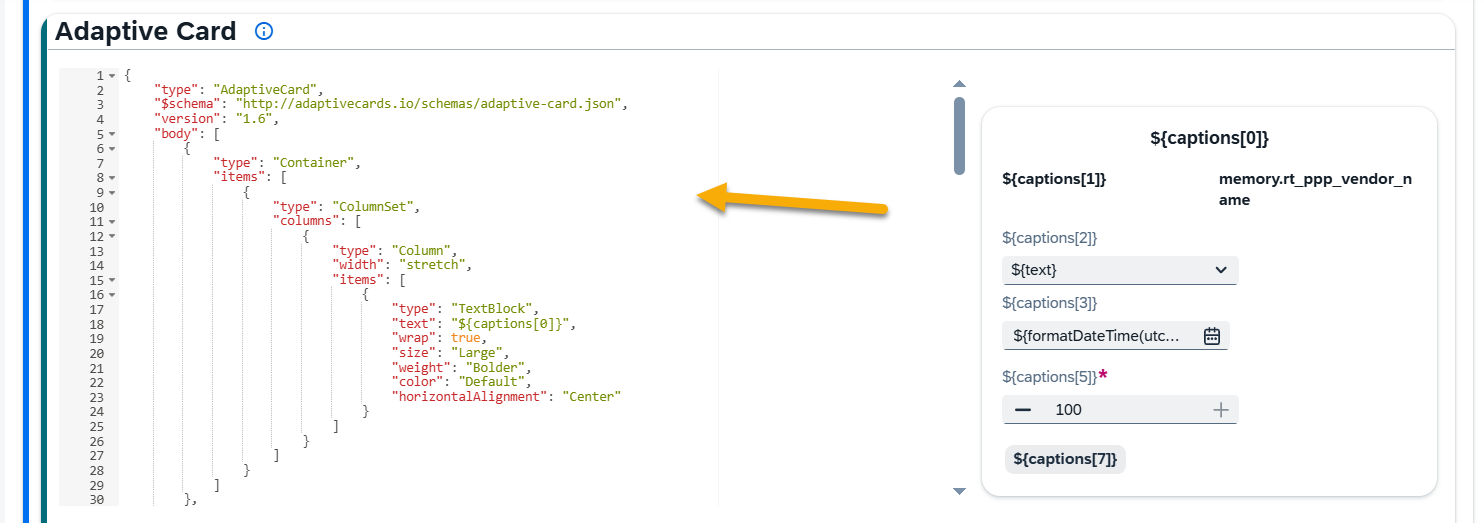
B – Adaptive Card JSON Editor
In the JSON Editor section, you paste the Adaptive Card schema that defines:
- Layout (columns, containers, text blocks, images, etc.)
- Styles (size, weight, color of text)
- Interactive elements (buttons, inputs, toggles, etc.)
You can use the official Adaptive Card Designer to visually create cards and then copy the JSON output.
C – Adaptive Card Preview
D – Set Captions
Captions are static, reusable text labels you define once and then reference inside your card JSON. They’re there to keep your card consistent and to make it easier to translate or update labels without touching the card JSON every time.
Add captions in the JSON array format:
[“caption text 1″,”caption text 2”, …]
You can reference captions in the Adaptive Card structure using:
- ${captions[n]} – for non-repeating sections
- ${$root.captions[n]} – for repeated blocks (e.g., items in a list)
E – Select Data Source Memory Parameter
If your Adaptive Card displays data received from an integration, define the memory parameter as the data source here.
Use the following format to reference values:
${memory_parameter}
NOTE: If you’re using Adaptive Cards in an integrated Skybuffer Business AI Scenario with an ABAP RIK class data source, please refer to the full integration instructions in the online documentation.
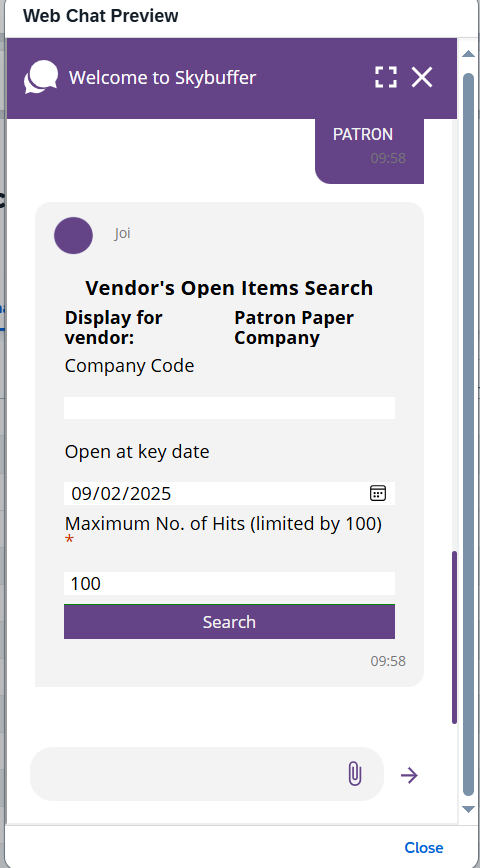
Example of Adaptive Card creation
In this example, we will create a Vendor Open Items Search Card.
Step 1. Open the Adaptive Card Designer and design your card layout.
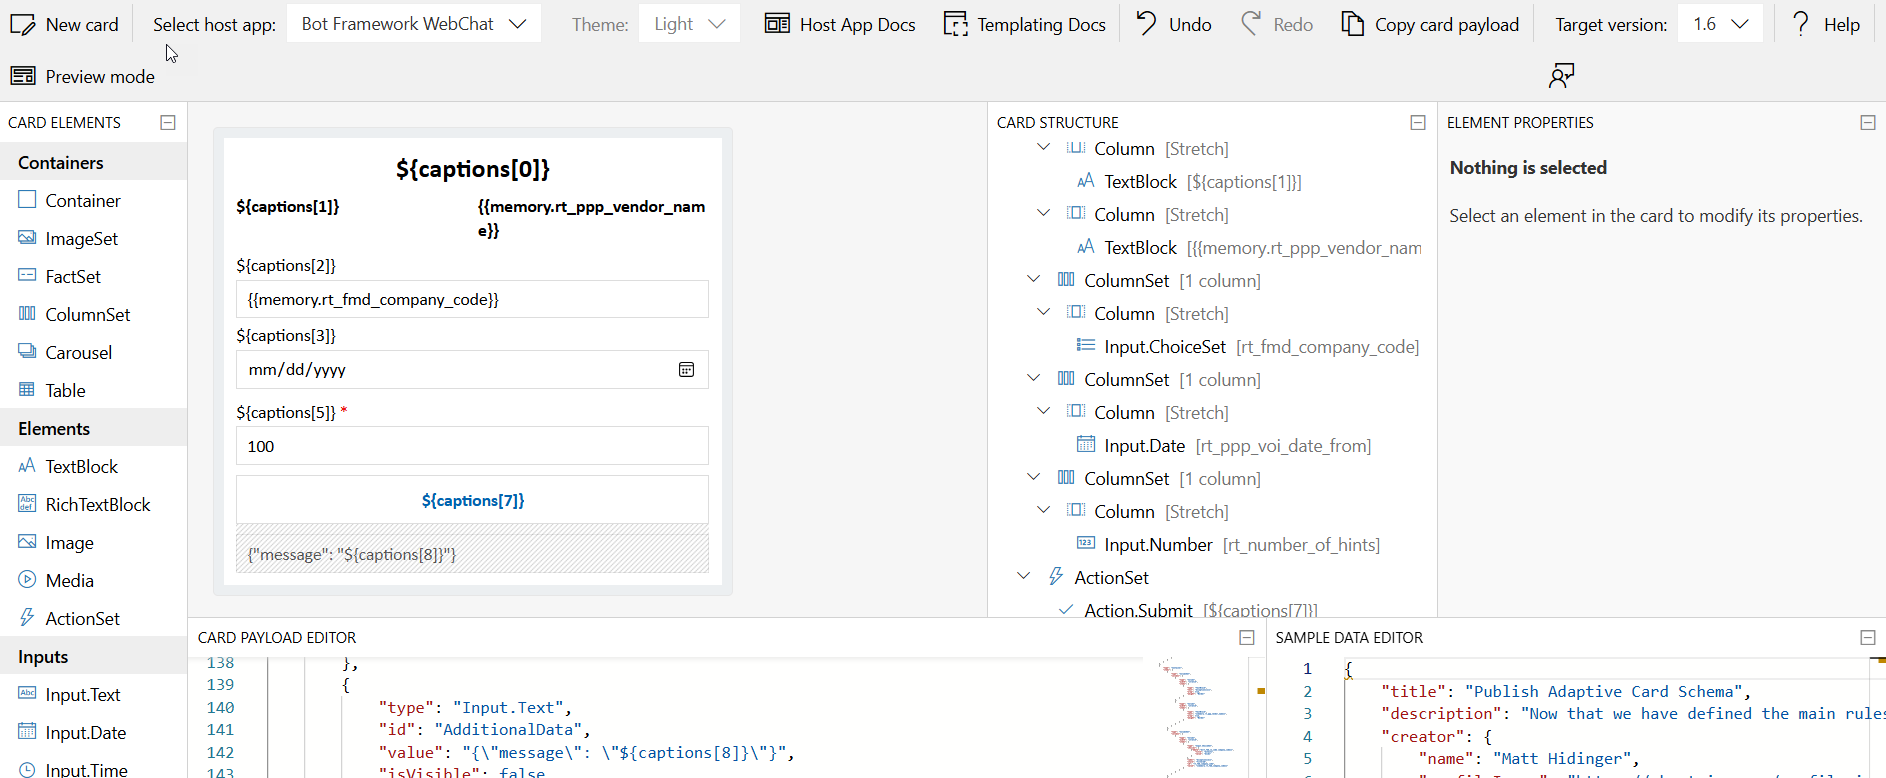
Step 2. Once the card is ready, copy its structure and paste it into the Adaptive Card JSON Editor.
Input example:
Show Adaptive Card JSON
{
"type": "AdaptiveCard",
"$schema": "http://adaptivecards.io/schemas/adaptive-card.json",
"version": "1.6",
"body": [
    {
        "type": "Container",
        "items": [
            {
                "type": "ColumnSet",
                "columns": [
                    {
                        "type": "Column",
                        "width": "stretch",
                        "items": [
                            {
                                "type": "TextBlock",
                                "text": "${captions[0]}",
                                "wrap": true,
                                "size": "Large",
                                "weight": "Bolder",
                                "color": "Default",
                                "horizontalAlignment": "Center"
                            }
                        ]
                    }
                ]
            }
        ]
    },
    {
        "type": "Container",
        "items": [
            {
                "type": "ColumnSet",
                "columns": [
                    {
                        "type": "Column",
                        "width": "stretch",
                        "items": [
                            {
                                "type": "TextBlock",
                                "text": "${captions[1]}",
                                "wrap": true,
                                "weight": "Bolder"
                            }
                        ]
                    },
                    {
                        "type": "Column",
                        "width": "stretch",
                        "items": [
                            {
                                "type": "TextBlock",
                                "text": "{{memory.rt_ppp_vendor_name}}",
                                "wrap": true,
                                "weight": "Bolder"
                            }
                        ]
                    }
                ]
            },
            {
                "type": "ColumnSet",
                "columns": [
                    {
                        "type": "Column",
                        "width": "stretch",
                        "items": [
                            {
                                "type": "Input.ChoiceSet",
                                "choices": [
                                    {
                                        "$data":"${rt_fmd_co_code.company_codes}",
                                        "title": "${text}",
                                        "value": "${id}"
                                    }
                                ],
                                "label": "${captions[2]}",
                                "style": "filtered",
                                "id": "rt_fmd_company_code",
                                "value": "{{memory.rt_fmd_company_code}}"
                            }
                        ]
                    }
                ]
            },
            {
                "type": "ColumnSet",
                "columns": [
                    {
                        "type": "Column",
                        "width": "stretch",
                        "items": [
                            {
                                "type": "Input.Date",
                                "id": "rt_ppp_voi_date_from",
                                "label": "${captions[3]}",
                                "value": "${formatDateTime(utcNow(), 'yyyy-MM-dd')}"
                            }
                        ]
                    }
                ],
                "spacing": "Small"
            },
            {
                "type": "ColumnSet",
                "columns": [
                    {
                        "type": "Column",
                        "width": "stretch",
                        "items": [
                            {
                                "type": "Input.Number",
                                "placeholder": "${captions[4]}",
                                "label": "${captions[5]}",
                                "id": "rt_number_of_hints",
                                "value": 100,
                                "min": 1,
                                "max": 100,
                                "isRequired": true,
                                "errorMessage": "${captions[6]}"
                            }
                        ]
                    }
                ]
            }
        ]
    },
    {
        "type": "ActionSet",
        "actions": [
            {
                "type": "Action.Submit",
                "title": "${captions[7]}",
                "id": "GenericAction"
            }
        ]
    },
    {
        "type": "Input.Text",
        "id": "AdditionalData",
        "value": "{\"message\": \"${captions[8]}\"}",
        "isVisible": false
    }
]
}
Step 3. Define captions for static labels and references.
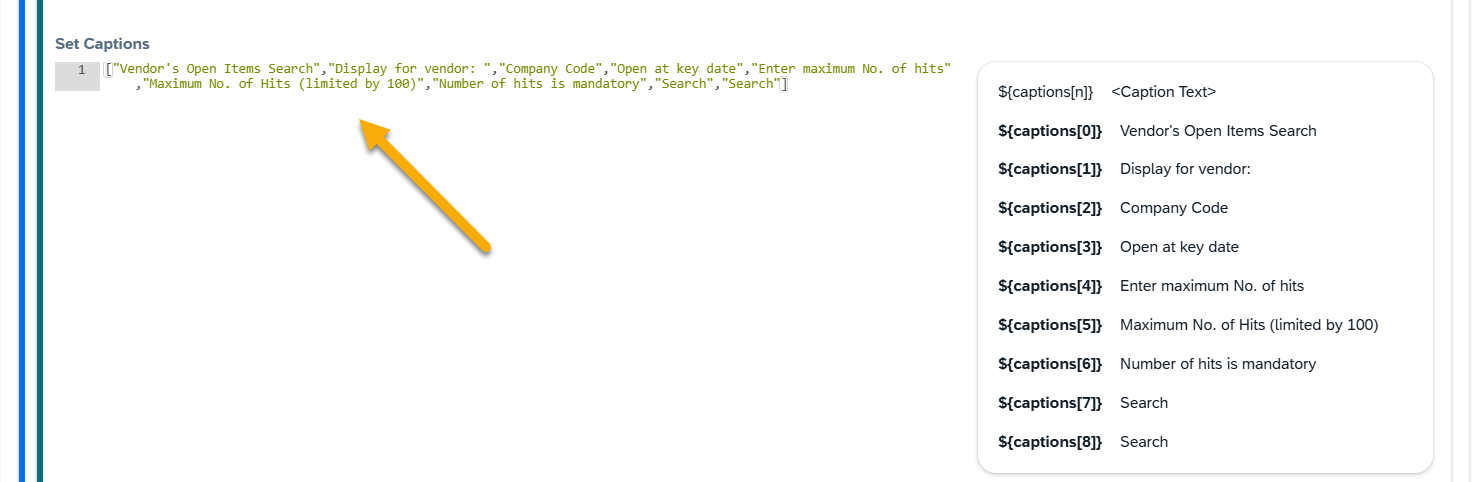
Input example:
[“Vendor’s Open Items Search”,”Display for vendor: “,”Company Code”,”Open at key date”,”Enter maximum No. of hits”,”Maximum No. of Hits (limited by 100)”,”Number of hits is mandatory”,”Search”,”Search”]
Step 4. Select the Data Source Memory Parameter if your card uses dynamic values from integrations.

Input example: rt_fmd_co_code
Step 5. Save your entries.
Step 6. Preview the card to confirm everything renders as expected.