• IDD
  • IDD
  • Skybuffer AI
    • Skybuffer AI Installation and Initial Setup
      • On Business Technology Platform (BTP)
        • Skybuffer AI Installation Guide on BTP
      • On Premise: XSA Runtime and SAP HANA EE
        • Installing SAP HANA Including XS Runtime
        • XS Deployment Process
      • Post Installation User Guide
    • AI Agent
      • AI Agent Configurator
        • Register New AI Agent
        • Intents and Entities Creation
        • Skills Creation and Management
          • Standard Action Types
          • Generative AI Action
          • RAG Action
        • Scheduling
        • Communication Channels
          • Webchat Communication Channel Setup
          • Facebook Messenger Communication Channel Setup
          • Zoom Communication Channel Setup
          • MS Teams Communication Channel Setup
          • Slack Communication Channel Setup
          • Telegram Communication Channel Setup
          • Viber Communication Channel Setup
          • WhatsApp Communication Channel Setup
          • AI Agent Communication Channel Setup
        • Monitor Section
      • Destination Management
      • AI Translate
      • Survey Craft
      • Identity Providers
      • Business AI Scenarios
      • ML Models Hub
      • RAG Document Hub
    • AI Connector
      • AI Connector Configurator
      • AI Connector Logs
      • AWS Integration
      • Google Services Integration
      • Twilio Integration
      • Yandex Services Integration
    • SAP Backend for Business AI
      • Business AI Scenarios Package Administration
        • Installation Guide
        • Uninstallation Guide
      • Business AI Scenarios Package Maintenance Guide
        • Product License
        • Configuration of Email Sending Mechanism
          • Configuration Settings
          • Setup of Specific Email Sending Control
        • Technical User Setup
          • Central oData Service Authorization Role Maintenance
          • Technical User ID Creation
        • Assigning Business AI Scenarios to ABAP RIK Classes
        • Simplified User Creation Scenario Setup (Without Approval Workflow)
          • Maintain and Assign Reference Users for User Creation Scenario
          • Activate Notification for New User Creation (Optional)
        • User Creation Scenario Setup with Approval Workflow
          • Configure Approval Workflow for User Creation Scenario
          • Set Up Approval Steps for Different User Types Creation
    • HOW-TO Guides
      • SAP AI Core Integration. Ollama Server Setup
      • MS SharePoint Integration. Add-in Registration
      • MS Teams Integration. Single Sign-On
        • Create Azure Bot Service
        • Configure Azure Bot Service and Connect to Bot Management App
        • Create Middleware SSO Application
        • Configure Bot Service Application SSO
        • Create Azure AD Enterprise Application for SAP Backend
        • Configure oAuth2 in SAP System
        • Assign Identity Provider and Push Nodejs Configuration
        • Deploy Your App into Microsoft Teams
        • Managing Application Keys
    • Troubleshooting
      • Edge Browser Access Issue
    • Hybrid Chats
      • Hybrid Chats Maintenance Guide
        • Business and Technical Users Setup
          • Create Business and Technical Users
          • Create Business Partners
        • Tenant Configuration
        • Live Pool Management and Configuration
          • Start Live Pool
          • Manage Live Pool
        • System Configuration
          • Configure Status Profile
          • Set Up Technical Messages for Hybrid Chats
        • Hybrid Chats Configuration
        • Hybrid Chats Categorization
          • Categorization Management
          • Categorization Mapping
          • Translate Categories
      • Hybrid Chats User Manual
        • Hybrid Chats
          • HC Archive Mode
          • HC Active Mode
        • HC My Data
          • Edit Personal Data and Profile Picture
          • Default Settings Management
          • Notification and Dialogue Manual Mode Management
          • Quick Replies Management
            • Standard User Mode - Quick Replies
            • Administrator User Mode - Quick Replies
        • HC Analytics
          • HC Analytics
          • Operator Activity Analytics
          • Exit Survey Analytics
        • HC Teams
          • Access HC Teams Application
          • Create New Team
          • Create New Team Member
          • Edit Agent
          • Edit Team Name

Operator Activity Analytics

12 views 0

Operator Activity Analytics

Opening the Application

To access the application, navigate to the Operator Activity Analytics in Fiori:

Obraz zawierający tekst, oprogramowanie, zrzut ekranu, Ikona komputerowa Opis wygenerowany automatycznie

Operator Activity Overview

When opened, the application displays a list of data for the last 7 days. If any operator hasn’t been active for that time, they won’t be visible.
You can use the filter panel to find the data you need:

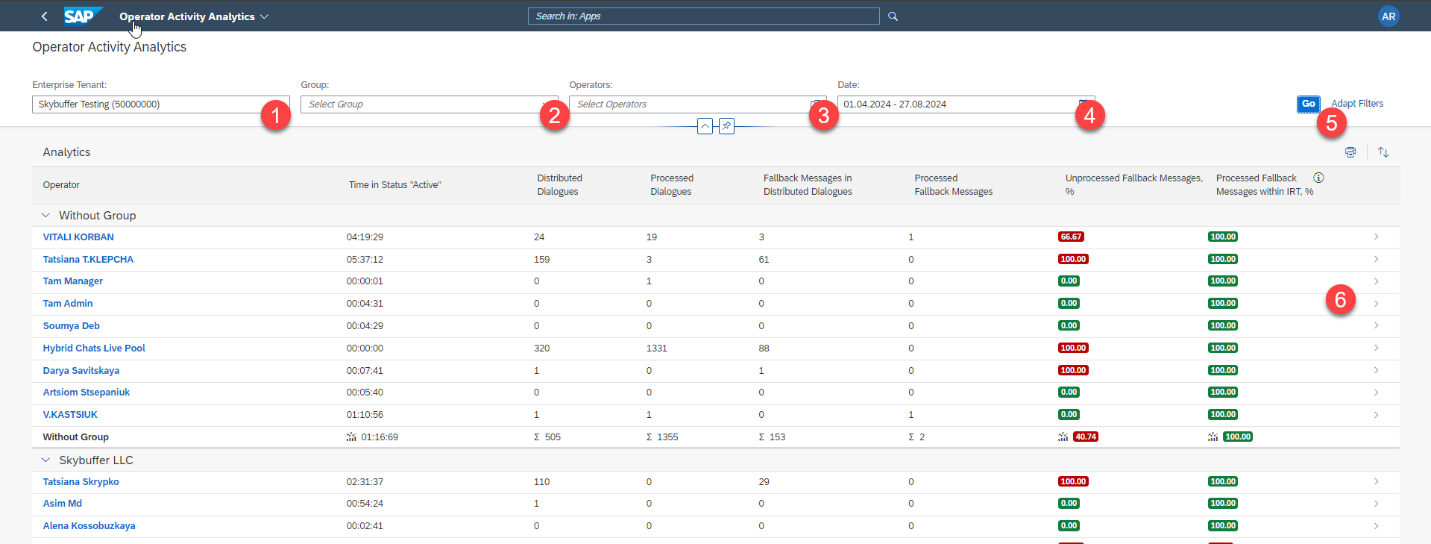
Step 1. Select the Enterprise Tenant. It is common that there is only one to choose

Step 2. Filtering by group

Step 3. Select the specific operators from the list. If left blank, all the operators are included

Step 4. Select the date range

Step 5. Click the Go button to see the results

Step 6. Click on the operator’s name (or click on the arrow icon) to see the metrics for a specific person

Obraz zawierający tekst, zrzut ekranu, oprogramowanie, numer Opis wygenerowany automatycznie

The following metrics are available:

  • Operator – displays first and last name
  • Time in Status “Active” – calculated total time the operator has been in active status in the HC Operator Workplace
  • Distributed Dialogues – number of all dialogues distributed to the given operator
  • Processed Dialogues – number of dialogues the operator interacted with (assigned, closed, those where the operator wrote to the user, etc.)
  • Fallback Messages in Distributed Dialogues – number of messages that cannot have been answered by AI Model
  • Fallback Processed Messages – number of fallback messages the operator has interacted with
  • Unprocessed Fallback Messages, % – indicates what percentage of the fallback messages distributed to the operator have not been processed by the operator
    The ideal value would be zero, meaning that every message that required attention was handled by the operator, and such values are marked green. Any value above zero is marked in red
  • Processed Fallback Messages within IRT, % – indicates what percentage of the fallback messages processed by the operator were taken over within the IRT* time limit.
    *IRT means “Initial Response Time”, and there is often a time limit/suggested value within which a support agent must respond to a customer’s request. In the case of AI Model interactions – we are looking at cases where the AI Model has no response and human intervention is required.

Configurating the IRT Time Limit values

The time period within which the operator has to respond (IRT Time Limit) is synonymous with the delay time for red/fallback messages*.
To set up this value, open the Connector Configuration application and set the correct value for the Delay in seconds for red conversations (UI side) parameter.
Click Save and then press the Push Update and Restart button to save the changes.

(If the AI Model doesn’t have an answer to a user’s message, the conversation tile changes its colour into red and the workflow stops for some time so that an available operator could join. Hence the delay. If the operator doesn’t step in in time, the workflow continues. For example, a support request might be saved with user’s comment and contact data. It is best for the operator to intervene within the delay time and not later, when the AI Model has already continued with the conversation).

Operator Metrics

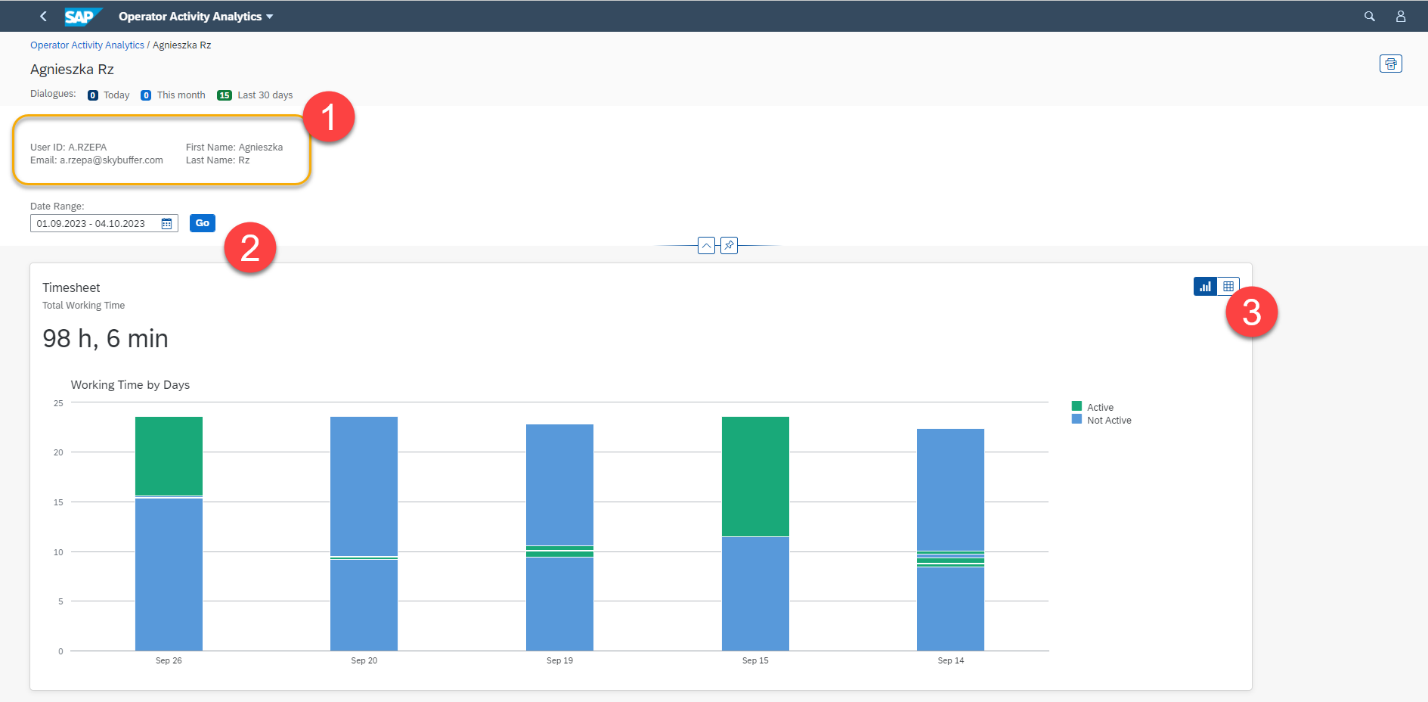
Each operator has a dedicated page with personal metrics.

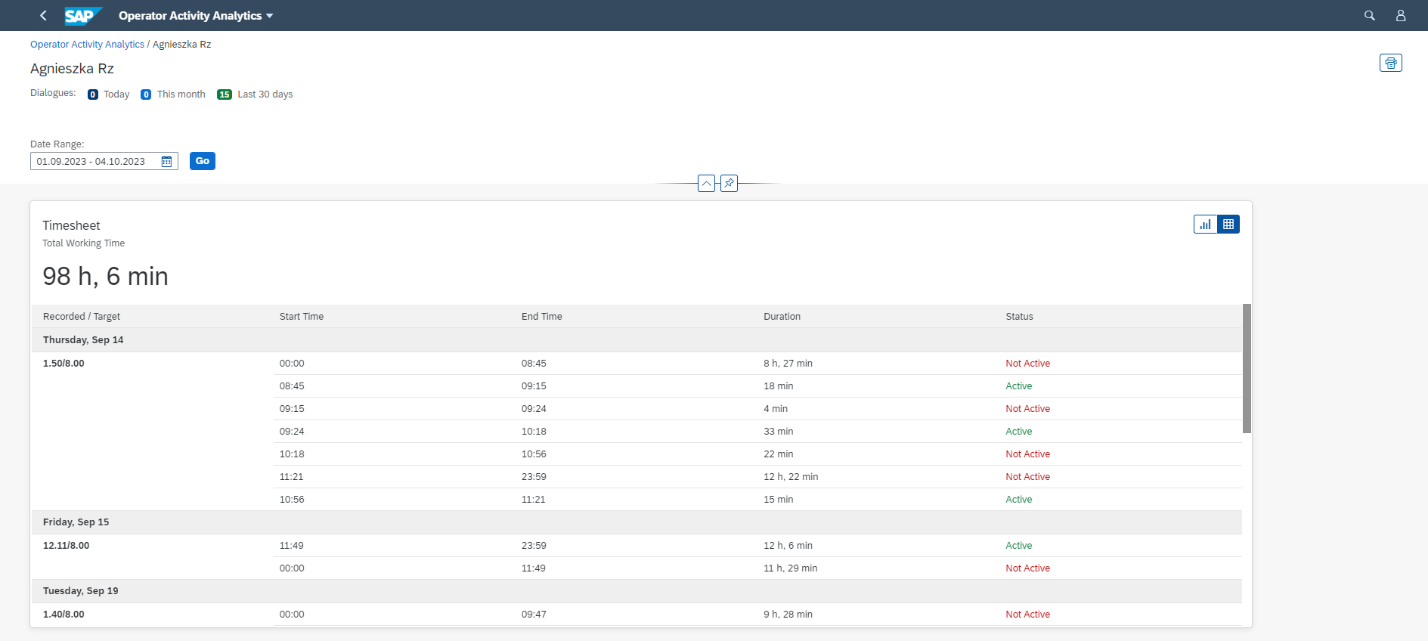
Step 1. Operator personal details: user ID, name, email

Step 2. Change date range if required and click Go to update the results

Step 3. Timesheet data. Toggle the button to change the view from the graph to the detailed data table:

Obraz zawierający tekst, zrzut ekranu, oprogramowanie, Ikona komputerowa Opis wygenerowany automatycznie

The data table view for the timesheet metrics:

Obraz zawierający tekst, zrzut ekranu, oprogramowanie, Ikona komputerowa Opis wygenerowany automatycznie

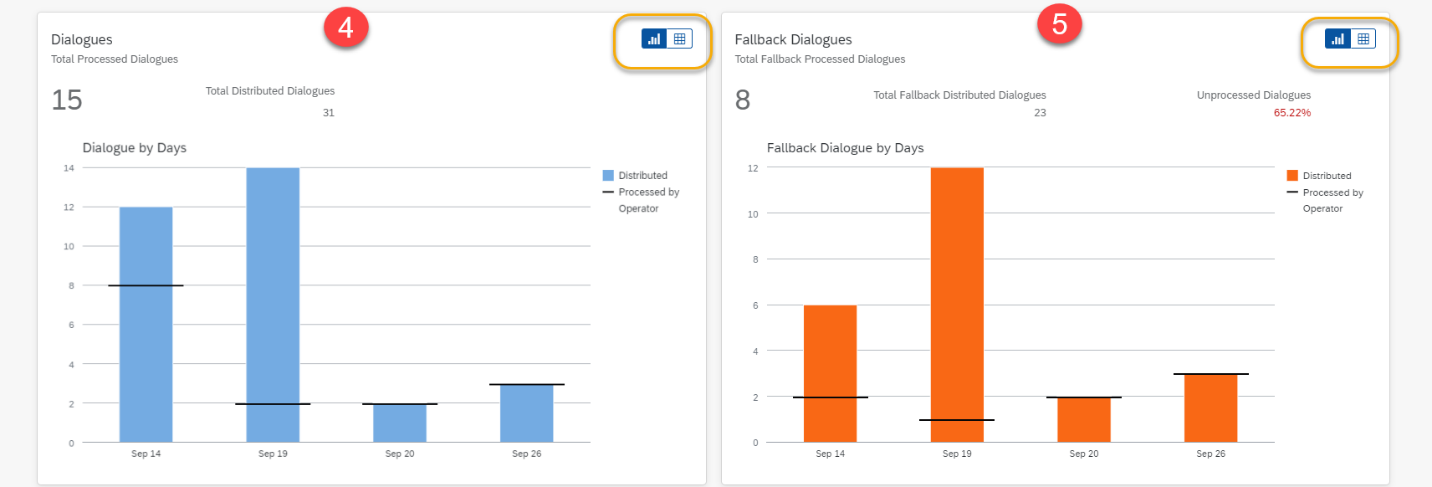
Step 4. Dialogue Metrics

View the distributed vs processed dialogues per day. Toggle the switch in the yellow square to switch from the graph to the data-table view.

Step 5. Fallback Dialogue Metrics

Review the number of the distributed fallback dialogues per day, and the percentage of the unprocessed dialogues.
Toggle the switch in the yellow square to switch from the graph view to the data table view.

Obraz zawierający tekst, diagram, Wykres, numer Opis wygenerowany automatycznie

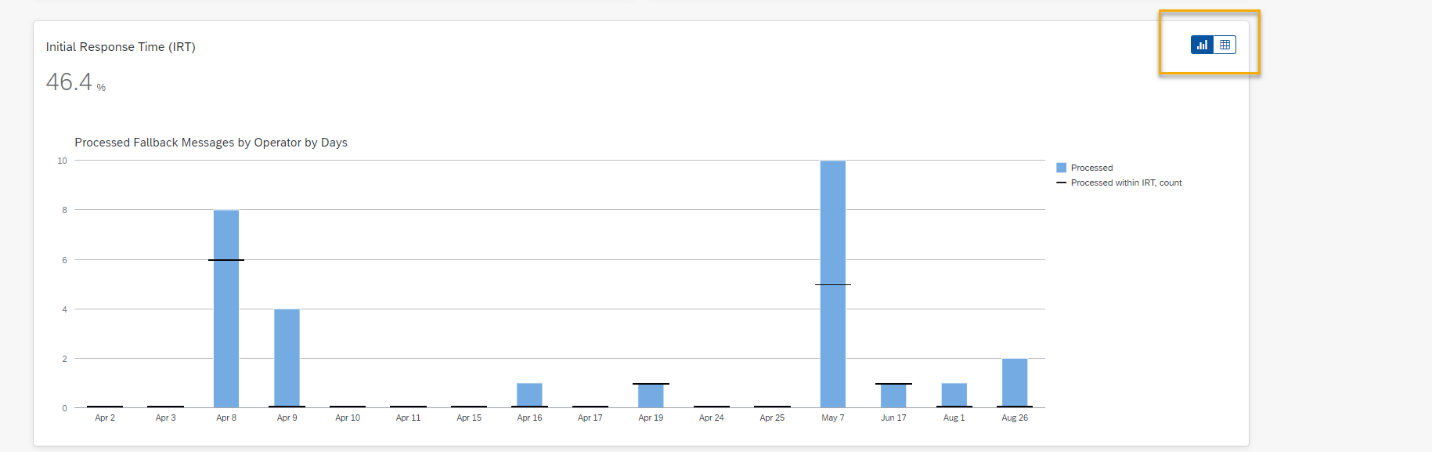
Step 6. Fallback IRT Time Limit Metrics

The application comprises a Response Time Measurement feature. This includes a detailed dataset for each operator.

The blue blocks in the graph show the number of fallback messages processed per day. The black horizontal line shows the number of dialogues processed within the set IRT time limit. Toggle the yellow switch to change the view to a data table.

Example: The operator processed 10 fallback dialogues on May 7th, but only 5 of those dialogues were taken over by the operator within the required time limit.

Obraz zawierający linia, tekst, zrzut ekranu, Wykres Opis wygenerowany automatycznie


Was this helpful?

Yes  No
Related Articles
  • Edge Browser Access Issue
  • Troubleshooting
  • Scheduling
  • AI Agent Communication Channel Setup
  • Post Installation User Guide
  • Installing SAP HANA Including XS Runtime
Copyright 2022 Skybuffer.com. All Rights Reserved.