Data Source Scenarios Management is an application that enables SAP data sources to be used in AI Agent conversations. It supports the configuration of system destinations, discovery of available data sources, management of their replication for Retrieval-Augmented Generation (RAG), and assignment of selected sources to AI Agents.
When properly configured, structured business data from SAP systems can be securely discovered, optionally replicated, and made available to AI Agents at runtime.
Overview of the Process
The overall process consists of the following steps:
- Register SAP data sources
- Create a destination with data source discovery enabled
- Discover available data sources
- Manage discovered data sources and replication settings
- Assign data sources to AI Agents
Data Source Scenarios Management
Before data sources can be discovered, they must be registered in the SAP system.
To enable data source discovery:
- Data sources must be registered in table /SKYBFR/YAICDSNM
- Only registered data sources can be discovered by the system
Destination Management
Step 1: Open Destination Management
Navigate to the AI Agent group and open the Destination Management application.

Step 2: Create a New Destination
Click the Add (+) button to create a new destination.

Provide the required connection and authentication details.
Enable Data Source Discovery for the destination.
Save the destination.
Once the destination is created:
- The system automatically runs data source discovery.
- The destination overview displays: last Run timestamp and number of discovered data sources
- A manual refresh option is available to trigger discovery again.
From the destination overview, you can navigate directly to the Data Source Management application using the redirection button.

Step 3. Registering Data Sources for Discovery
This section describes how to register existing SAP data sources so that they can be discovered and later used by AI agents via a configured destination.
The registration process does not create new data sources; it only makes existing objects available for discovery.
Prerequisites
- The data source to be registered already exists and is active in the SAP system
- The user has authorization for: Transaction SM30 and maintenance access to table /SKYBFR/YAICDSNM
- A destination is configured for Data Source discovery.
Procedure
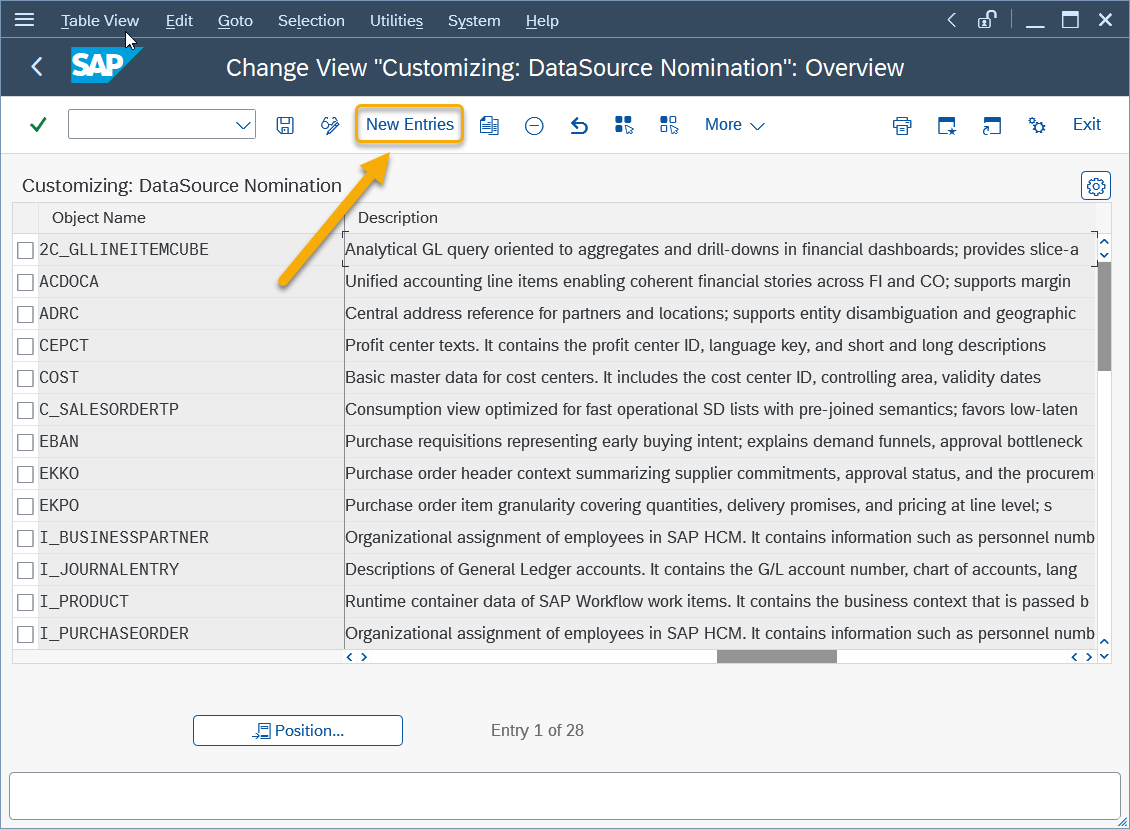
Execute transaction SM30.

Enter table name /SKYBFR/YAICDSNM and choose Maintain.

Choose New Entries.
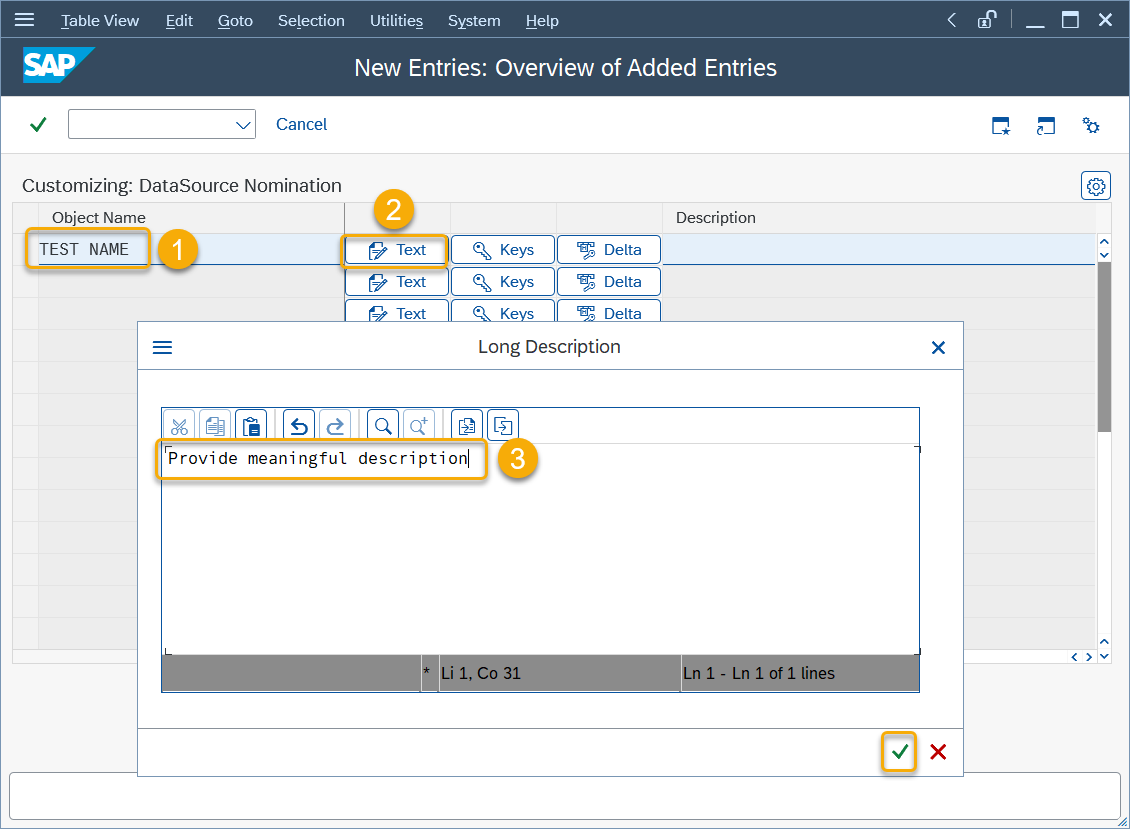
Enter the required information:
Object Name: Technical name of the existing object (for example, a CDS view or service name).
Description: Short functional description of the data source.
Save the entry.
Result
- If the specified data source exists in the system, it is discovered on the configured destination.
- The data source becomes available for the later use by AI agents.
- If the data source does not exist, it is not discovered.
Data Source Management Application
Step 4. Open Data Source Management Application
To manage discovered data sources, navigate to the AI Agent group and open the Data Source Management application.

Main Page Overview
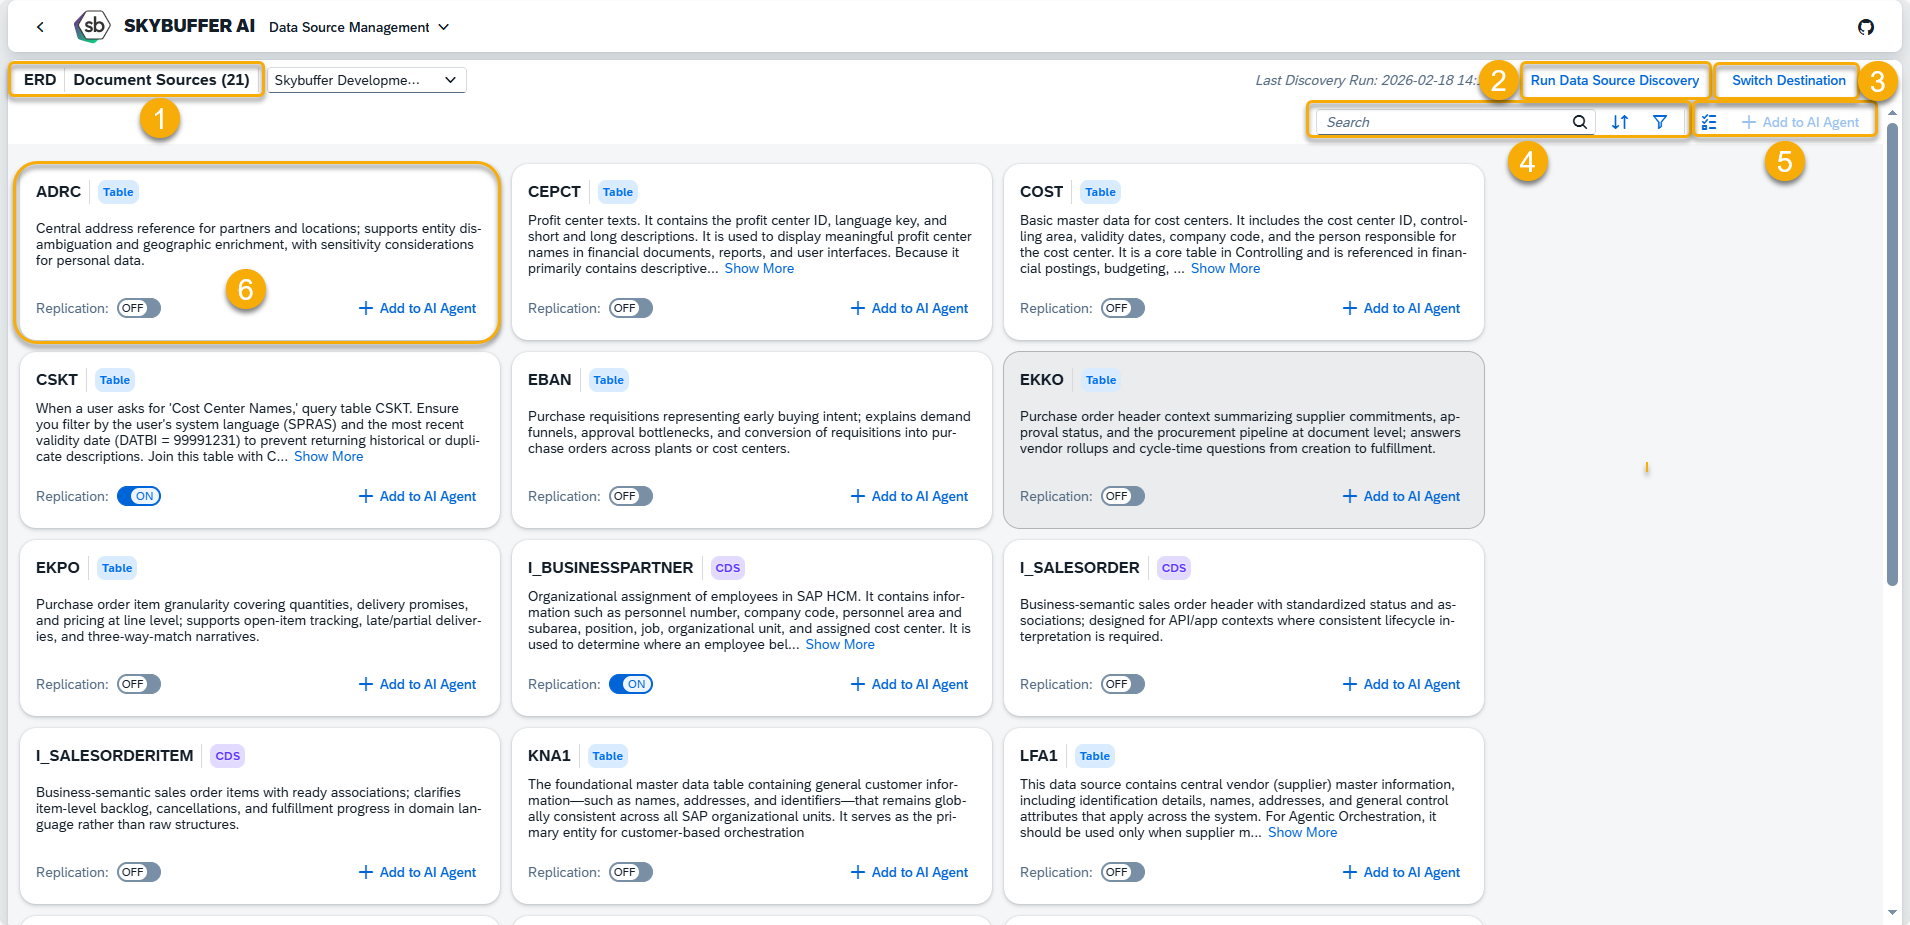
The main page displays all discovered data sources across destinations and includes the following elements:
1. Destination Name
Displays the destination along with the number of data sources discovered for it.
2. Run Data Source Discovery
Manually triggers data source discovery for the selected destination.
3. Switch Destination
Allows switching between different configured destinations.
4. Search, Filter, and Sort Area
Enables searching, filtering, and sorting of data sources.
5. Adding datasources to AI Agent
6. Data Source List
Each data source entry shows:
- Name
- Type (Table, CDS, View, Other)
- Description
- Replication status (On / Off)
- Option to directly assign the data source to an AI Agent
Step 5. Data Source Details View
Selecting a data source opens the Data Source Details view, which provides detailed technical and replication information.
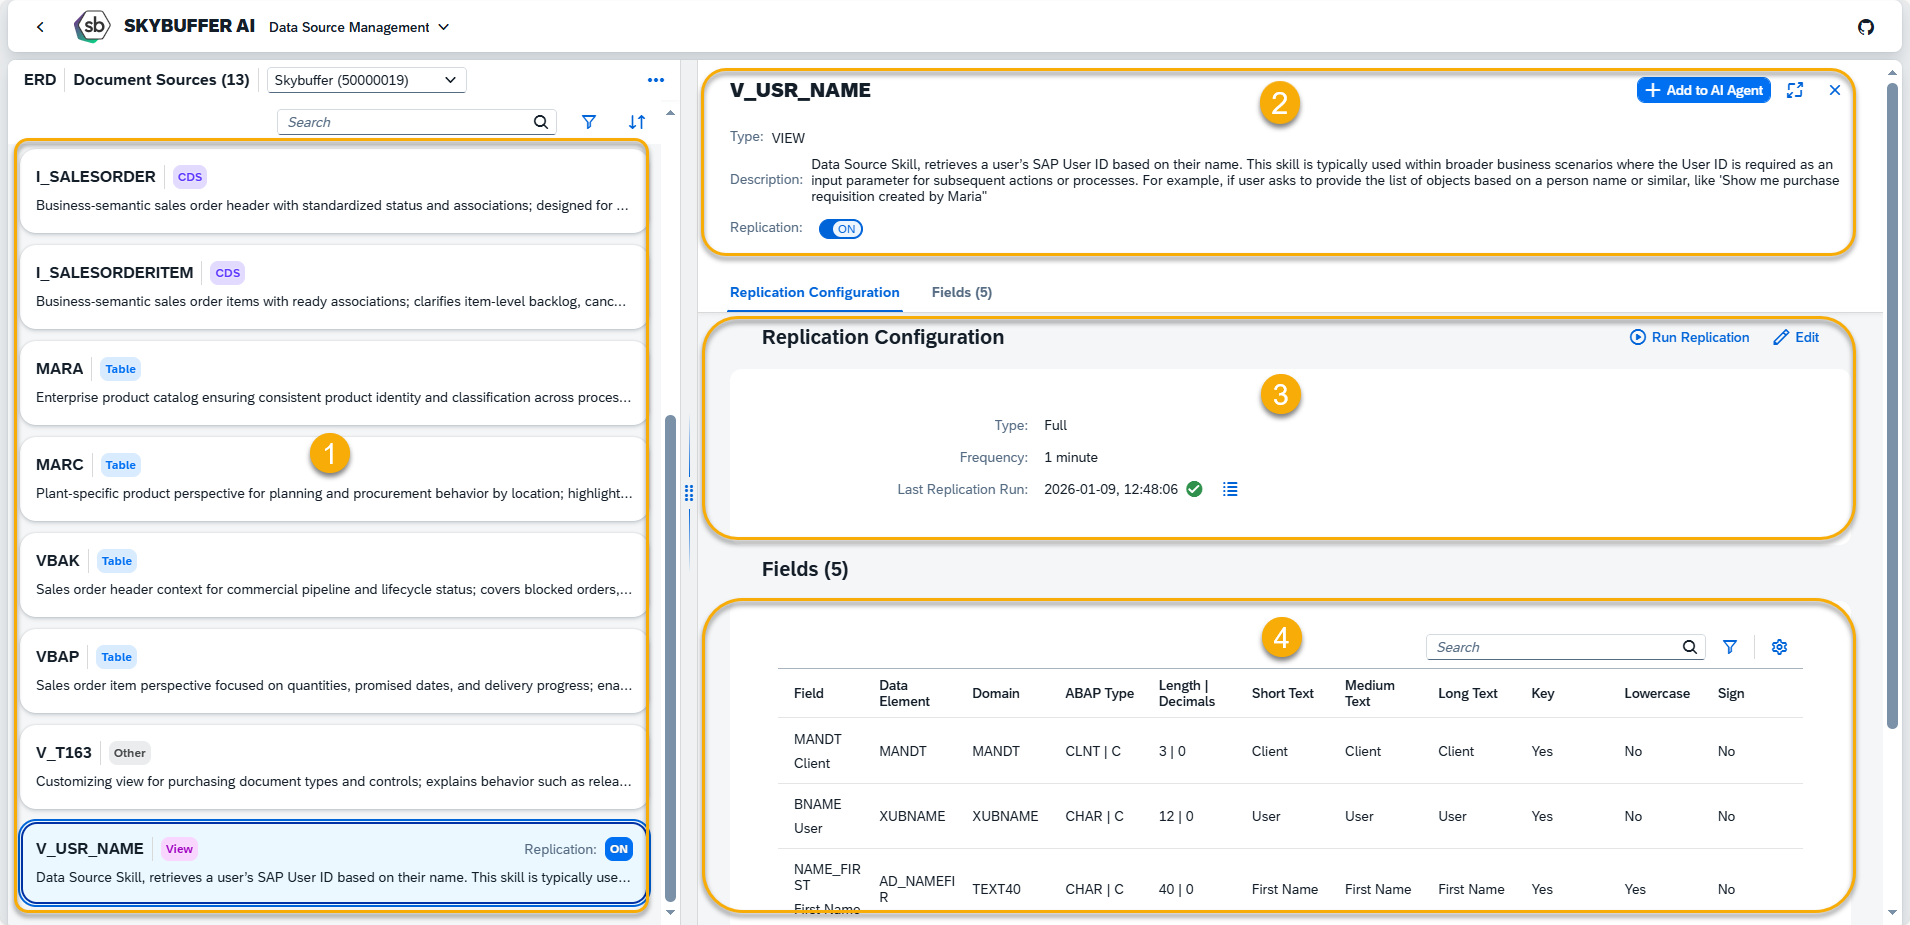
1. List of Data Sources
2. General Information
Type: (Table, CDS, View, Other)
Description: data source description for SAP system
Replication status (enabled or disabled)
Add to AI Agent: option to add data source to the selected AI Agent
3. Replication Configuration
The replication section allows configuring and monitoring data replication for the selected data source.
Replication is required for data sources that should be stored and used by Retrieval-Augmented Generation (RAG).
Enabling Replication
To enable replication:
Switch the Replication toggle to On and select the Replication Type:
- Full Replication– the complete data set is replicated
- Delta Replication– only changed data is replicated (if supported by the data source)
NOTE: When replication is initialized, a dedicated space for vectorized documents is automatically created. Within this space, you can monitor the vectorization status and review the documents that are available for use by AI Agents.
Full Replication
Full replication synchronizes the entire data set from the source system during each replication run. No change detection is applied.
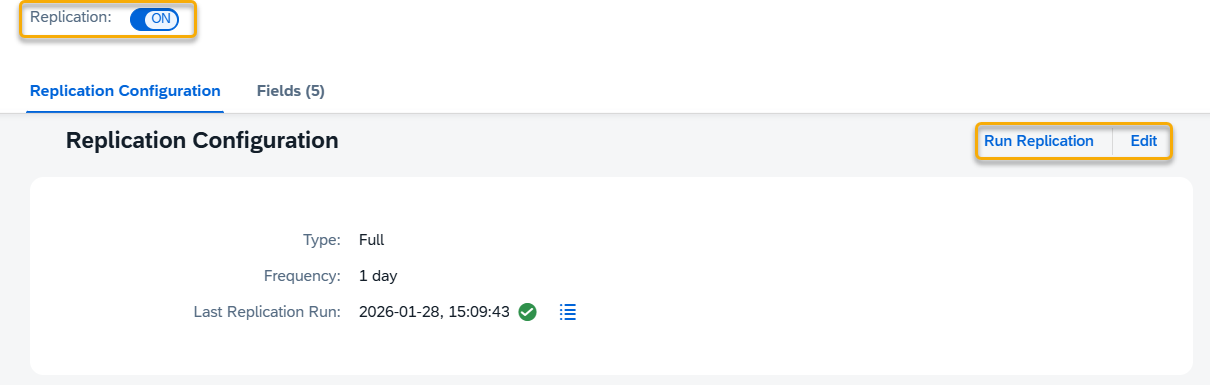
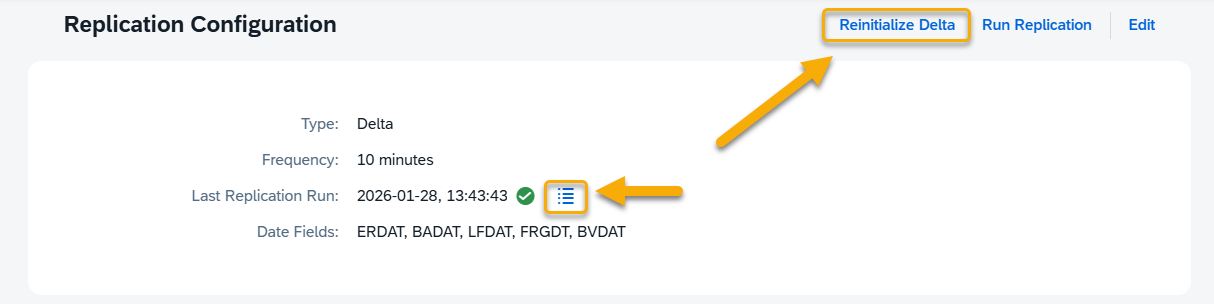
Type: Specifies the replication mode for the data source
Frequency: Defines how often replication is executed.
Last Replication Run: Displays the timestamp of the most recent replication execution.
Run Replication button: triggers replication manually for the selected data source.
Edit button: Allows changing replication settings such as type and frequency.
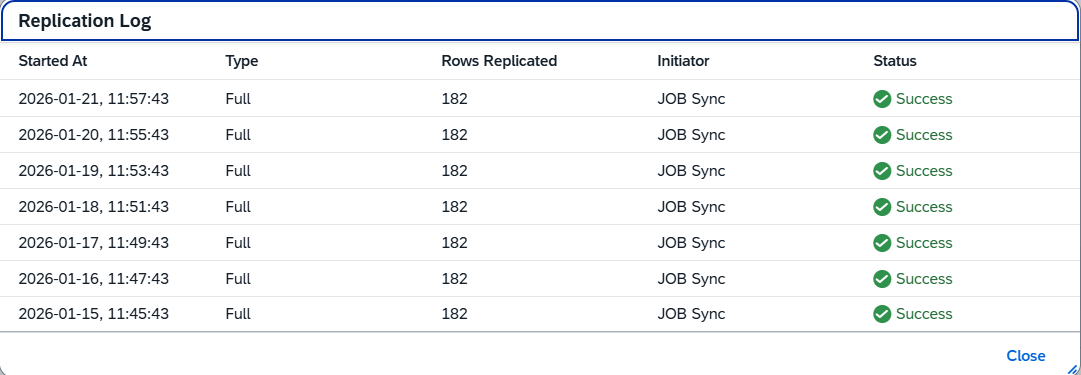
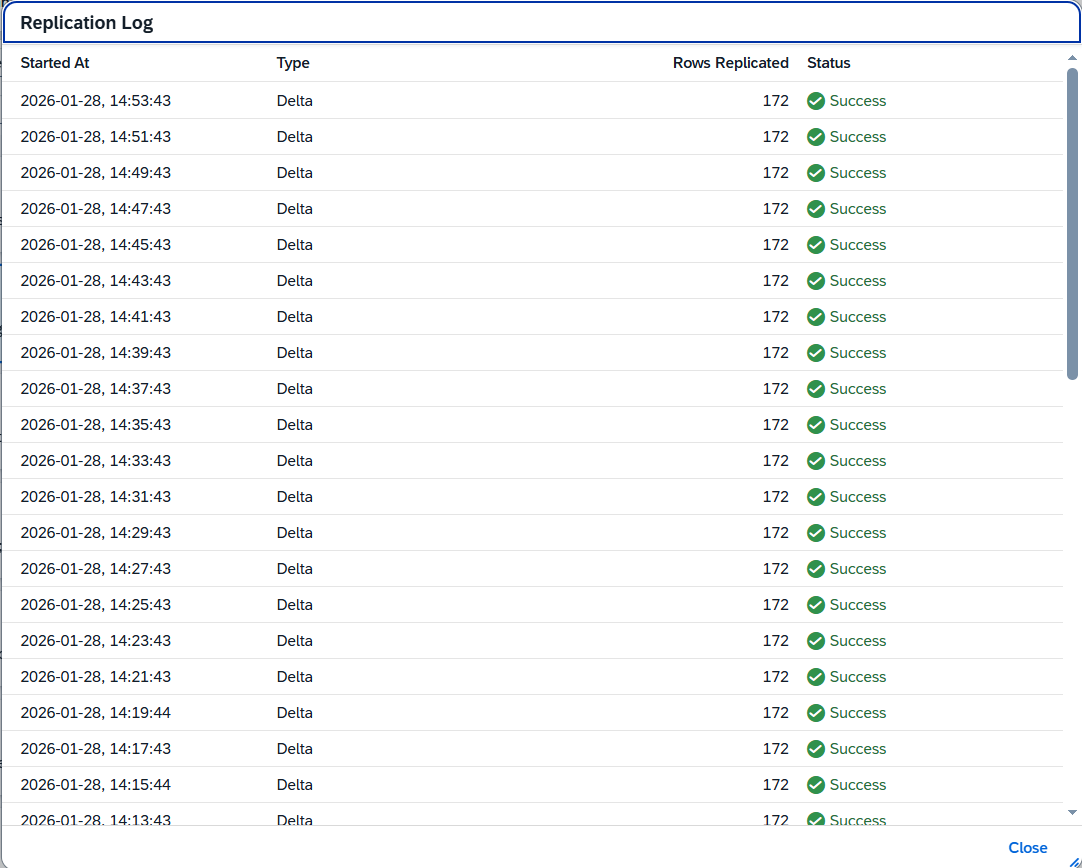
View Replication Logs: Opens a list of replication runs with status and execution details.
NOTE: During full replication, newly fetched data is vectorized as an independent document while the currently active document remains available to AI Agents. Only after the new document has been fully vectorized is it published and replaces the previous version in RAG.
This approach ensures continuous data availability and prevents gaps during the replication process.
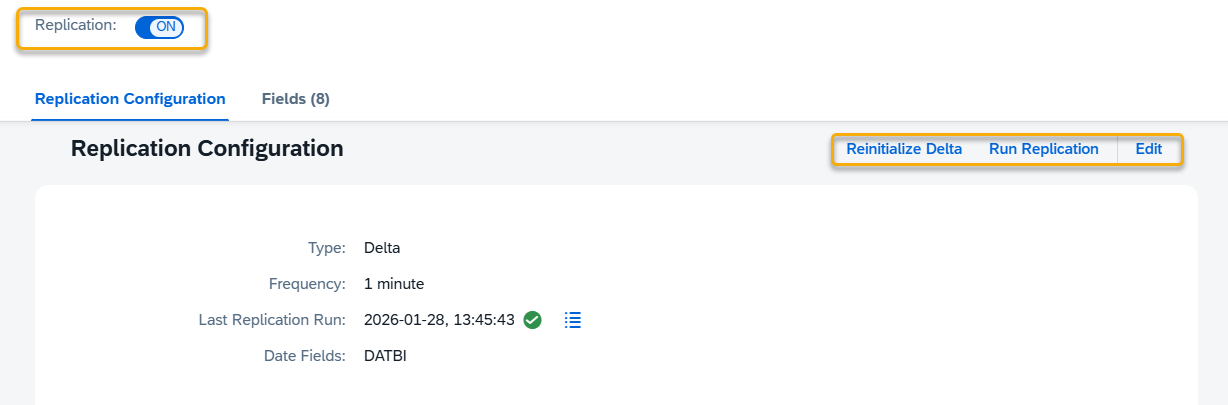
Delta Replication
Delta replication enables incremental data transfer by detecting changes since the last replication run.
Prerequisites
- Delta replication is only available for data sources that expose a suitable date field.
- The date field must represent the last change timestamp of the record.
Without a date field, incremental change detection is not possible.
Preparing Data Sources for Delta Replication
If delta replication is required, ensure that the data source exposes an appropriate date field:
- Tables: Create a new Data Source that includes or joins a relevant date column.
- Views: Extend or adjust the view to expose a date field suitable for change tracking.
- CDS Views: Add or expose a date field or parameter that reflects the last modification timestamp.
NOTE: The selected date field must indicate the last update or change of the data record.
Fields representing creation date only are not suitable for delta replication.
Delta Field Selection
When configuring delta replication, select one or more Date Fields that will be used for delta detection.
Ensure that the selected fields accurately reflect changes made to the underlying data.
Reinitialize Delta
After delta replication is configured, the Reinitialize Delta option becomes available.
Reinitializing delta:
- Resets delta tracking for the data source
- Causes all data to be fully replicated again during the next replication run
This option is typically used after:
- Structural changes to the data source
- Corrections to delta field configuration
- Data inconsistencies

View Replication Logs: Opens a list of replication runs with status and execution details.
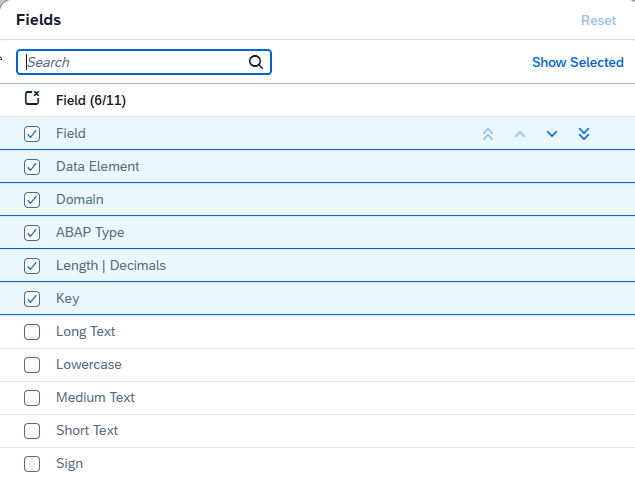
4. Fields Information
The Fields section displays detailed metadata about the structure of the data source.
For each discovered field, the following information is shown in a table:
- Field
- Data Element
- Domain
- ABAP Type
- Length / Decimals
- Short Text
- Medium Text
- Long Text
- Key
- Lowercase
- Sign
This information helps assess the structure and suitability of the data source for AI Agent usage.
5. Parameters (CDS Data Sources)
If the selected data source is a parameterized CDS view, a Parameters section is displayed in the details view.
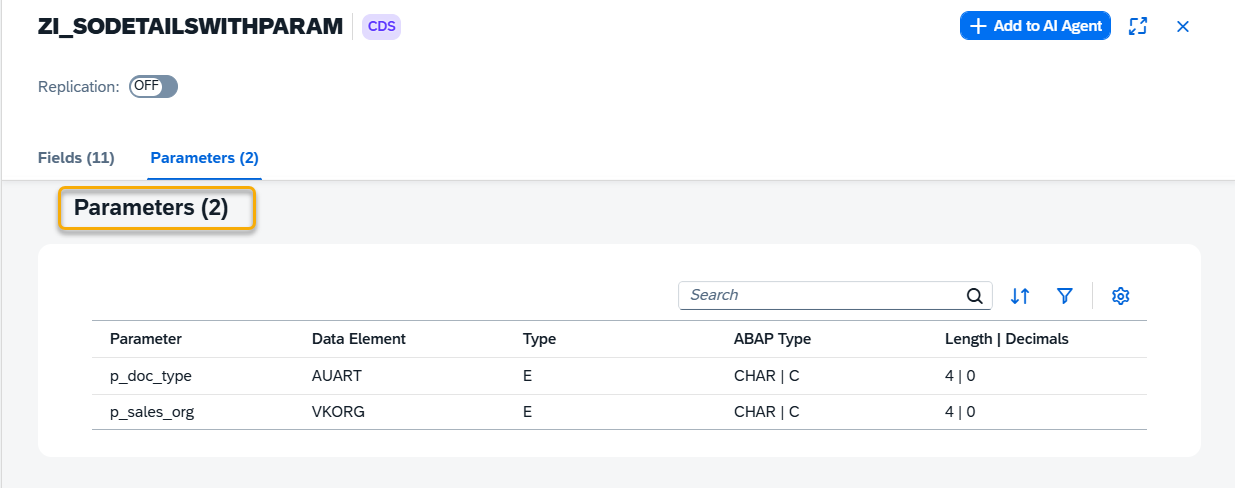
The parameters table shows the following information:
- Parameter
- Data Element
- Type
- ABAP Type
- Length / Decimals
If a data source does not define parameters, this section is not displayed.
Step 5. Searching, Filtering and Sorting
You can search, sort and filter this data using the following buttons:
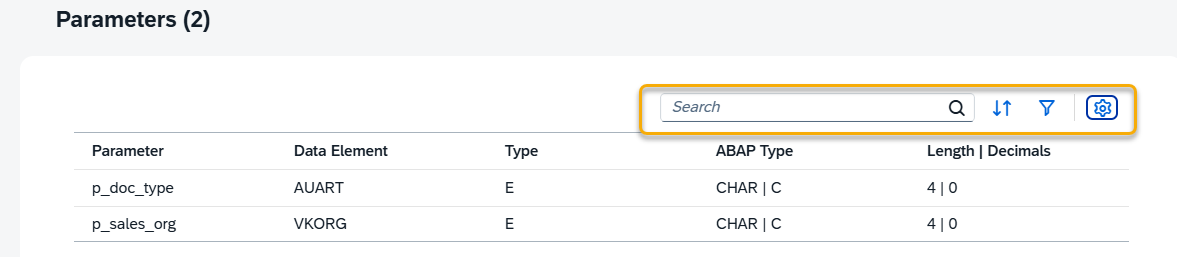
and decide which filds should be visible:
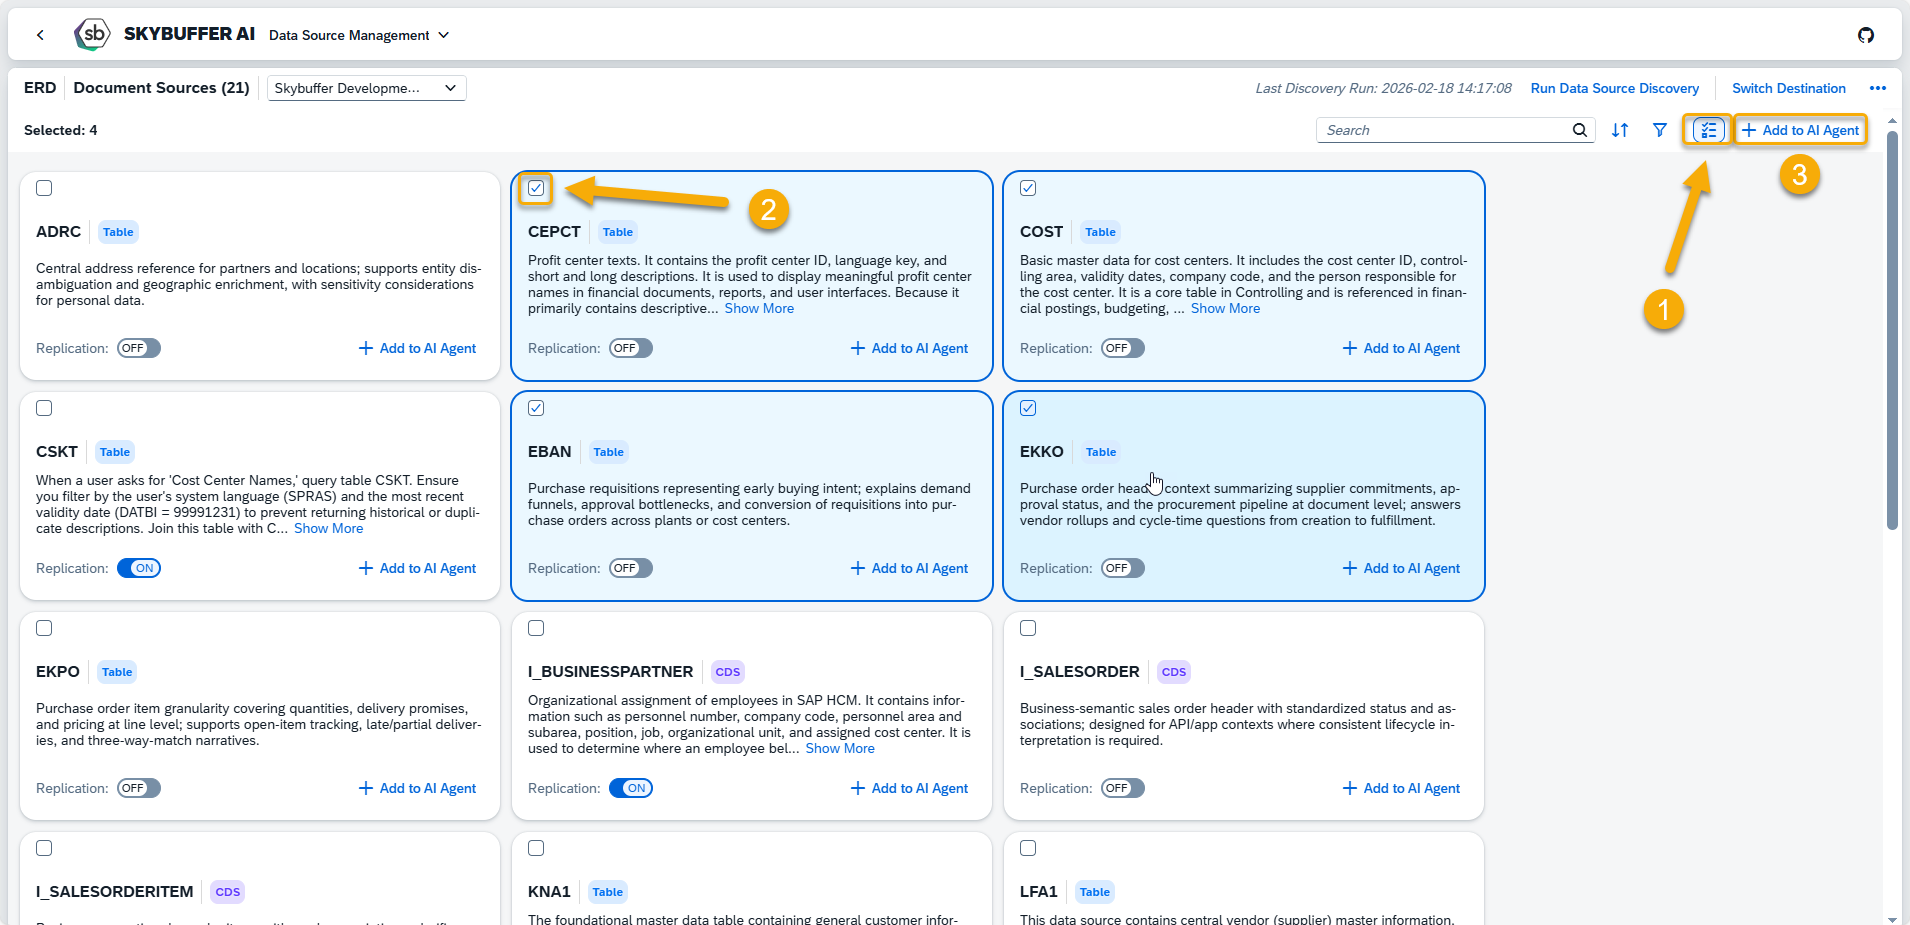
Step 5. Assigning Data Sources to AI Agents
From both the Data Source Management list and the Data Source Details view, data sources can be directly assigned to AI Agents.
On the main application view you can select more than one data source and add them to AI Agent.
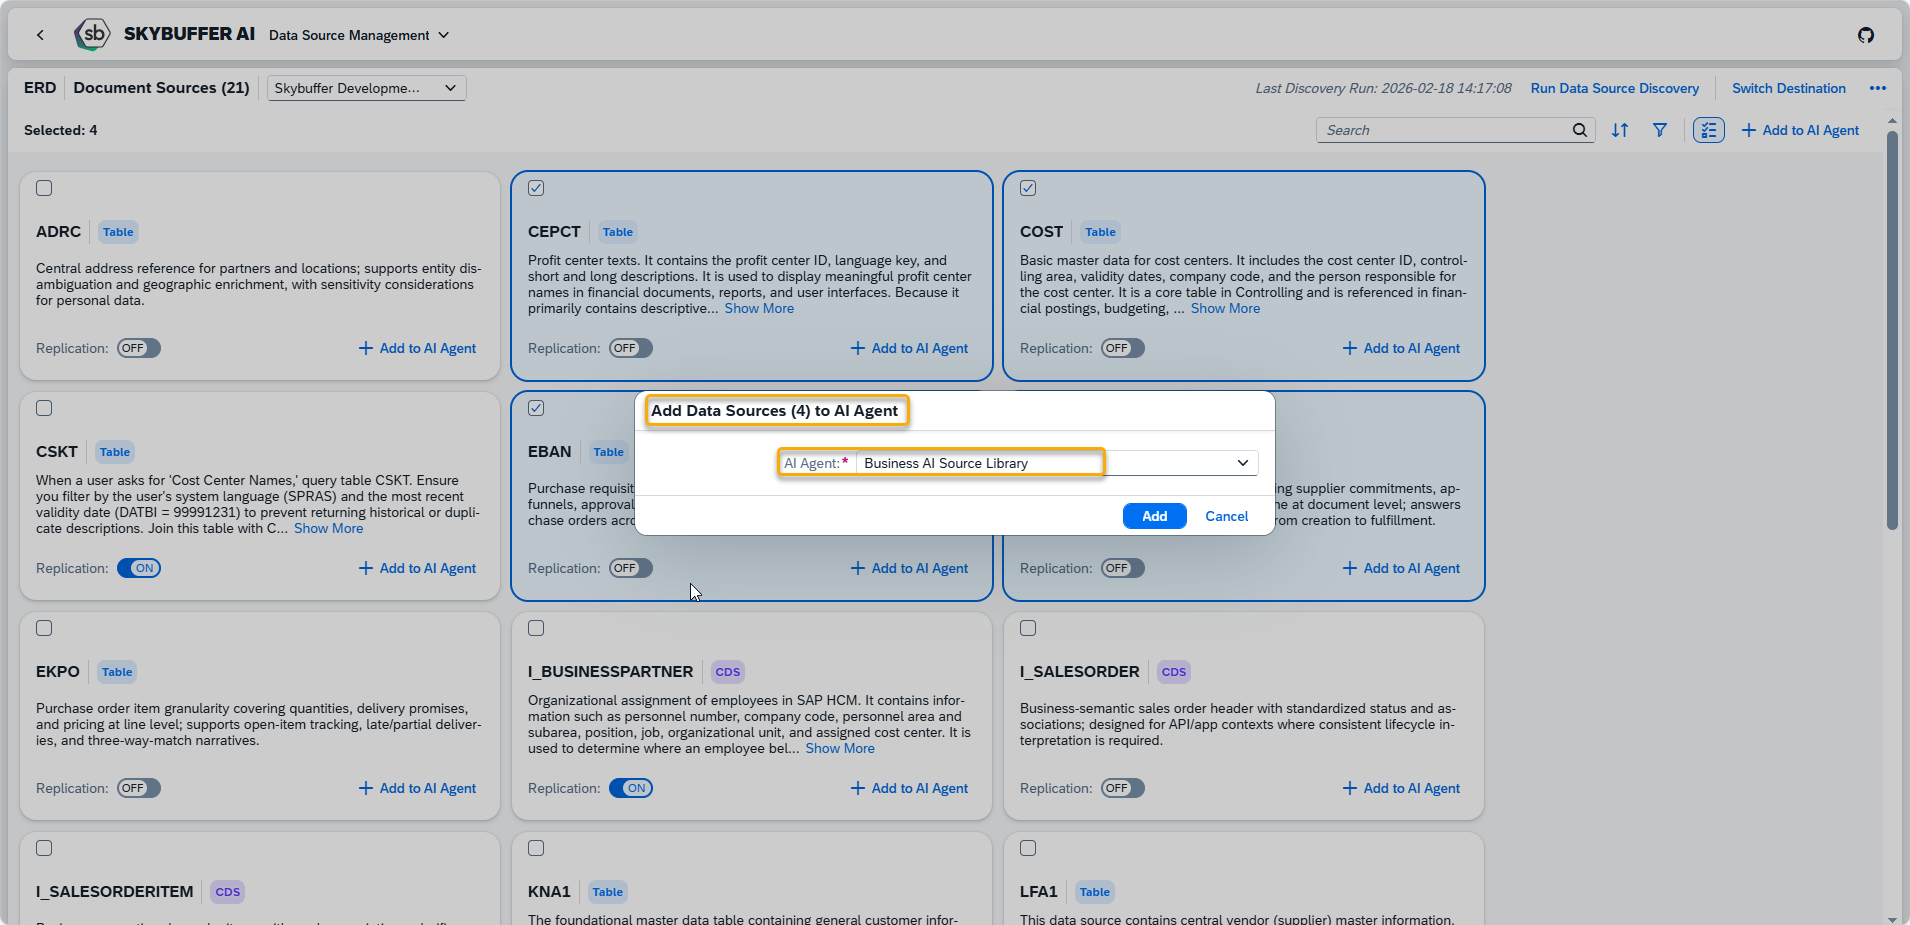
You can also enter data source details view and add it directly from there:
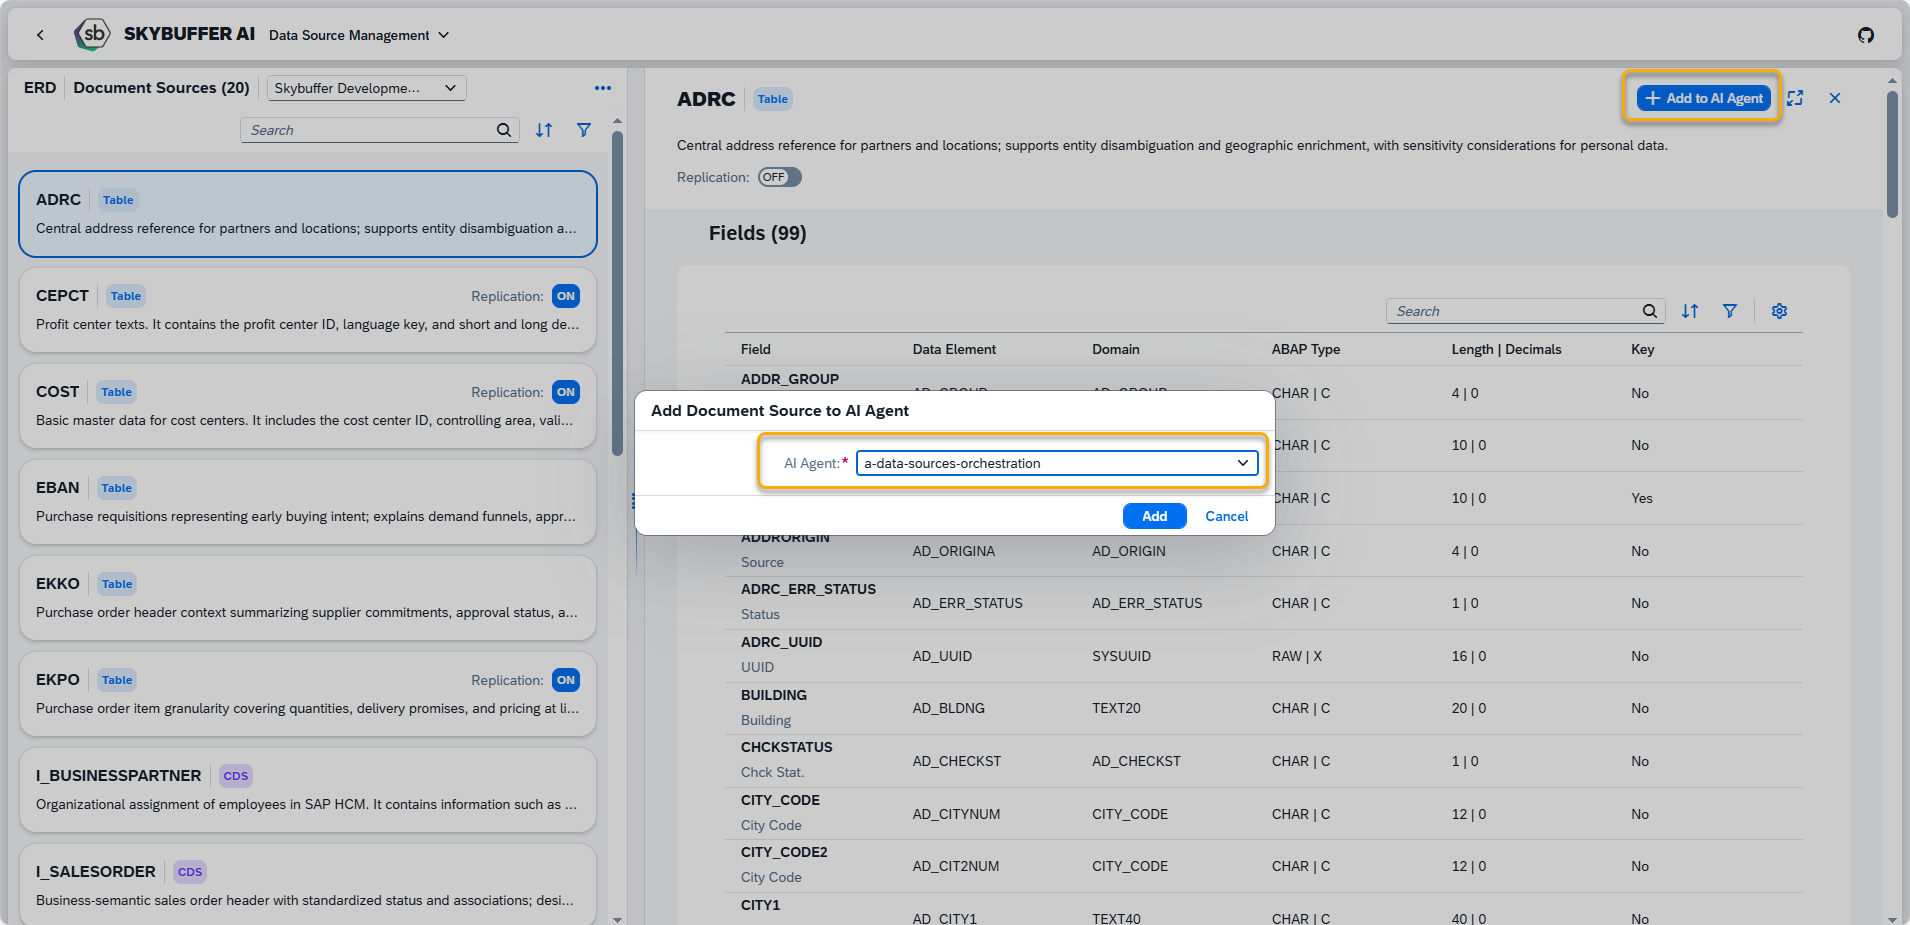
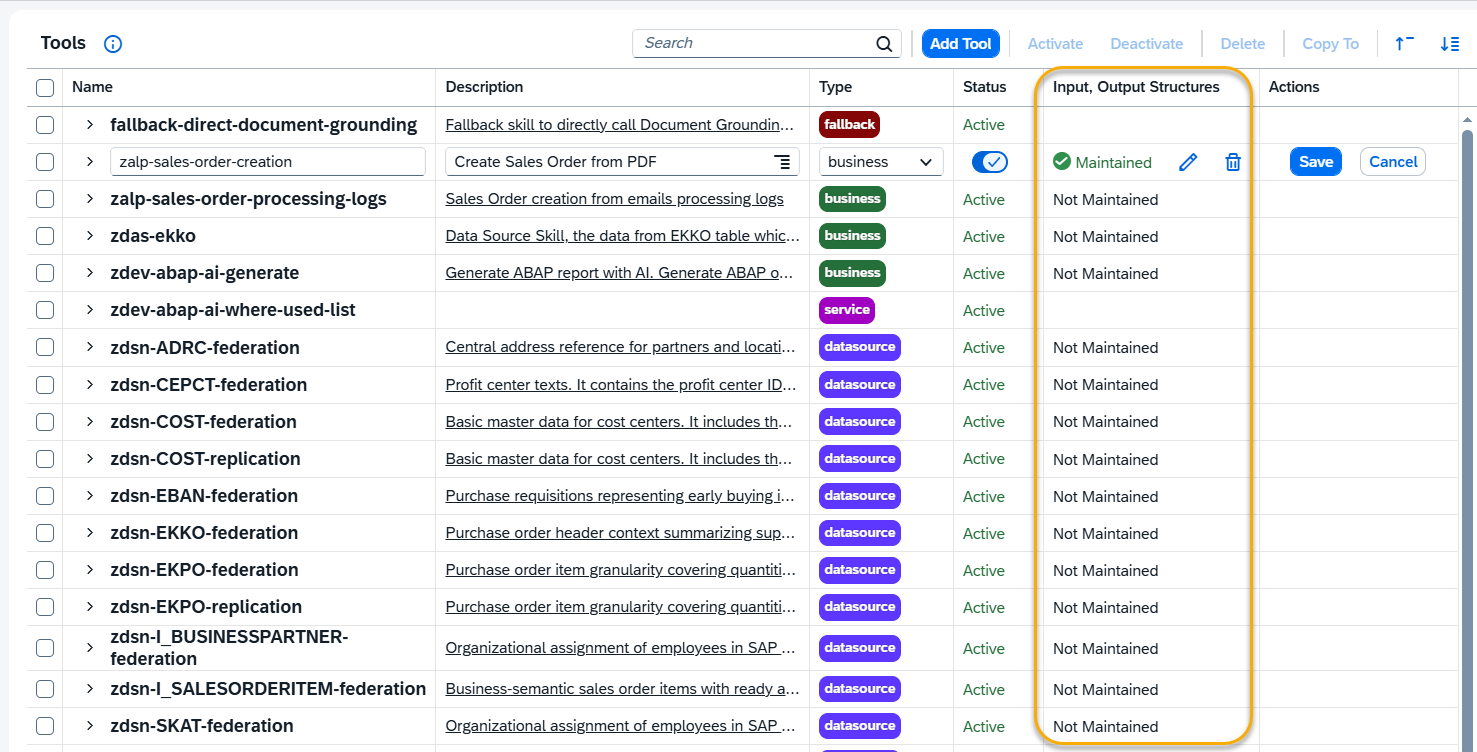
When a data source is assigned to an AI Agent, a corresponding tool is automatically added to that agent. The tool is named after the data source and includes information about its replication status.
All such tools are created with the type “datasource”, enabling the AI Agent to access and use the replicated data during runtime.

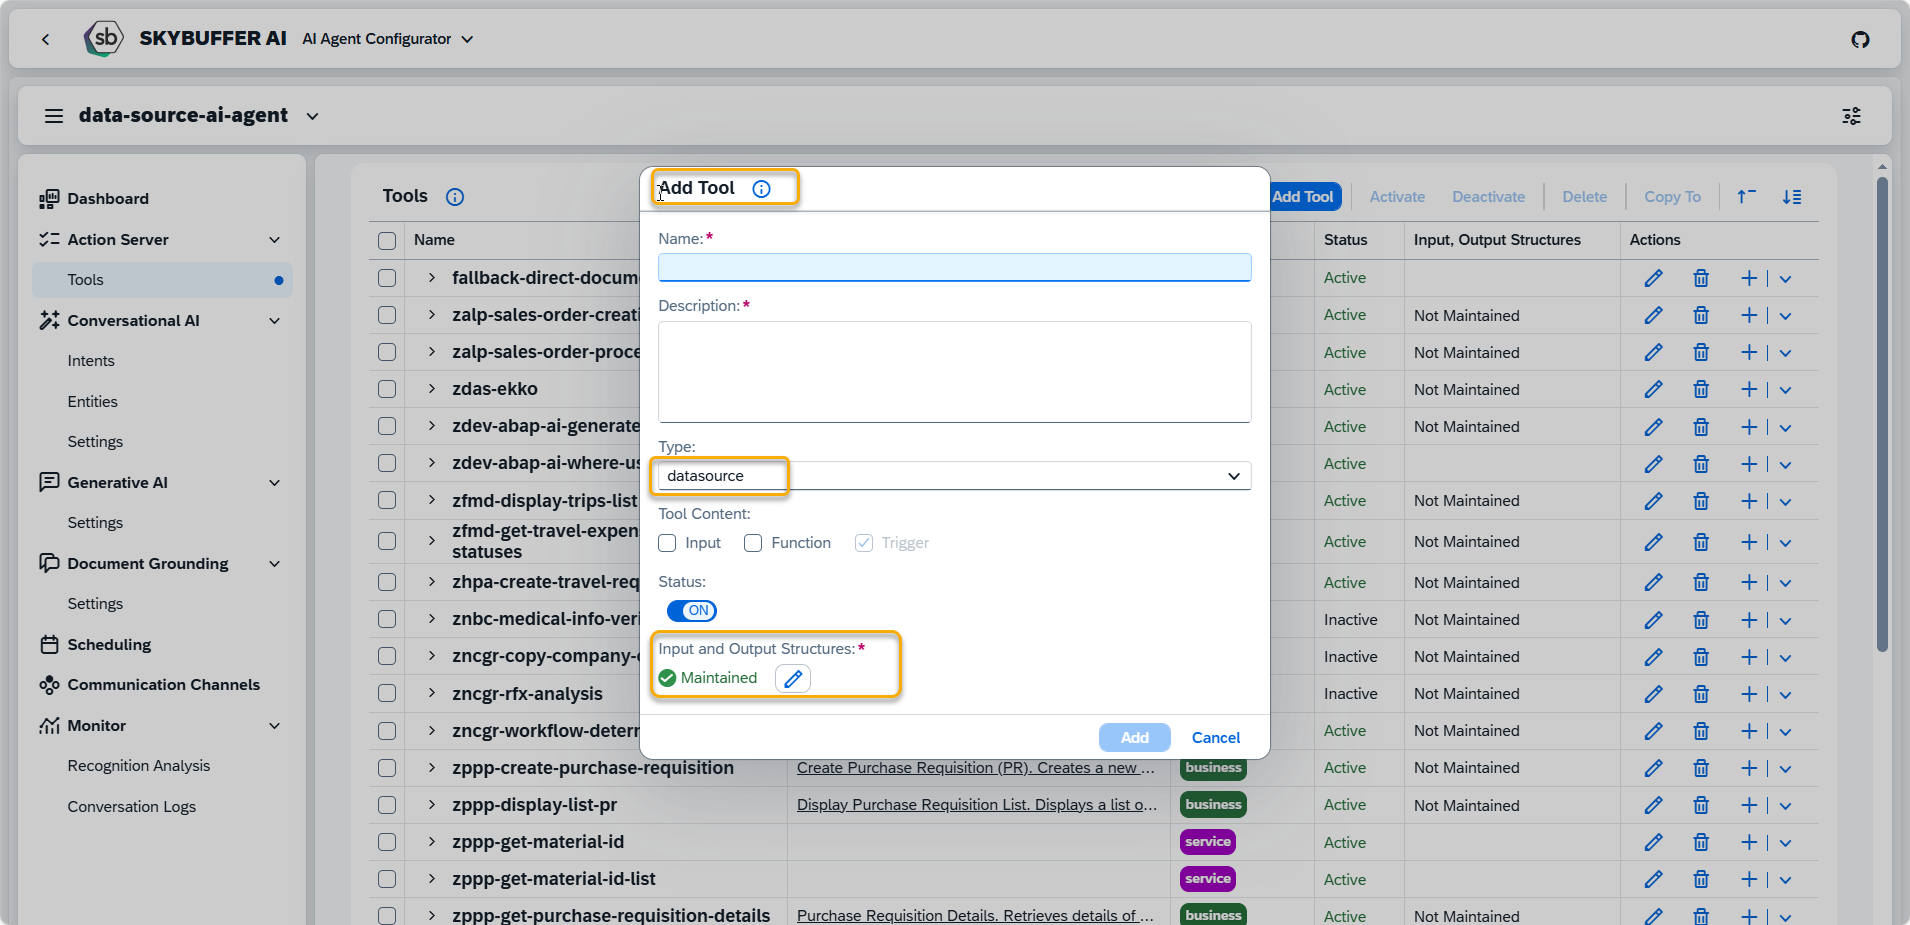
Step 6. Managing Input and Output Structures on the Tool Level
This section describes how Data Sources and Business Tools are executed by the AI Agent, how data is passed into the tool, how results are returned, and how outputs are stored for later use.
Data Sources and Business Tools follow a common execution model when used by an AI Agent:
- Input data is passed to the tool
- The tool is executed
- Output data is returned in a structured format
- The result is stored in the AI Agent’s memory and can be reused
While creating new tool select type: datatsource or business and you will be able to establish necessary input and output structures.
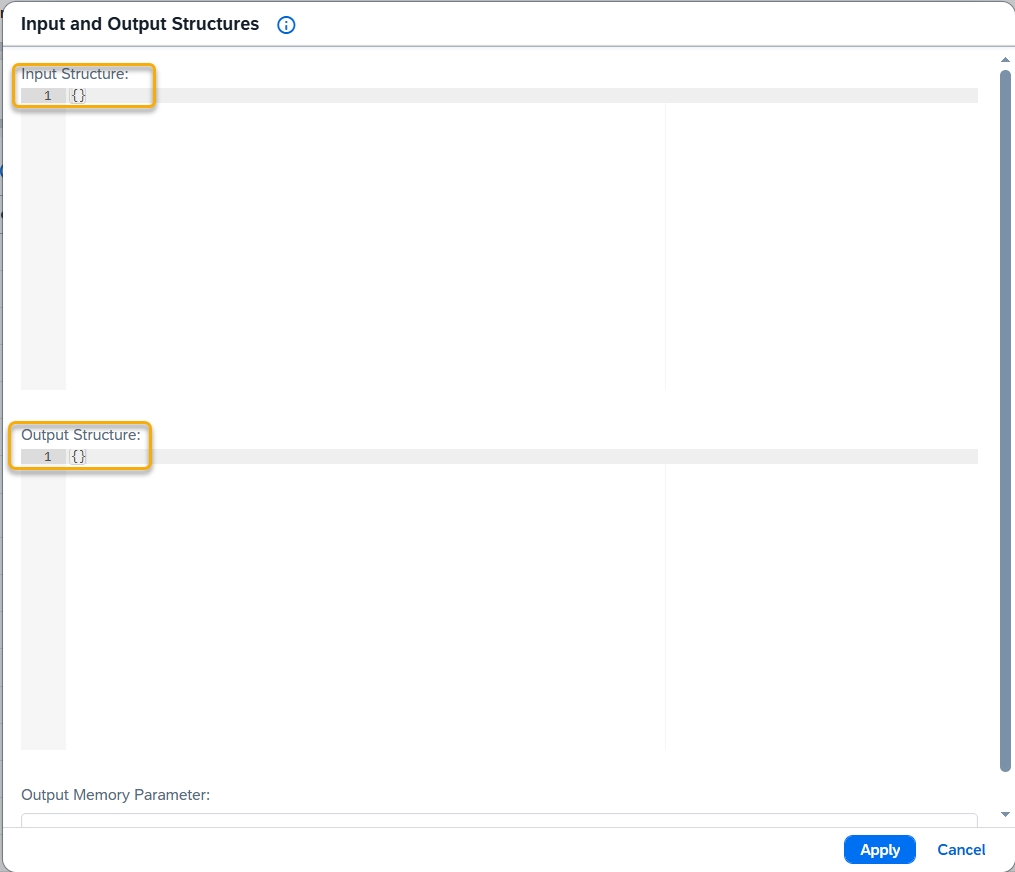
Input Structure
Describes the data required to run the tool.
- For Business Tools, input values are provided by the AI Agent or previous steps. You must provide the input json structure to enable Business tool to be used by MCP server or A2A interface.
- For Data Sources, input fields are automatically populated based on metadata (for example, table parameters, views, or filters). No manual input mapping is required for metadata-driven data sources.
Output Structure
Defines the format of the data returned by the tool after execution.
- Data Sources return structured data from tables, views, or queries.
- Business Tools return execution results, such as document numbers, statuses, or messages.
The output structure must match the expected schema to ensure proper downstream usage.
Target Memory Parameter
Specifies where the tool output is stored in the AI Agent’s memory.
Stored results can be:
- Reused by subsequent tools or skills
- Referenced in prompts and logic
- Included in responses to the user
Each tool execution can write to a dedicated memory parameter to avoid data conflicts.
NOTES:
- Data Sources are typically metadata-driven and read-only
- Business Tools require explicit input and output definitions
- Correct memory configuration is required for multi-step AI Agent scenarios
Tool view with the information in which tools input and outpot structures are maintained: