Setting Up Scheduled Sync Jobs in SAP BTP
Step-by-step guide for the Job Scheduling Service
What this guide covers
This guide shows you how to create two automatic jobs in the SAP BTP Job Scheduling Service. Each job calls a web address (URL) of one of the Skybuffer applications at a regular interval, so that data stays in sync without anyone having to start it by hand.
You will set up the following two jobs:
| Job 1 | Job 2 | |
|---|---|---|
| Purpose | Synchronises data sources | Synchronises the shared document location |
| Service instance | job_scheduler_datasources | job_scheduler_sync_shared_location |
| Job name | SyncDataSources | SyncSharedLocation |
| Application called | js_bot_management | file_processor_hub |
| Path added to the URL | /xsjs/jobDatasoucesSync.xsjs | /fileprocessorhub/syncSharedDocument |
| HTTP method | GET | POST |
| How often it runs | Every 5 minutes | Every 5 minutes |
The whole process takes about 10–15 minutes. Both jobs follow the same four steps: find the application URL, open the service instance, create the job, and add a schedule.
About the screenshots :
The screenshots in this guide were taken in the Skybuffer test system and are only examples. In your system the subaccount, space, organisation, route addresses (URLs), IDs and dates will be different. Always use the values from your own BTP account.
Before you begin
Make sure you have:
- Access to the SAP BTP Cockpit for the subaccount and Cloud Foundry space where the Skybuffer applications are deployed. If you are not sure which ones, ask your BTP administrator.
- Permission to open the Job Scheduling Service Dashboard for both service instances listed above.
- The instance names in this guide are the default names created during installation. If your administrator used different names, choose the matching instances in your account.
- Both applications (js_bot_management and file_processor_hub) in the Started state.
Good to know :
All times in the Job Scheduling Service are in UTC. Convert to your local time zone when you read start times or run history.
Key terms
| Term | What it means |
|---|---|
| Route | The public web address of an application in BTP (it starts with https://). |
| Service instance | A separate container in the Job Scheduling Service that holds jobs. Each of the two jobs lives in its own instance. |
| HTTP job | A job that calls a URL. The URL is the application route plus a path. |
| Schedule | The rule that says when and how often a job runs. A job without an active schedule never runs. |
| HTTP method | How the URL is called. GET usually reads or triggers; POST sends a request to perform an action. Use exactly the method stated in this guide. |
Job 1: SyncDataSources
Step 1. Find the URL of the js_bot_management application
- Open the SAP BTP Cockpit and go to your subaccount → Cloud Foundry → Spaces → your space (the space where the Skybuffer applications are deployed).
- In the left menu, click Applications and then click js_bot_management.
- On the Application Overview page, copy the full address shown under Mapped Routes (it starts with https://). This is the route of the application — see Figure 6 in Job 2 for where to find it.
Alternative: in your space, click Routes in the left menu and find the row where Mapped Applications shows js_bot_management. The route is https:// + Host Name + . + Domain.
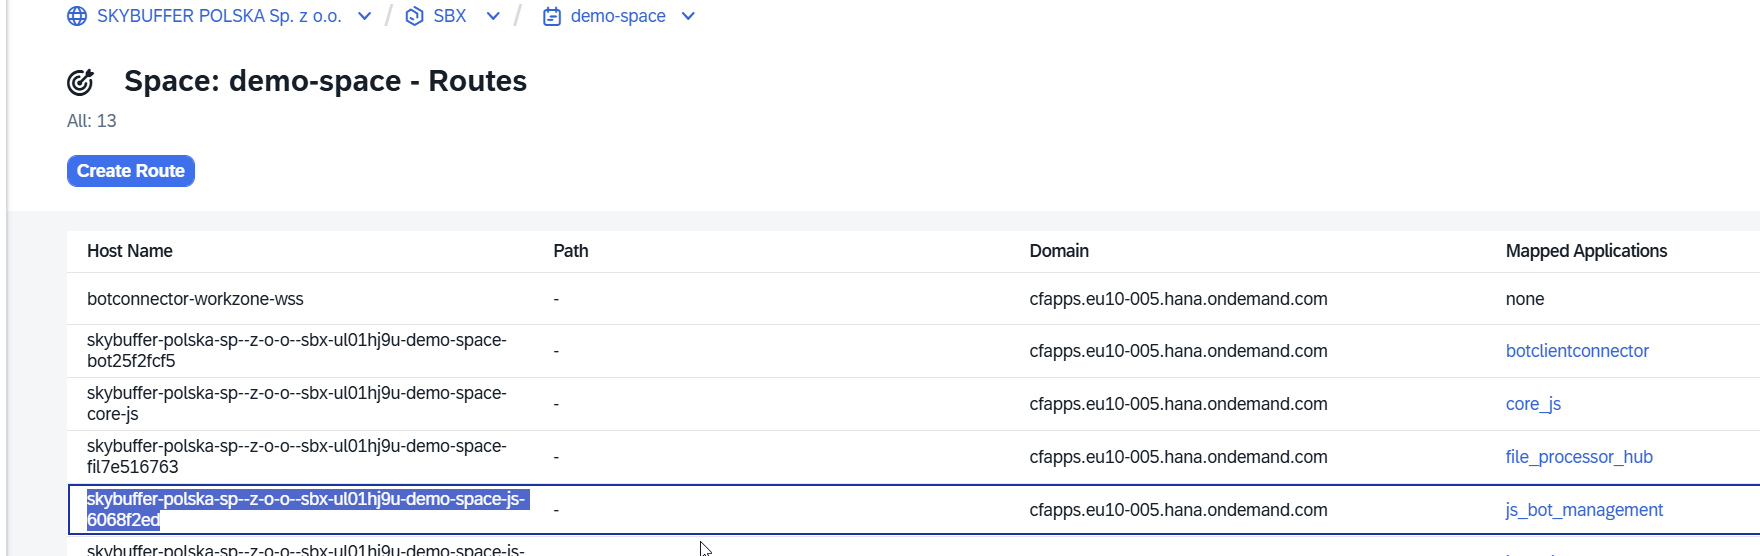
Figure 1 — Example from the test system: the Routes page. The highlighted row is the route of js_bot_management.
Now add the job path to the end of the route. The complete URL for this job is:
/xsjs/jobDatasoucesSync.xsjs
Replace <js_bot_management route> with the address you copied, without a slash at the end. For example, if the route is https://<host>.cfapps.<region>.hana.ondemand.com, the URL becomes https://<host>.cfapps.<region>.hana.ondemand.com/xsjs/jobDatasoucesSync.xsjs.
Step 2. Open the job_scheduler_datasources service instance
- In the SAP BTP Cockpit, go to your subaccount → Services → Instances and Subscriptions.
- In the Instances list, find job_scheduler_datasources (service: Job Scheduling Service).
- Open its dashboard: click the … (more actions) button at the end of the row and choose View Dashboard, or click the instance name and then View Dashboard. The Job Scheduling Service Dashboard opens in a new browser tab.
- Check that the page header says Service Instance: job_scheduler_datasources.
- In the left menu, click HTTP Jobs.

Figure 2 — Example: Job Scheduling Service Dashboard. Click HTTP Jobs in the left menu.
Step 3. Create the job
- Click Create Job (top right of the HTTP Jobs page).
- Fill in the form as shown in the table below.
- Click Create.
| Field | What to enter |
|---|---|
| Name | SyncDataSources |
| Description | Optional, e.g. “Sync data sources every 5 minutes”. |
| URL | <js_bot_management route>/xsjs/jobDatasoucesSync.xsjs |
| HTTP Method | GET |
| Start Time / End Time (UTC) | Leave empty (the job will run without a start or end date). |
| Send ANS Error / Success Events | Leave off. |
| Enable SAP Cloud ALM | Leave off. |
| Activate Job | Leave ticked. |
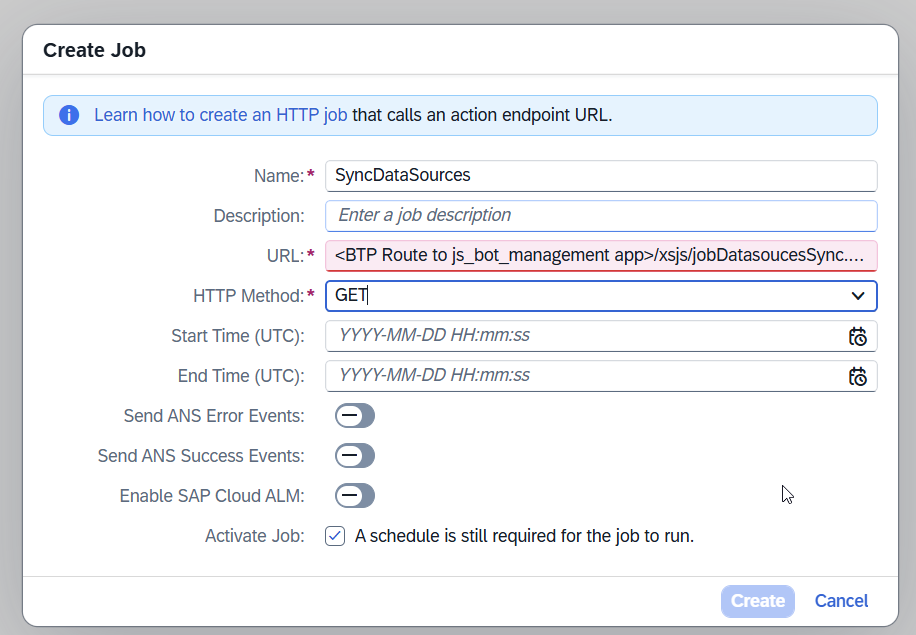
Figure 3 — Example: the Create Job form for SyncDataSources.
After you click Create, the job overview opens with the status Active. The job is created but will not run yet — it still needs a schedule.
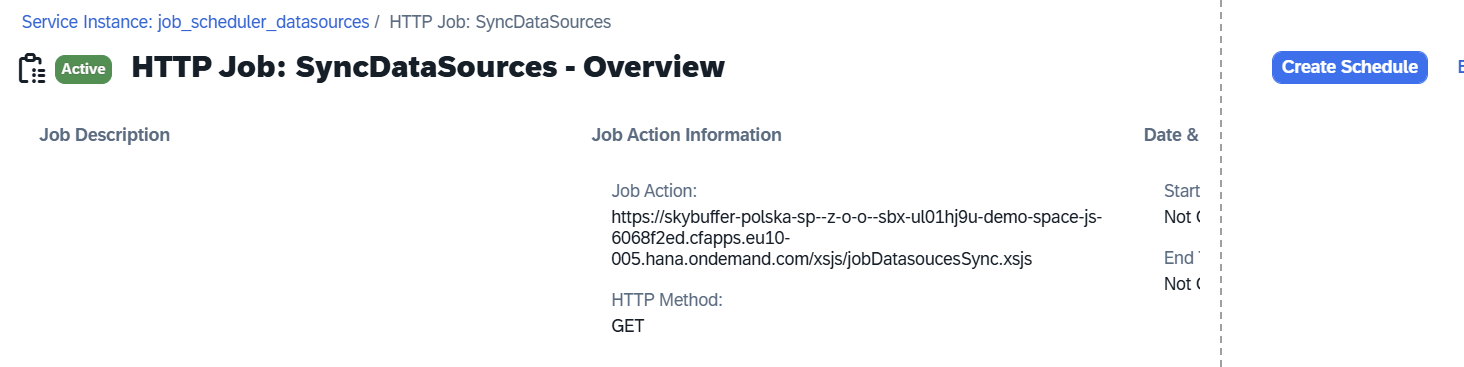
Figure 4 — Example: job overview for SyncDataSources (left) and the Create Schedule button at the top right of the page.
Step 4. Add a schedule
- On the job overview page, click Create Schedule (top right).
- Fill in the form as shown in the table below.
- Click Save.
| Field | What to enter |
|---|---|
| Description | Every 5 minutes |
| Pattern | Recurring — Repeat Interval |
| Value | 5 minutes |
| Start Time / End Time (UTC) | Leave empty. |
| Data (JSON) | Leave empty. |
| Activate | YES |
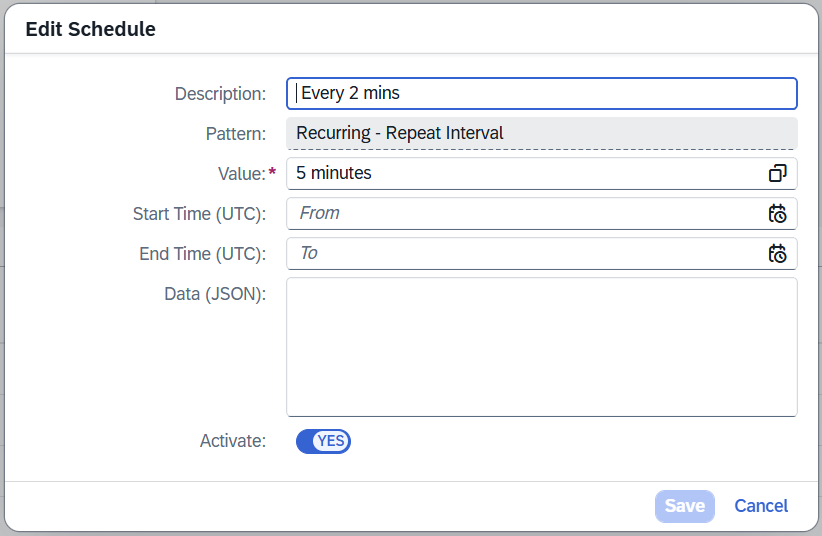
Figure 5 — Example: schedule settings for SyncDataSources (the screenshot shows the Edit Schedule dialog with a different description — enter “Every 5 minutes” as described above).
Tip :
5 minutes is the shortest interval allowed on the standard service plan. Make sure the Description matches the Value so others are not confused.
Job 2: SyncSharedLocation
This job is set up in the same way as Job 1, but in a different service instance, for a different application, and with the POST method.
Step 1. Find the URL of the file_processor_hub application
- In the SAP BTP Cockpit, go to your subaccount → Cloud Foundry → Spaces → your space → Applications.
- Click the application file_processor_hub.
- On the Application Overview page, copy the full address shown under Mapped Routes. (You can also use the Routes page, as described in Job 1.)

Figure 6 — Example from the test system: Mapped Routes on the Application Overview page. Your address will be different.
Add the job path to the end of the route. The complete URL for this job is:
/fileprocessorhub/syncSharedDocument
Replace <file_processor_hub route> with the address you copied, without a slash at the end.
Step 2. Open the job_scheduler_sync_shared_location service instance
- In the SAP BTP Cockpit, go to your subaccount → Services → Instances and Subscriptions.
- Find job_scheduler_sync_shared_location and open its dashboard (… → View Dashboard), as in Job 1.
- Check that the page shows Name: job_scheduler_sync_shared_location.
- In the left menu, click HTTP Jobs.
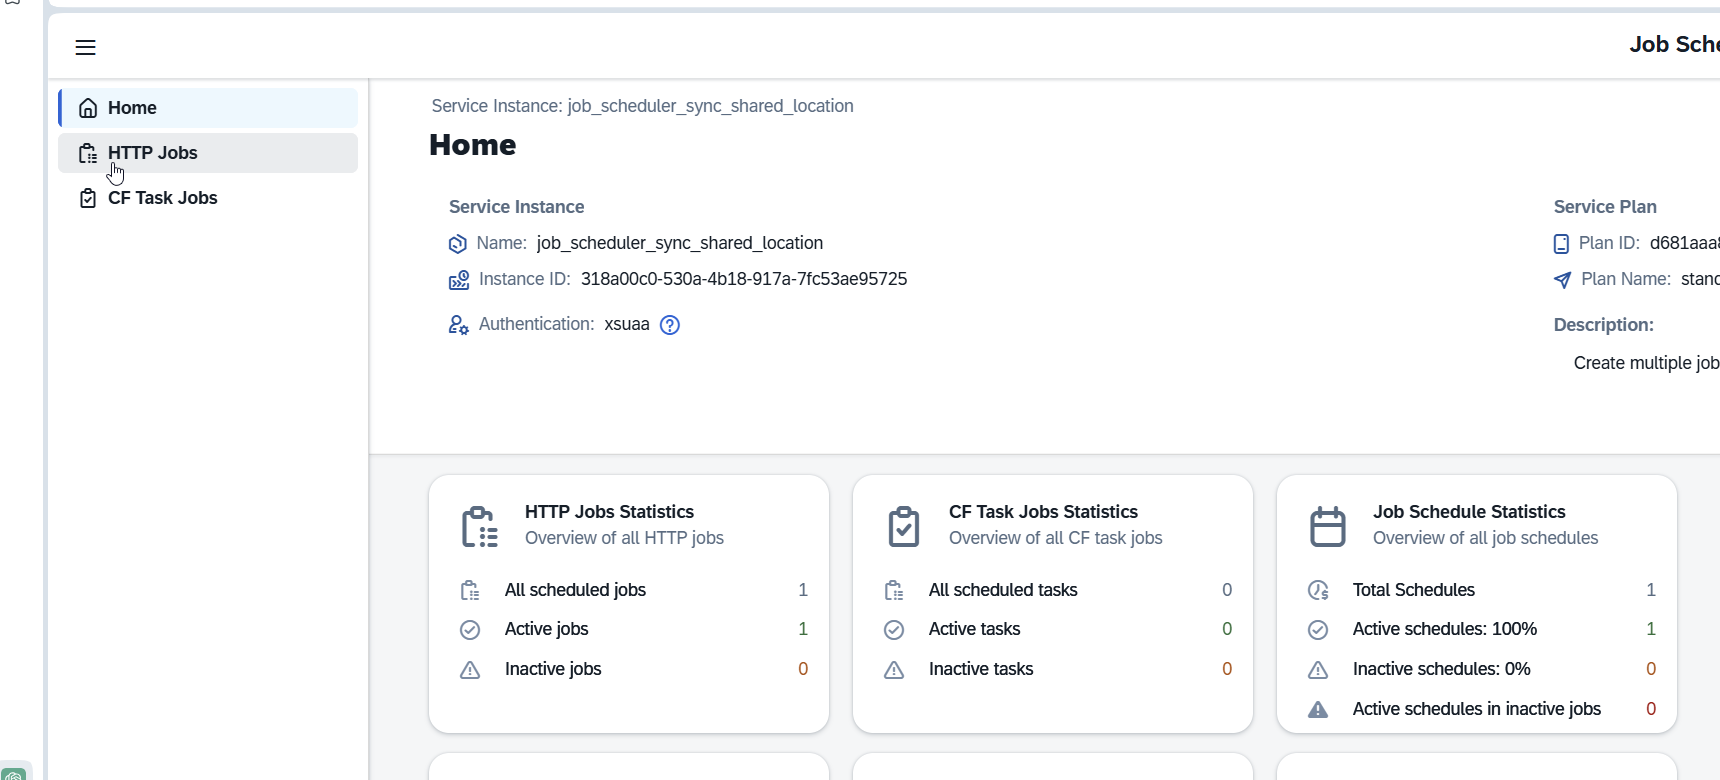
Figure 7 — Example: home page of the job_scheduler_sync_shared_location instance. Click HTTP Jobs.
Step 3. Create the job
- Click Create Job.
- Fill in the form as shown below, then click Create.
| Field | What to enter |
|---|---|
| Name | SyncSharedLocation |
| Description | Optional, e.g. “Sync shared location every 5 minutes”. |
| URL | <file_processor_hub route>/fileprocessorhub/syncSharedDocument |
| HTTP Method | POST (not GET — this is different from Job 1) |
| Start Time / End Time (UTC) | Leave empty. |
| Send ANS Error / Success Events | Leave off. |
| Enable SAP Cloud ALM | Leave off. |
| Activate Job | Leave ticked. |
The new job now appears in the HTTP Jobs list with the status Active.
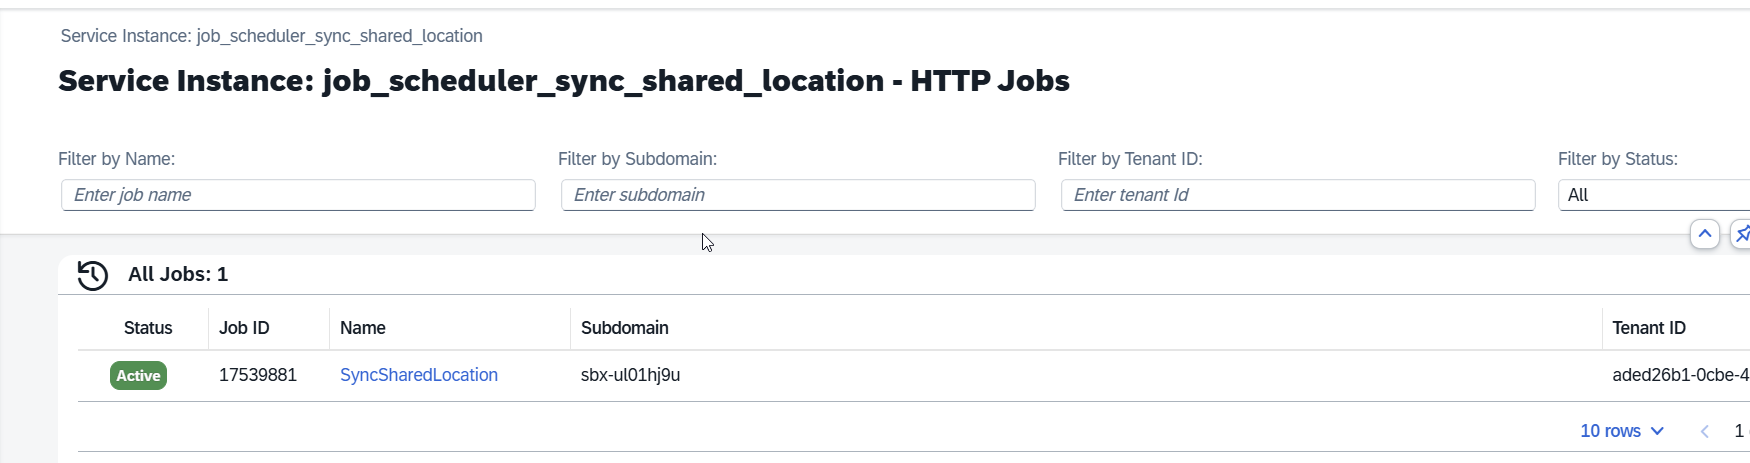
Figure 8 — Example: the SyncSharedLocation job in the HTTP Jobs list (Create Job button is at the top right of this page).
Step 4. Add a schedule
- Click the job name SyncSharedLocation to open it.
- Click Create Schedule and fill in the same values as for Job 1 (see the table below).
- Click Save.
| Field | What to enter |
|---|---|
| Description | Every 5 minutes |
| Pattern | Recurring — Repeat Interval |
| Value | 5 minutes |
| Start Time / End Time (UTC) | Leave empty. |
| Data (JSON) | Leave empty. |
| Activate | YES |
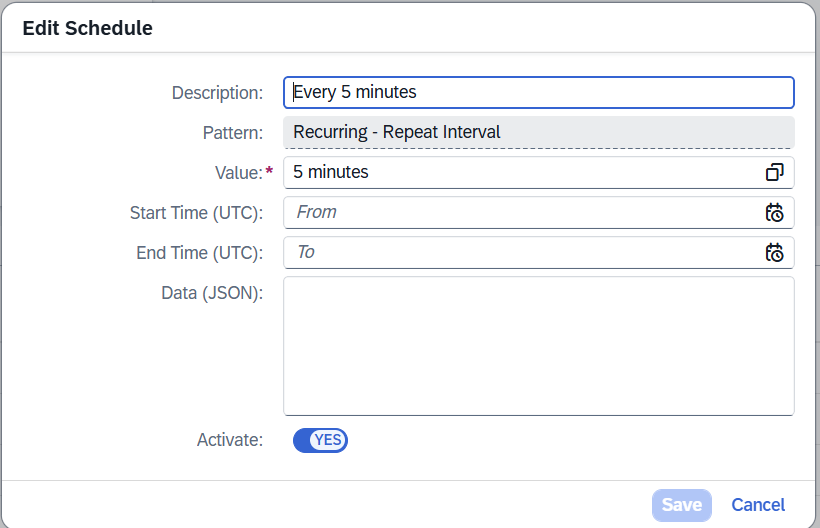
Figure 9 — Example: schedule settings for SyncSharedLocation.
Check that the jobs are working
Wait about 5–10 minutes after saving the schedule, then open the schedule again (service instance → HTTP Jobs → job name → schedule).
- In Schedule Execution History, new rows should appear every 5 minutes with the status COMPLETED/SUCCESS.
- The Execution Success Rate tile should be close to 100%.
- The Recent Run Errors tile should be empty or show only occasional errors.
Note :
An occasional single failed run (for example while an application is restarting) is normal. Act only if errors keep repeating.
Troubleshooting
| What you see | Likely cause | What to do |
|---|---|---|
| Nothing appears in the execution history | The schedule is not active, or Activate Job was unticked | Open the job and schedule and make sure both show Active / YES. |
| REQUEST_ERROR (502) | The application was stopped, restarting or temporarily unavailable | In BTP Cockpit, check that the application is Started. If errors keep repeating, restart the application. |
| Error 404 (Not Found) | The URL is wrong | Check that the route is the one from your own system and that the path is copied exactly. |
| Error 405 (Method Not Allowed) | Wrong HTTP method | Job 1 must use GET; Job 2 must use POST. |
| Error 401 / 403 | Missing permission | Contact the BTP administrator. |
| Job runs at an unexpected time | Times are shown in UTC | Convert UTC to your local time zone. |
Quick reference
| SyncDataSources | SyncSharedLocation | |
|---|---|---|
| Instance | job_scheduler_datasources | job_scheduler_sync_shared_location |
| URL | <js_bot_management route>/xsjs/jobDatasoucesSync.xsjs | <file_processor_hub route>/fileprocessorhub/syncSharedDocument |
| Method | GET | POST |
| Schedule | Recurring — Repeat Interval, 5 minutes | Recurring — Repeat Interval, 5 minutes |