

MCP Channel. Single Sign-On with Microsoft Entra ID
Use this guide to let the users of an MCP channel sign in with Microsoft Entra ID. After the sign-in, the tools of the channel call SAP with an access token that SAP issues for the signed-in user. The guide is for the administrators of Microsoft Entra ID, of the SAP system and of the Skybuffer AI platform.
The setup uses one application registration in Entra ID for the sign-in, and an enterprise application in Entra ID for the SAP system:
User sign-in → sign-in application in Entra ID → SAML 2.0 assertion for the SAP enterprise application → SAP OAuth 2.0 token endpoint → SAP call with the user’s access token
Prerequisites:
- You can register applications, create enterprise applications and grant admin consent in Microsoft Entra ID.
- You can maintain transactions
SAML2andSOAUTH2in the SAP system. - The AI agent has an MCP channel, and the SAP system has a destination in Destination Management.
How the sign-in works
Section titled “How the sign-in works”- The user starts the sign-in. The browser opens the Entra ID sign-in page of the sign-in application.
- Entra ID sends the browser back to
https://<host>/login/callbackwith an authorization code. - Skybuffer AI redeems the code at Entra ID with the client ID and secret of the sign-in application, and asks for a SAML 2.0 assertion for the SAP enterprise application.
- Skybuffer AI posts the SAML assertion to the SAP OAuth 2.0 token endpoint. SAP returns an access token for the user.
- The tools of the channel call SAP with
Authorization: Bearerand this access token.
Values used in this guide
Section titled “Values used in this guide”| Setting | Example | Where it is used |
|---|---|---|
| Application ID URI of the SAP enterprise application | https://<sap-host>/login |
The resource that Skybuffer AI asks the SAML assertion for. In Skybuffer AI: Backend Application ID URI (from Azure). |
| Scope | https://<sap-host>/login/user_impersonation |
The sign-in, together with openid, profile and offline_access. In Skybuffer AI: Middleware Application Scope. |
| Redirect URI | https://<host>/login/callback |
The sign-in application in Entra ID. In Skybuffer AI: Redirect URL. |
| SAP token endpoint | https://<sap-host>/sap/bc/sec/oauth2/token |
The reply URL of the SAP enterprise application. In Skybuffer AI: Token Endpoint for OAuth 2.0. |
<host> is the host of the botclientconnector application, the same host as in the URL under Endpoints in the settings of the MCP channel. <sap-host> is the host name of the SAP system, with the port if it is not 443.
Step 1. Create the SAP enterprise application
Section titled “Step 1. Create the SAP enterprise application”Create this application first. Its Application ID URI is the resource, its user_impersonation scope is the scope of the sign-in, and its reply URL is the address that SAP checks as the recipient of the SAML assertion. Create Azure AD Enterprise Application for SAP Backend shows the screens for creating an enterprise application with SAML single sign-on.
Step 1. In Microsoft Entra ID, create an enterprise application for the SAP system. Name it after the system and the client, for example PRD100 - OAuth.
Step 2. In the app registration of the enterprise application, open Expose an API and set the Application ID URI to https://<sap-host>/login. This exact string is the resource. It is also the Identifier (Entity ID) in the Basic SAML Configuration of the enterprise application.
Step 3. Under Expose an API, add a delegated scope named user_impersonation. The full scope value is https://<sap-host>/login/user_impersonation. Write consent texts such as “Allow the application to access the SAP system on behalf of the signed-in user.” Admin consent required can stay No, because an administrator grants the permission for the tenant in Step 2.
Step 4. In Single sign-on → Basic SAML Configuration, set Reply URL (Assertion Consumer Service URL) to the SAP OAuth 2.0 token endpoint, for example https://<sap-host>/sap/bc/sec/oauth2/token. The path must end with /oauth/token, /saml/oauth/token or /sap/bc/sec/oauth2/token.
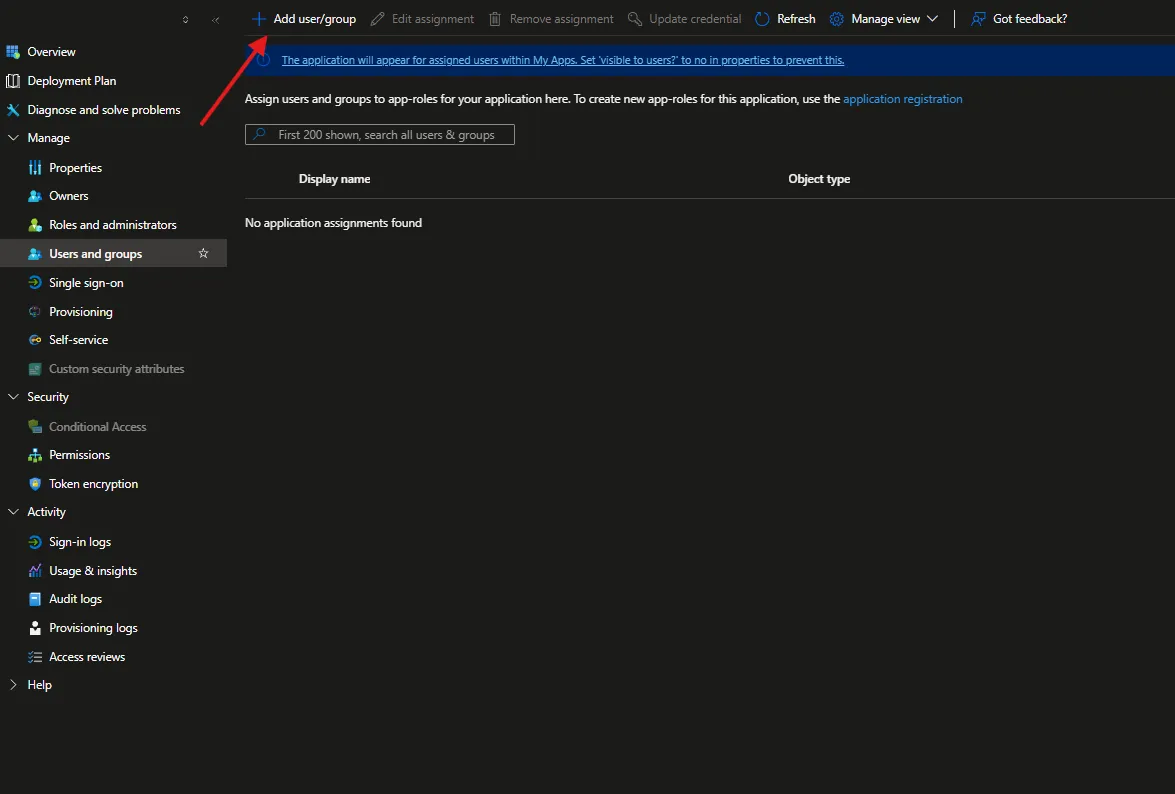
Step 5. If Assignment required? is Yes in the Properties of the enterprise application, open Users and groups, click Add user/group and add the people who will sign in.
Step 2. Create the sign-in application
Section titled “Step 2. Create the sign-in application”The sign-in application is one application registration in Entra ID. The browser opens it for the sign-in, and Skybuffer AI uses its client ID and secret to ask for the SAML assertion. You do not need a second application registration.
Step 1. In App registrations, register a new application for accounts in this organizational directory only (single tenant). On its Overview, copy the Directory (tenant) ID and the Application (client) ID.

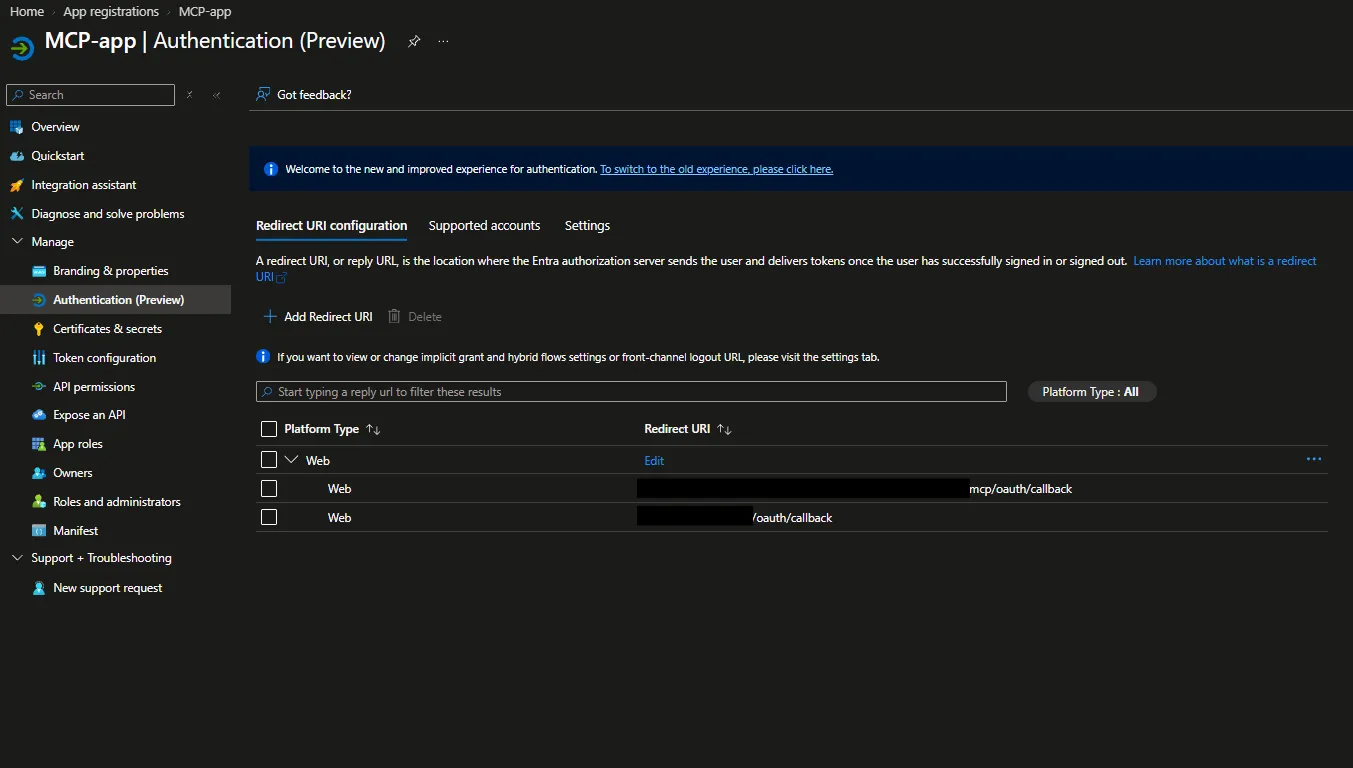
Step 2. Open Authentication and add a redirect URI of the platform Web: https://<host>/login/callback. The address in Entra ID, the address that the browser opens and the address that Skybuffer AI sends with the authorization code must be the same string.
Step 3. Open Certificates & secrets and create a client secret. Copy its value. You enter it in Skybuffer AI, and it stays there.
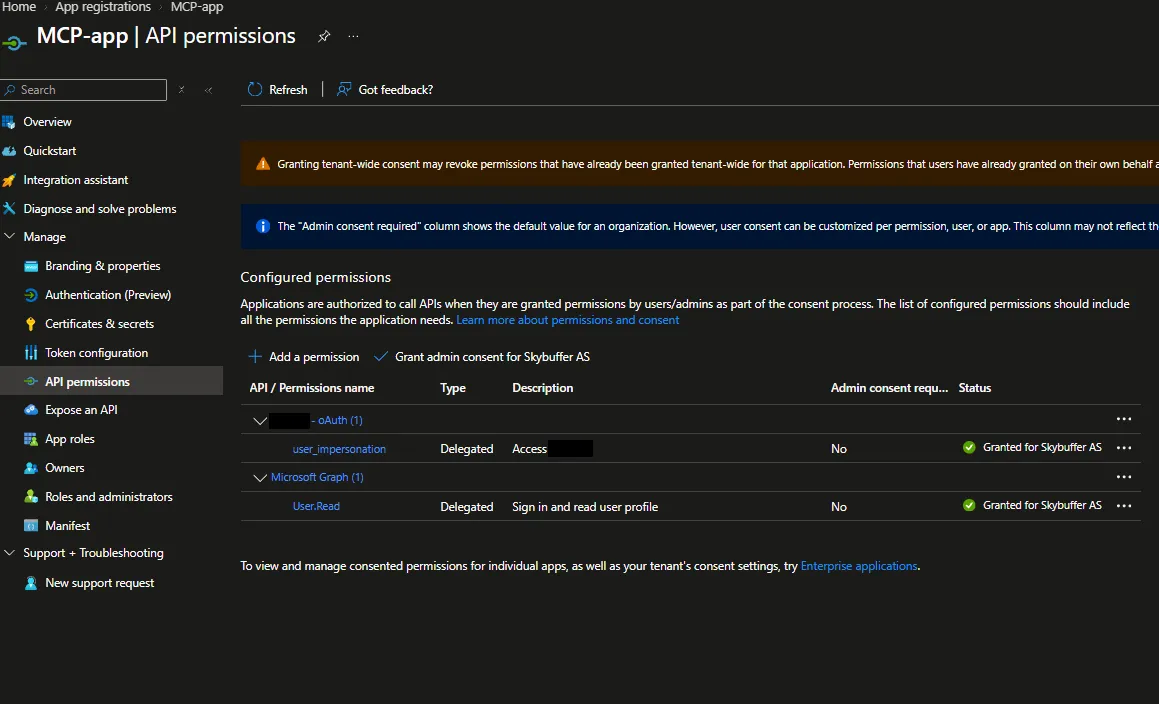
Step 4. Open API permissions, click Add a permission, select the SAP enterprise application and add its delegated permission user_impersonation. Then grant admin consent for your tenant. The status of the permission changes to Granted for followed by the name of your organization.
Click user_impersonation to see the details of the permission: the full scope value and the consent texts.
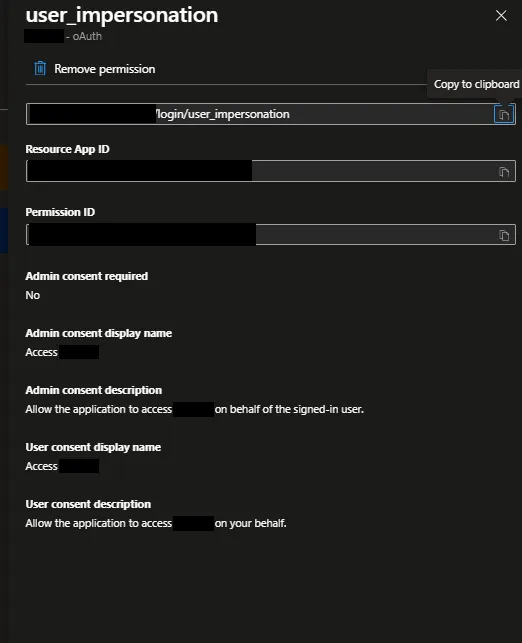
Step 5. The sign-in asks for the scope openid profile offline_access https://<sap-host>/login/user_impersonation. You enter it in Skybuffer AI in Step 4.
Step 3. Configure OAuth 2.0 in the SAP system
Section titled “Step 3. Configure OAuth 2.0 in the SAP system”SAP must accept the grant type urn:ietf:params:oauth:grant-type:saml2-bearer and trust SAML assertions from your Entra ID tenant with the audience https://<sap-host>/login. On SAP NetWeaver ABAP, you maintain the trust in transaction SAML2 and the OAuth 2.0 client in transaction SOAUTH2. Configure oAuth2 in SAP System shows these screens, the scope of the OData service and the authorization that the users need.
Step 1. In transaction SAML2, add your Entra ID tenant as a trusted OAuth 2.0 identity provider, with the metadata of the SAP enterprise application. The recipient that SAP checks is the reply URL of the enterprise application.
Step 2. In transaction SOAUTH2, create an OAuth 2.0 client that accepts the SAML 2.0 bearer grant from this identity provider and has the scope of the OData service. You enter its client ID and its scope in Skybuffer AI.
Step 3. The token endpoint is the same address as the reply URL of the SAP enterprise application, for example https://<sap-host>/sap/bc/sec/oauth2/token.
Step 4. If the OAuth 2.0 client requires HTTP Basic authentication, you also need its password. Skybuffer AI then sends Authorization: Basic with the client ID and the password on the token request as well.
Step 4. Enter the settings in Skybuffer AI
Section titled “Step 4. Enter the settings in Skybuffer AI”Enter the Microsoft values in an identity provider connection of the type Frontend Application, and the SAP values in a connection of the type Direct Backend Application. Then set the destination of the SAP system to single sign-on, and select the frontend application in the MCP channel. Identity Providers describes the app and its fields.
The sign-in application
Section titled “The sign-in application”Step 1. Open the Identity Providers app and create a connection, for example MCP Azure, with the Application type Frontend Application, the Channel type Webchat and the Identity provider type Azure.
Step 2. On the Frontend tab, fill in:
- Application (client) ID: the Application (client) ID of the sign-in application.
- Client secret: the client secret of the sign-in application.
- Redirect URL:
https://<host>/login/callback. - Directory (tenant) ID: the Directory (tenant) ID.
Step 3. On the Middleware tab, leave Joint “authorization code” and “on behalf” call via the Frontend application (skip the Middleware application) unselected, and enter the sign-in application again:
- Application (client) ID and Client secret: the same values as on the Frontend tab.
- Middleware Application Scope:
openid profile offline_access https://<sap-host>/login/user_impersonation. - Directory (tenant) ID differs from Frontend application: leave it unselected.
Step 4. Save the connection.
The SAP system
Section titled “The SAP system”Step 1. Create a second connection, for example PRD100 SSO, with the Application type Direct Backend Application and the Identity provider type Azure.
Step 2. Fill in:
- Backend Application ID URI (from Azure):
https://<sap-host>/login, the Application ID URI of the SAP enterprise application. - Directory (tenant) ID differs from Frontend application: leave it unselected when the SAP enterprise application is in the same tenant as the sign-in application.
- Client Authentication for Token Endpoint for OAuth 2.0: Basic, when the OAuth 2.0 client requires HTTP Basic authentication.
- User ID and User Password: the client ID and the password of the OAuth 2.0 client.
- OAuth 2.0 Client ID: the client ID of the OAuth 2.0 client.
- OAuth 2.0 scope ID: the scope of the OAuth 2.0 client, for example
ZBOT_CENTRAL_SERVICE_SRV_0001. - Token Endpoint for OAuth 2.0: the reply URL of the SAP enterprise application.
Step 3. Save the connection.
The destination and the channel
Section titled “The destination and the channel”Step 1. In Destination Management, open the destination of the SAP system. Under Business Authentication, set Authentication Type to Single-Sign-On and Identity Provider Application to the Direct Backend Application connection. Save the destination.
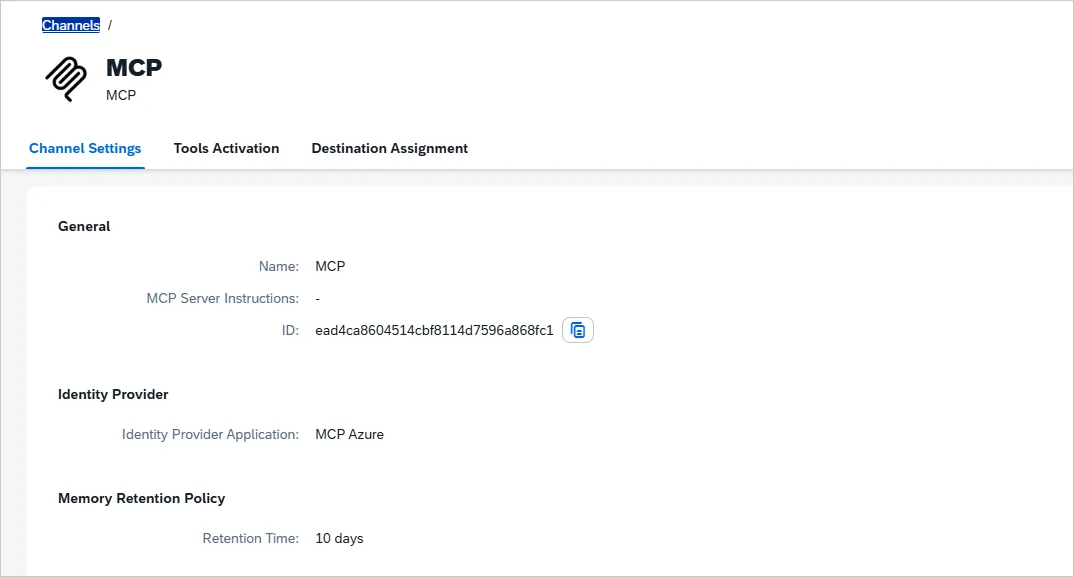
Step 2. In the AI Agent Configurator, open the AI agent, then Communication Channels and the MCP channel, and click Edit. Under Identity Provider, set Identity Provider Application to the Frontend Application connection, and save.
Step 3. On the Destination Assignment tab of the channel, assign the destination of the SAP system to the tools that call SAP. See Destination Assignment.
Skybuffer AI keeps the sign-in for about 24 hours. After that, the user signs in again.
Step 5. Check the sign-in
Section titled “Step 5. Check the sign-in”Step 1. Connect an MCP client to the URL under Endpoints in the settings of the MCP channel, and start the sign-in. The browser opens the Microsoft sign-in page, login.microsoftonline.com, of the sign-in application.
Step 2. Sign in with a user who may use the SAP enterprise application. When assignment is required, the user must be assigned to it.
Step 3. The browser returns to https://<host>/login/callback. Skybuffer AI redeems the code and receives a SAML assertion for https://<sap-host>/login.
Step 4. Call a tool of the channel that reads data from SAP. Skybuffer AI posts the assertion to the SAP token endpoint and calls SAP with the access token of the user.
Step 5. If Entra ID or SAP rejects a call, the error text is in the log of the botclientconnector application.
Troubleshooting
Section titled “Troubleshooting”| What you see | What to correct |
|---|---|
AADSTS50011, the redirect URI does not match |
The Web redirect URI of the sign-in application must be https://<host>/login/callback. |
AADSTS65001, consent required |
On the sign-in application, grant admin consent for the user_impersonation permission of the SAP enterprise application. |
AADSTS500011, the resource is not found |
Backend Application ID URI (from Azure) must be https://<sap-host>/login, the Application ID URI behind the user_impersonation scope. |
AADSTS650053, or an invalid scope |
Middleware Application Scope must include https://<sap-host>/login/user_impersonation. User.Read does not replace it. |
| SAP reports that the recipient does not match | The reply URL of the SAP enterprise application must be the SAP token endpoint that Skybuffer AI posts to, Token Endpoint for OAuth 2.0. |
invalid_grant from SAP |
SAP must trust your Entra ID tenant and the audience https://<sap-host>/login. OAuth 2.0 Client ID and OAuth 2.0 scope ID must match the OAuth 2.0 client in transaction SOAUTH2. |
Checklist
Section titled “Checklist”- One application registration for the sign-in, and no second application in Entra ID.
- API permissions of the sign-in application show
user_impersonationof the SAP enterprise application, delegated and granted for your tenant. - The scope is
https://<sap-host>/login/user_impersonation. - The resource is
https://<sap-host>/login. - The Application ID of the SAP enterprise application is in neither the scope nor the resource.
- The redirect URI is
https://<host>/login/callback. - The reply URL of the SAP enterprise application is the SAP token endpoint.
- The destination of the SAP system uses Single-Sign-On, with a Direct Backend Application connection that has the same token endpoint.